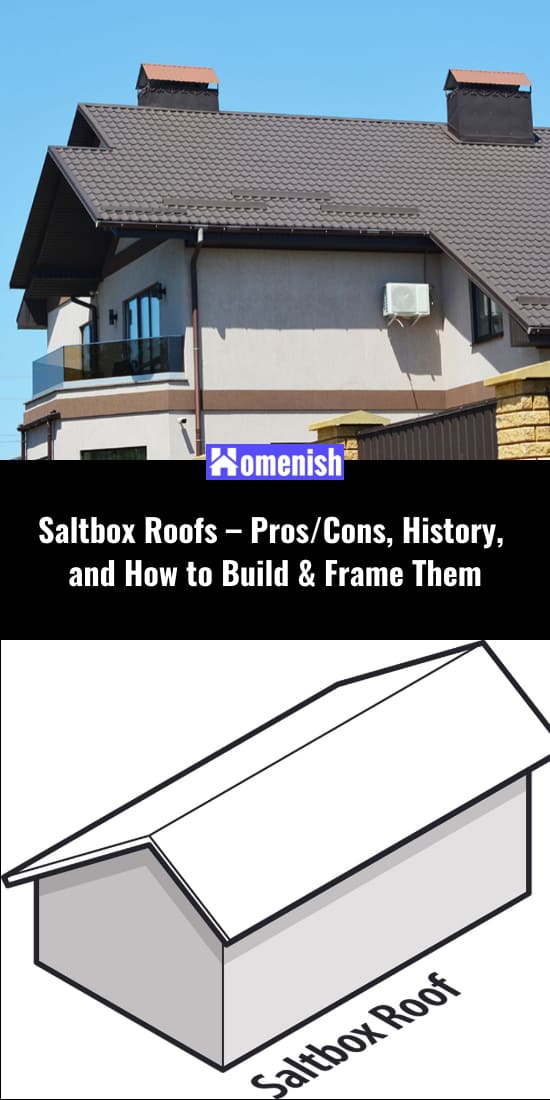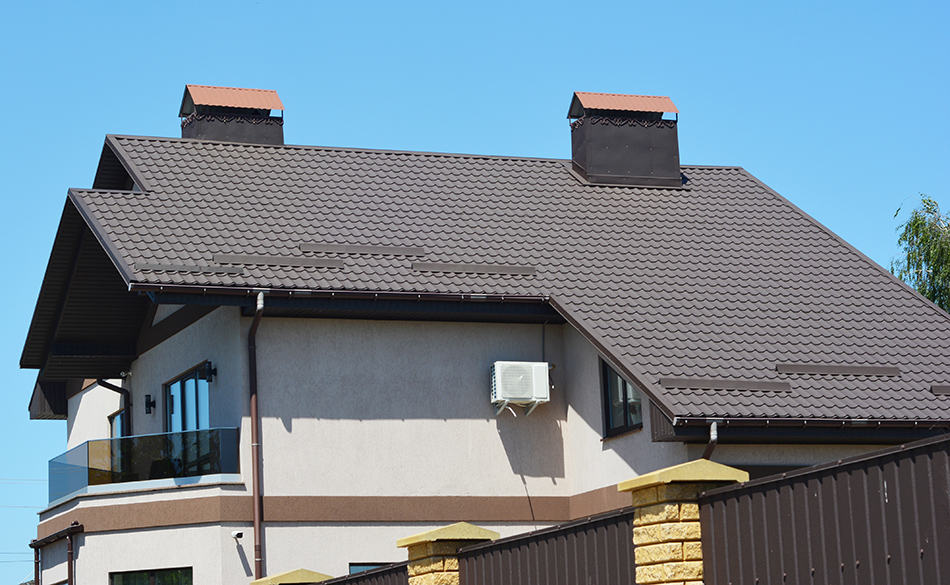
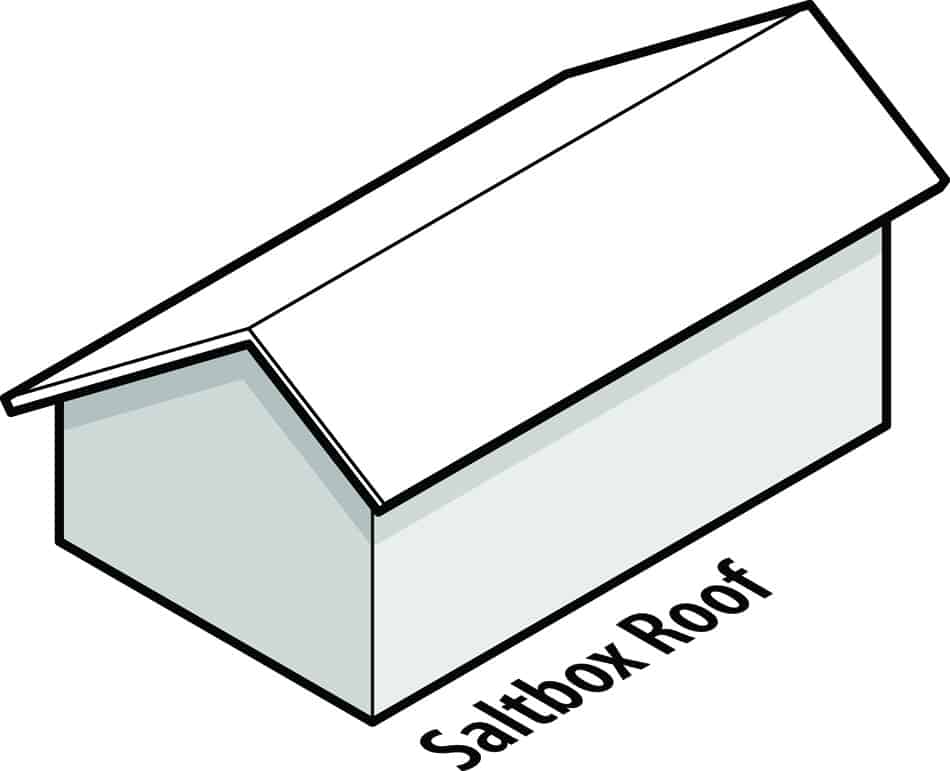
A saltbox home is a standard New England design of home with long, pitched roofing that slopes to the back, typically with wood framing. A saltbox has one story in the back and two stories out front. The flat front and chimney in the center are identifiable features, though the asymmetry of the unequal sides and the long, low rear roofing line are the most distinguishing characteristics of a saltbox, which takes its name from its similarity to a lidded wood box in which salt was kept.
The saltbox takes its name from a popular wood box utilized to keep salt in Colonial times; both the home and the wood box share the very same gable roofing shape. The earliest Saltbox houses were produced by just including a lean-to addition to the back of the initial home.
Interestingly, the saltbox idea of construction seems to have been a way to avoid paying higher taxes on a property. When Queen Anne raised taxes on two-story homes, many people created these homes that were half one story and half two stories. That way, they could claim owning a single-story home without technically lying.
The Saltbox design has naturally fallen in and out of style throughout the years, though if you look close enough, you can see saltbox houses practically anywhere. Learn all about it here.
Table of Contents
Pros of a Saltbox Roof
The angle of a saltbox roof makes it a super slide for rain and snow. If you live in area that sees a lot of precipitation, such as in the Northeast US, this kind of roof makes sense. You don’t want snow sitting on your roof, and with such a steep roofing style, the weight of the snow causes it to slide right off before it gets too heavy.
You might also use a saltbox roof when your home is built on a slope. Many houses built on hills will have a walk-out basement. The driveway slopes down the hill, and the garage is built into the natural slope of the landscape. Adding a saltbox roof to this style of home can add a very distinct visual appeal and make the home’s construction utilizing the landscape seem more intentional. In this case, the front of the house will often be one story, and the back will be two.
Cons of a Saltbox Roof
As far as living in a saltbox house, the one disadvantage is that the steeply sloped roof reduces your attic space. You might only be able to store items in half of the area.
The biggest disadvantage is actually building the roof. It’s more complex than a gable roofing system, which means it will be more expensive. If you hire a contractor, make sure they have experience working on saltbox roofs.
Historic Construction
A lot of early saltboxes, as with lots of other types of New England colonial homes, are timber-frame. The outside of a saltbox was frequently completed with clapboard or another type of wood siding.
Modern Roofing Materials for Saltbox Roof
When it comes to selecting a roof product for your saltbox roofing system, it’s more of an individual choice. Still, think about the product’s toughness, upkeep, approximated life-span, appeal, and, obviously, your spending plan.
Asphalt shingles and wood shakes are a few of the most popular products utilized for a saltbox roof. If you’re adding a saltbox roof to a commercial building, such as a stylized storefront or repair shop, you might consider a metal roof to complete the clean and simple look of your business.
How to Build Your Own Saltbox Roof
What You’ll Need:
- Plans
- Nails, metal ties, bolts, screws
- Woodworking tools
- Dumpster
- Ladder
- Plastic tarp or sheets
- Lumber
- Work equipment– construction hat, gloves, boots, tool belt, and knee pads
- Scaffolding
- Shingles or other roof covering material
- Underlayment material
If you desire a saltbox roofing system for your home, you can do it yourself if you have a minimum of technical ability. Setting up a saltbox roofing system or transforming the existing, traditional roofing to fulfill extra requirements is an exceptional method of contributing to the structure of your home. Although saltbox roofs cause a compromise in regards to the attic area, they are exceptional for waterproofing your structure and raising its thermal insulation.
#1: Planning and Decision-Making
This is a necessary first step. It includes all your pre-building ideas and the activity that enters into guaranteeing that the roofing system being constructed is properly developed, appropriately structured, in accordance with your regional building regulations, and technically practical, along with being visually pleasing. This part includes getting in touch with regional authorities, handling contractors, picking the proper plans, getting material quotes and settling labor expenses, and securing an insurance plan.
#2: Prep Work
This includes getting prepared to begin the installation procedure. There is generally greenery, such as a garden, flower beds, or potted plants near a home that need to be removed or safeguarded. A dumpster will be required as your work advances, so be sure you rent one.
#3: Cutting and Measuring
Cut the ridge board according to the length of the roof. The common rafters that need to be cut next need to be done for both the short and the long side. (See the next section for more details on framing.)
#4: Position and Nail Your Rafters to the Beam
The rafters then need to be connected on the first side, utilizing nails. After this, your ridge pieces needs to be raised so that another two rafters can be secured to the other side. Given that saltbox roofing rafters overhang the walls, it is crucial to position them exactly.
#5: Position and Secure the Rafters to the Roof
Each rafter needs to be set up on both sides of the roofing system by being connected to the studs in the wall. This assists in guaranteeing the stability of the roof.
#6: Finishing
Take your chosen roof covering and put them across the rafters. After the covering is in location, nail it or screw it to secure it down.
How to Frame a Roof for a Saltbox
In this section, we’ll go into more detail and constructing the frame of your saltbox roof.
#1: Measure Trusses
Identify the essential figures for the roofing trusses. This includes the pitch of the opposing two slopes and the run of each, which will be the length that each rafter needs to support.
#2: Cut Long Rafters
Start with the rafters for the longer side. Lay a 2-by-4- board on a completely flat surface. The 4-inch side profile should be facing up. Then put the apex of a framing square right at the bottom on one of the ends. The thin tongue should be over the board. Mark the pitch.
#3: Measure Remaining Rafters
Determine the “length of typical rafter” table on your blade, then check right under the pitch marking for the distinction. Step that range down the bottom of your board using a tape measure and draw a vertical line 1 inch in.
#4: Cut Rafters
Figure this as you did the plumb cut except put the square’s point at the top of the board. Use a circular to make your angled cuts. Make all the rafters required for the roof’s length, with the trusses spaced 24 inches from one another.
#5: Cut Short Side Rafters
Now take a short rafter board and repeat the computations for the rafters on the short side. Utilize the 2-inch pitch marking to draw the plumb cut. Then place the birdsmouth right at 26 inches and include the overhang. This might be the as it was on the long side, though it could also be shorter or longer.
#6: Place Cross Ties
Put a 2-by-4-inch board lain horizontally in between the rafters 12 inches down the shorter side from the roof’s peak. Mark your angles for the rafters on the board to add a cross tie to link the rafters.
#7: Place Gussets
Use rectangle-shaped gussets for each side joint; make the leading gusset directly throughout the bottom to link both rafters, though angled to the top for your roof’s peak. Install a gusset on either side of each truss.
#8: Mark Exterior
Mark 23 1/4 inches away from your end wall and mark the exterior of the 2nd truss; utilize the square’s tongue to mark the inside line of the second truss. Repeat this step to the end of the roofing; the last area might be less than 24 inches.
#9: Level Truss in Place
Raise the first truss for the end into position. Use a level to make sure it’s plumb, then and nail the birdsmouths into the wall caps using three 16d nails. Drive them in diagonally using a hammer. Two will be on one side of end of the truss, and one on the other side. Lift all the other trusses, ensuring they’re plumb, and briefly brace them with 1-by-4 boards nailed between your cross ties.
#10: Cover Trusses
Cover each truss with 5/8-inch OSB (oriented strand board). Nail it to the sides of the rafters using 8d galvanized nails. Let the short-side panel overlap the topmost edge of that on the corresponding long-side panel.