Whether you want them as weapons or to chop wood, axes are one of the most useful sharp tools around. They are surprisingly easy to use, as they rely on a pretty intuitive movement in order to do their job. Of course, that doesn’t mean that the art of ax-throwing is not one imbued with finesse – but let’s face it, the average user will rely on much simpler movements with fewer lost fingers involved.
Part of this ease relies on the combination of several simple, but well-thought-out elements. Turns out, there is a lot more to axes than just a pole and a sharp stone!
Table of Contents
What Are the Parts of an Ax?
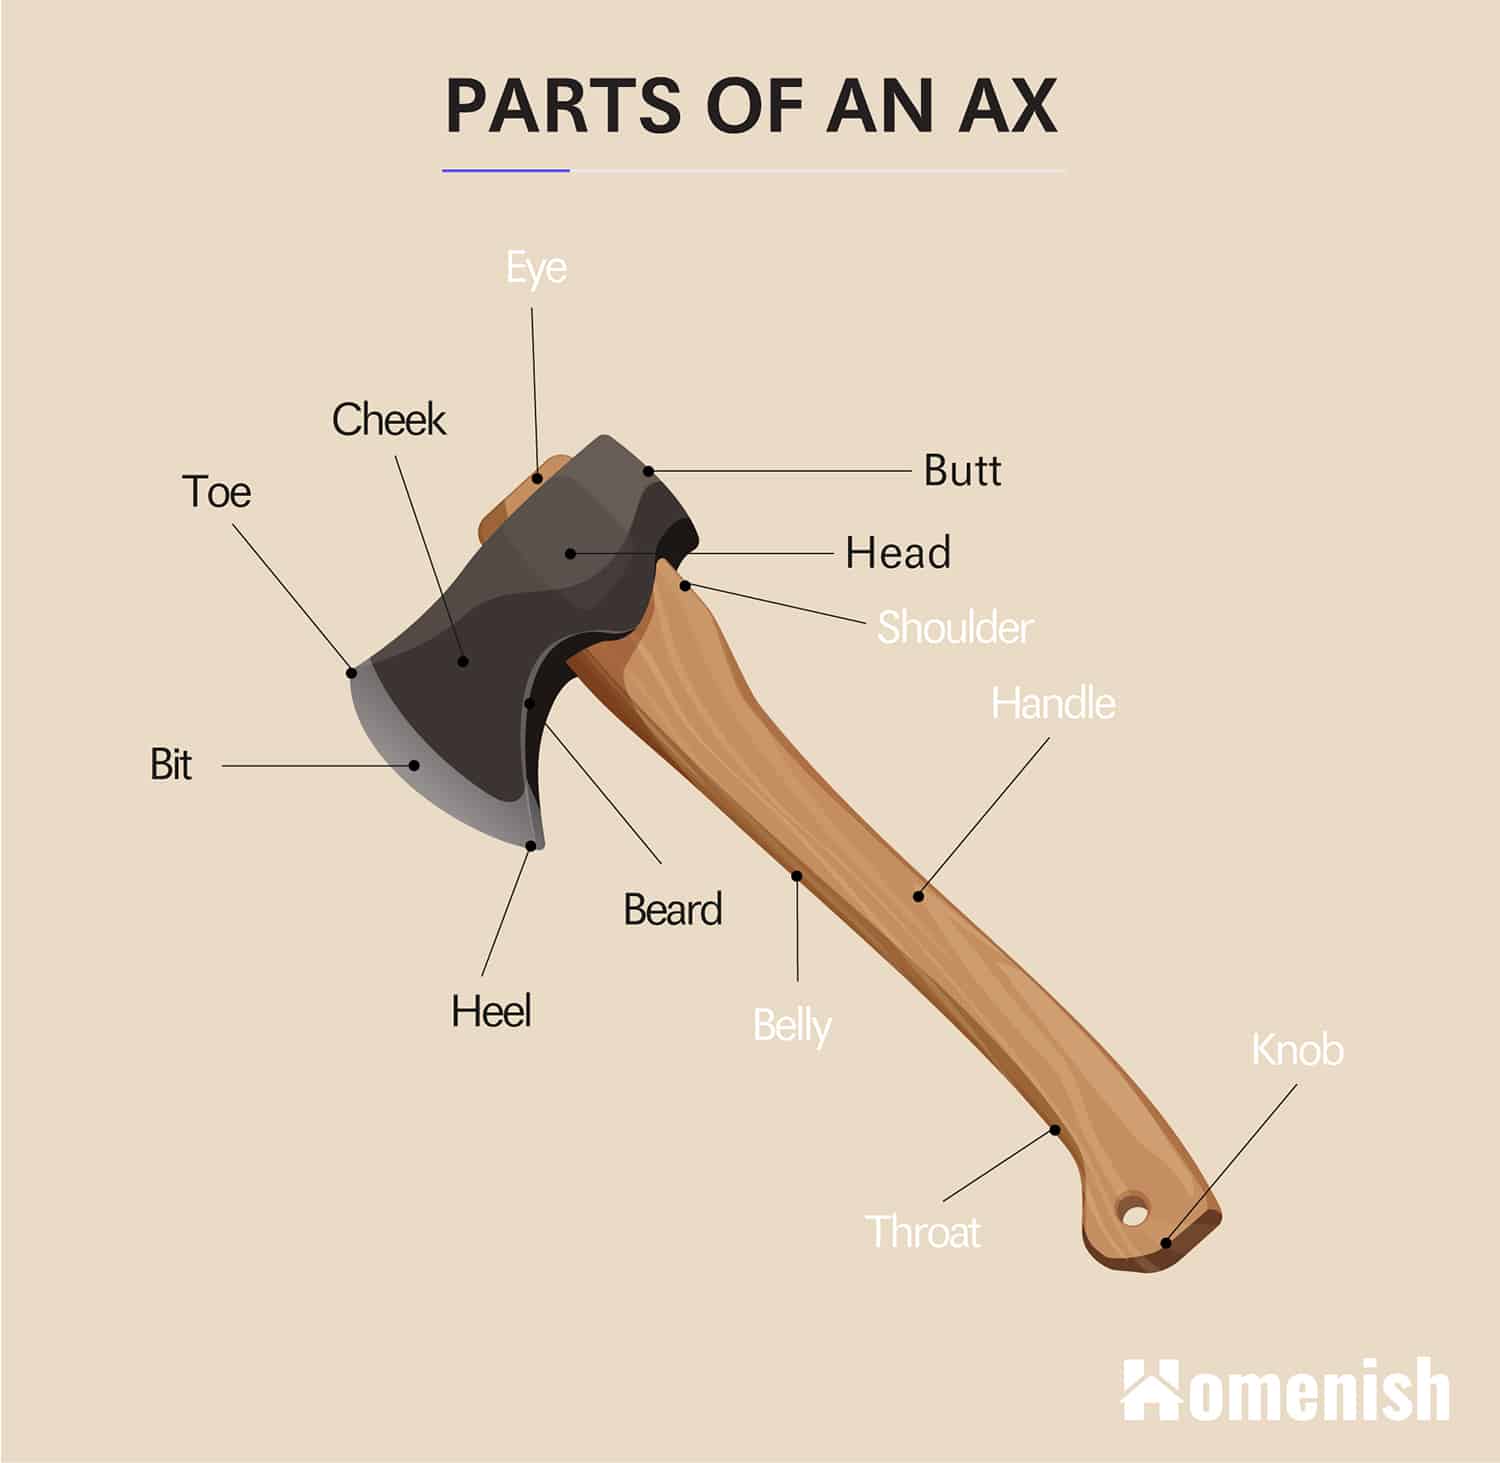
Ax anatomy generally recognizes two main parts: a head made of metal or stone (depending on your century of origin) and a lighter handle, which is usually made of wood. So, where do all these parts come into play? Besides reading the explanation of the ax parts below, you should also check out the diagram above to have a visual look at your ax.
The Head
When you wield an ax against a bunch of logs, you will be hitting it with the head. This head is comprised of six distinct parts that need to work in harmony:
The Butt
Traditionally, an ax head will have a thicker, blunt side and a slimmer sharp one. The blunt side is often known as the butt, poll, or back. This part isn’t just a leftover from the edge, however: it is meant to balance the back of your ax and helps any swinging movements feel natural.
The Bit
The bit of an ax is the upper side of its cutting portion or edge. This part will be used to do most of the cutting, although the chopping will actually happen thanks to the weight lent by the butt. This edge is often curved on one side. Models that include this curve are particularly useful since they can double as a shovel or pry bar.
The Toe
Unlike what its name implies, the toe is not a protuberance of any sort. In reality, it is the top corner of the bit or the edge. There is no clear demarcation as to where the toe ends or begins. However, it is still useful to keep an eye on this part: whenever you are wielding an ax, you should aim to have the toe as the part that makes the first impact on your target.
The Heel
The heel of an ax acts as the counterpart to its toe because it is the bottom part of the ax’s edge. In many models, the edge on the heel-side is slightly narrower than the one on the toe-side. This is meant to help you use the heel for carving or for precise cuts.
The Beard
If you look at an ax’s head upfront, you will notice that the bit side is often longer than the butt side. This is because there is usually a slight curve on the head’s bottom side, which creates a section that extends below the rest of the ax. This slight curve is called the “beard,” although perhaps you should call it “chin” instead.
The Cheek
The difference in thickness between the butt and the bit is formed by a progressive incline in between the two. This incline or curve is called the “cheek.” Sometimes, the cheek of an ax doesn’t simply curve inwards, but also to the sides, creating a small shovel in the middle.
The Handle
The handle is the long, wooden club that you will hold onto when using the ax. In basic models that are just mainly used as a wood chopping tool, the handle can simply be a long, straight pole. However, multi-tool models and throwing axes will often include many extra elements and parts to their handles. These are meant to balance it and help you grip it more accurately.
An ax handle has five parts:
The eye
This is the very top section of the handle, which is often embedded in its head. Sometimes, in very worn axes, the eye may be visible from the top of the head. If this happens, check for cracks: it could be a sign that your ax is worn out or in dire need of some maintenance.
The shoulder
Immediately below the head is a thicker, straight section. This helps add a little bit of a distance between the area where you will be gripping the ax and the one that is exposed to any blunt force. By being perfectly straight, this section also helps you aim the ax when throwing it – it will ensure no curves get in the way of your blow.
The belly
The belly is the main part of the handle. It often begins immediately below the shoulder, and it is slightly curved outwards (towards the bit or edge). When you grip an ax, you will want your top hand to rest on the curve formed by the belly.
Unfortunately, this area also provides another point for structural problems: if the handle is made from cheap wood, you may find the grain will begin to crack around here.
The throat
The throat is a smaller curved section of the handle, which balances the curve provided by the belly. Because of this, it will usually point inwards or towards the ax’s butt. This shorter curve will also point at the right place for your lower, or non-dominant hand.
The knob
Finally, the knob is a small, thicker curved dent at the bottom of the handle. It follows the same direction as the belly. In many models, the knob is usually painted in a different color than the rest of the handle.
Conclusion
Axes are one of mankind’s oldest tools. This is why their basic construction often looks incredibly simple when in reality, it is often carefully designed to save you effort and muscle soreness. You should get to know all the different parts of your ax before you take it to the field. This will help you identify how to use it more precisely, as well as spot any places where it may get damaged or break.