Tiles can brighten up any room and save you the hassle of doing expensive repairs. In kitchens, adding tiles to your flooring and backsplashes can transform the look of the room without spending much money. But aside from the kitchen, you can add tiles to any wall or floor of your house. The only tricky part is tiling the inside corners of adjoining walls or floors.
Mosaic and terracotta tiles are available in many different materials, including glass and ceramic. Whether you’re tiling two adjacent walls or skirting corners, you’ll need to think about how to tile an inside corner where the walls meet. Other issues you’ll also be dealing with are whether the corner lines should be grouted or caulked since walls may move over time and crack.
In this article, we’ll cover all you need to know on how to measure, cut, and tile inside corners of any room for long-lasting results.
Table of Contents
How to Tile Inside Corners
Measuring and Cutting the Tiles
There are two ways to measure and cut your tiles:
Option 1: Hold the tile you want to cut over another full tile. Fit another tile against the wall where it overlaps the tile below. Now mark the tile with a pencil and cut.
Option 2: Instead of holding the tile over the wall before measuring it, you can take separate measurements from the top of the corner wall to the bottom using a tape measure. Mark these measurements on the tile with a pen or pencil. Draw a line between the two squares so you get a vertical line to cut along. Using these marks, you can then start cutting the tiles.
To cut the tiles into a corner wall, you have two options: either use a tile cutting board or a wet saw. Cutting boards are only suitable for synthetic tiles. For natural stone tiles, you must use a wet saw, but remember to dry the back of each tile after cutting it, as water will penetrate through the adhesive bond or the wall.
Sometimes, you can just fit full-size tiles across the wall without cutting them for the inside corner. If no tile cutting is necessary, then jump to the next section of how to tile corners. In most cases, however, you will need to cut the individual tiles in order to fit them into the corner of the wall.
Once you’ve cut them, stack the tiles from the bottom up and get ready to move on to the actual tile fitting part.
Tiling Inside Corners: Method 1
If you’re using full sheets of mosaic tiles for the inside corners, start by applying glue directly onto the wall corner using a trowel. Make sure the adhesive is a thin layer but thick enough for the trowel lines to be visible. If you have cut the mosaic tile sheets to size, apply a thin layer of glue to the back of the sheet before installing each piece with the cut edge pointing to the internal corner of the wall.
After each adhesive application, clean your trowel by wiping it off with a wet cloth or sponge.
Once you’ve installed all the tiles into the corner, allow the adhesive to dry for 1 hour. Natural stone tiles are best installed with a grout sealer, which prevents the grout from sticking to the stone tile. However, you won’t need to use grout for non-porous or synthetic tiles.
Finally, don’t forget to remove the tile spacers when you’re done. Wait for 2 hours or so before filling the corner lines with caulk. An appropriate latex caulk or grout in the same color as your tiles will complete the job nicely.
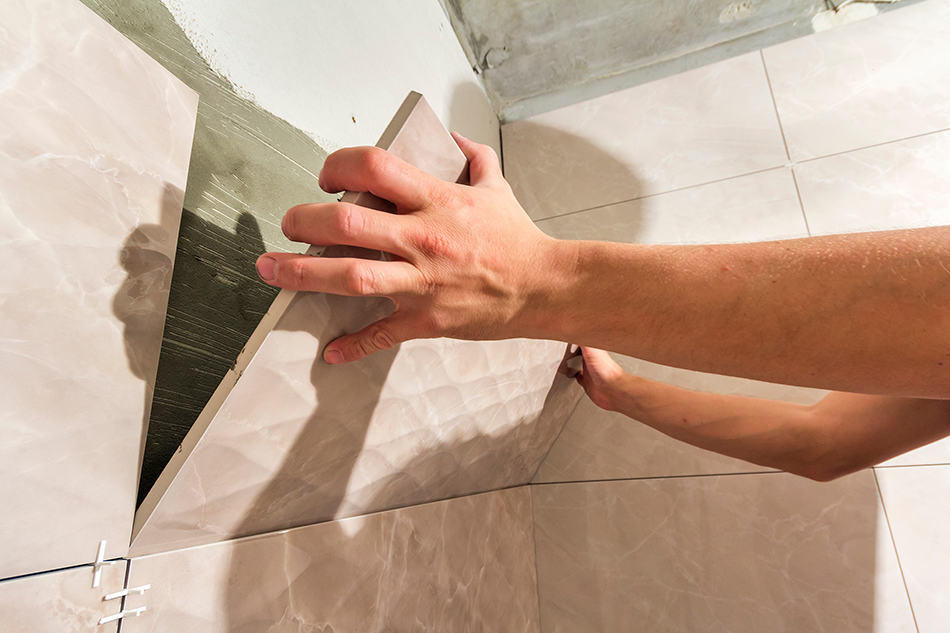
Tiling Inside Corners: Method 2
Place all the uncut tiles over the adjoining walls, starting from the middle of each wall to the bottom and then up, row by row. Sit the tiles on thin mortar and spread the mortar with a trowel. You must put spacers in between each tile. Once the full tile no longer fits in the corner of the adjacent wall, stop each course.
The next step is to measure from the edge of the tile to the corner of the last tile. Deduct a quarter of an inch from the measurement as well as the width of the tile spacer. For instance, if your tile spacers are 1/6 inch, deduct 3/6 inch from the spacer and then cut the tile at that width using your tile cutter.
Now, you’re ready to apply some mortar to the back of the tile using your trowel. Press the tile firmly against the wall with the cut side facing towards the wall corner while the other edge is next to the previous full tile in the row. Make sure the space between the two tiles is consistent with the rest. There should be around a quarter of an inch of space left at the corner.
Repeat the same process for each corner tile for the two adjoining walls, and make sure all the cut sides are facing each other. Once the tiles are fully set, remove all the spacers.
If you used caulk in the first method, we’ll go over grouting for this method. Spread the grout over the tiles and press it into the lines between each tile. Scrape off any residue from the surface before wiping up the remainder with a damp sponge. The corner lines don’t require grouting, as they can be left open.
Allow the grout to dry for two days before filling the ungrouted corner lines with caulk. Let the caulk set for 1 day.
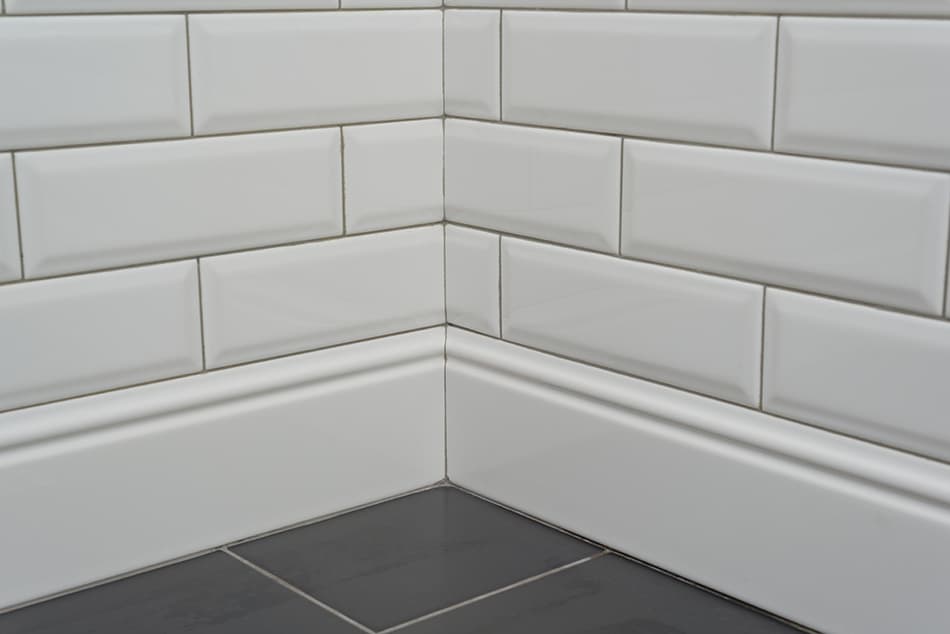
Gaps and Caulking
One common mistake that most people often make is to put grout into the joints of the adjoining walls. This can lead to grout cracking over time or the tile coming off the wall. It is best to leave at least 1/8 inch of gap between each tile before caulking it with a latex, silicone, or acrylic caulk.
Closing the gap around the tile’s edge is essential in preventing water from penetrating through the wall. This is particularly important for kitchen countertops and backsplashes where you don’t want water to seep through the fixtures or fittings and onto the wall.
Here is a step-by-step guide on how to seal around the tile’s edge:
Step 1: Attach the sealant’s nozzle to the cartridge gun and cut off the tip.
Step 2: Run a straight bead from one end of the tiled area to the other. Keep the gun steady with a consistent speed for even application.
Step 3: Smooth out any irregularities using your wet finger, but try not to wipe the sealant off the wall surface.
Step 4: Leave the sealant to dry thoroughly for 24 hours.
3 Best Ways to Finish Tiled Corners
One of the main challenges that most people face during the tiling process of inside corners is how to finish the edges of tiled walls or floors. To ensure proper installation and a finished project, it is important to pay particular attention to the final part of this task. Most tiles offer bullnose parts that match different tile sizes.
However, if your particular tiles don’t have bullnose pieces, no need to lose heart and give up on the project. You have three options to finish your tiled corners. There are alternatives available to ensure your tiled corner walls or floor look as smooth and refined as possible. Here are our suggestions:
- Caulk the tile’s edges: as per our previous methods, caulking the edges is the easiest solution. Whether you have mosaic tiles or porcelain ones, caulking them is a cost-effective option. Simply assess the tiles from the sides and if they don’t look finished, apply a thin line of caulk to the edge to achieve a clean seal.
- Tile molding: these products are in natural stone or porcelain and readily available to buy in most home improvement stores. Tile moldings are thin, decorative designs that help you achieve a finished look for your wall’s edges. These products provide a cohesive and clean look for a striking project. In case the tiles you’ve bought don’t come with molding, you can always choose one that closely matches your tiles or even go for contrasts to create a wow factor in your space.
- Aluminum edges: these products are available in various styles and finishes. Suitable for both indoor corners and outdoor walls, aluminum edges provide a clean and contemporary look to any space. Metal edges are very popular among DIYers as they make the inside corners look finished. What’s more, they are the most cost-effective and easy to install solution. Be sure to coordinate the color with your wall or tile color to achieve a cohesive feel.
If you’re still not too confident with tiling your kitchen or bathroom’s inside wall corners, watch this video now: