Let’s be honest: you want to keep the mud out of your house and off your patio table, but kids need a place to get messy. A mud kitchen gives them a sturdy outdoor spot to mix, pour, and play without taking over your grown-up space.
This approach aims for a backyard mud kitchen that actually looks good, feels sturdy, and won’t trip up a first-time builder. You’ll start with the base, add upright framing, angle on a roof, put together a sink counter and mixing area, and then wrap it up with shelves, hooks, and a finish that keeps the weather out. Here’s how to it properly with our easy-to-follow instructions.
Table of Contents
- Things to Consider Before Building
- Tools
- Materials
- Step 1: Build The Base Platform
- Step 2: Install The Vertical Posts
- Step 3: Build The Back Wall Frame
- Step 4: Install The Slanted Roof Supports
- Step 5: Attach The Corrugated Roof Panels
- Step 6: Build The Sink Counter
- Step 7: Build The Mud Mixing Station
- Step 8: Add Shelves And Storage
- Step 9: Install Hooks And Hanging Utensils
- Step 10: Sand And Seal The Wood
- Finished DIY Mud, Kitchen Reveal
- Mud Kitchen Accessories To Add
- Best Wood For Outdoor Mud Kitchens
- How To Waterproof A Mud Kitchen
- Mud Kitchen Safety Tips
Things to Consider Before Building
Hold off on breaking out the saw—first, you’ve got to figure out where this thing goes, how big it should be, and which materials will actually last in your climate. If the kitchen fits your kids’ play style and your outdoor space, it’ll get used a lot more.
Choosing the Location
Look for a flat spot that doesn’t turn into a swamp after rain. Waterlogged ground will chew up those legs faster than you’d think.
Some shade goes a long way. Full sun can bake the surfaces, dry out the mud too fast, and fade your finish. A bit of shade keeps the whole setup comfortable, so the kids aren’t dodging hot countertops by noon.
Don’t crowd it. You’ll want room for buckets, stools, and the inevitable dance of kids circling each other. If you’re putting it near a fence or wall, leave a little breathing space for air flow and easier cleanup behind.
Choosing the Size
A width around 48 inches usually hits the sweet spot—enough for a sink, a mixing area, and storage, but not so big it swallows your yard.
Height makes a difference. Younger kids do best with counters at 20 to 24 inches. If you want it to last as they grow, go closer to 24 inches and give the bottom shelf some depth for bigger buckets or bins.
Here’s a tip: pick your sink tub or bowl before you settle on frame dimensions. That one measurement sets the whole top layout. If you’re tweaking a plan or using a pallet, measure the sink first and work out from there.
Choosing Materials
Cedar just works for outdoor projects—handles moisture, isn’t too heavy, and is easy to cut. Cedar 2x4s for the bones, cedar fence boards for the surfaces—solid combo for durability and a clean look.
Some folks use pressure-treated wood for the frame, but a lot prefer cedar since it’s lighter and less likely to leave green streaks or splinters. Reclaimed or pallet wood can work, but check every piece for splinters, rot, and old nails. Be wary of wood that might’ve been treated with chemicals.
For the sink, a plastic tub or dishpan is easy to swap out if it cracks. Corrugated plastic panels make the roof light and simple to install, and they’ll shed water without weighing the whole thing down.
Tools
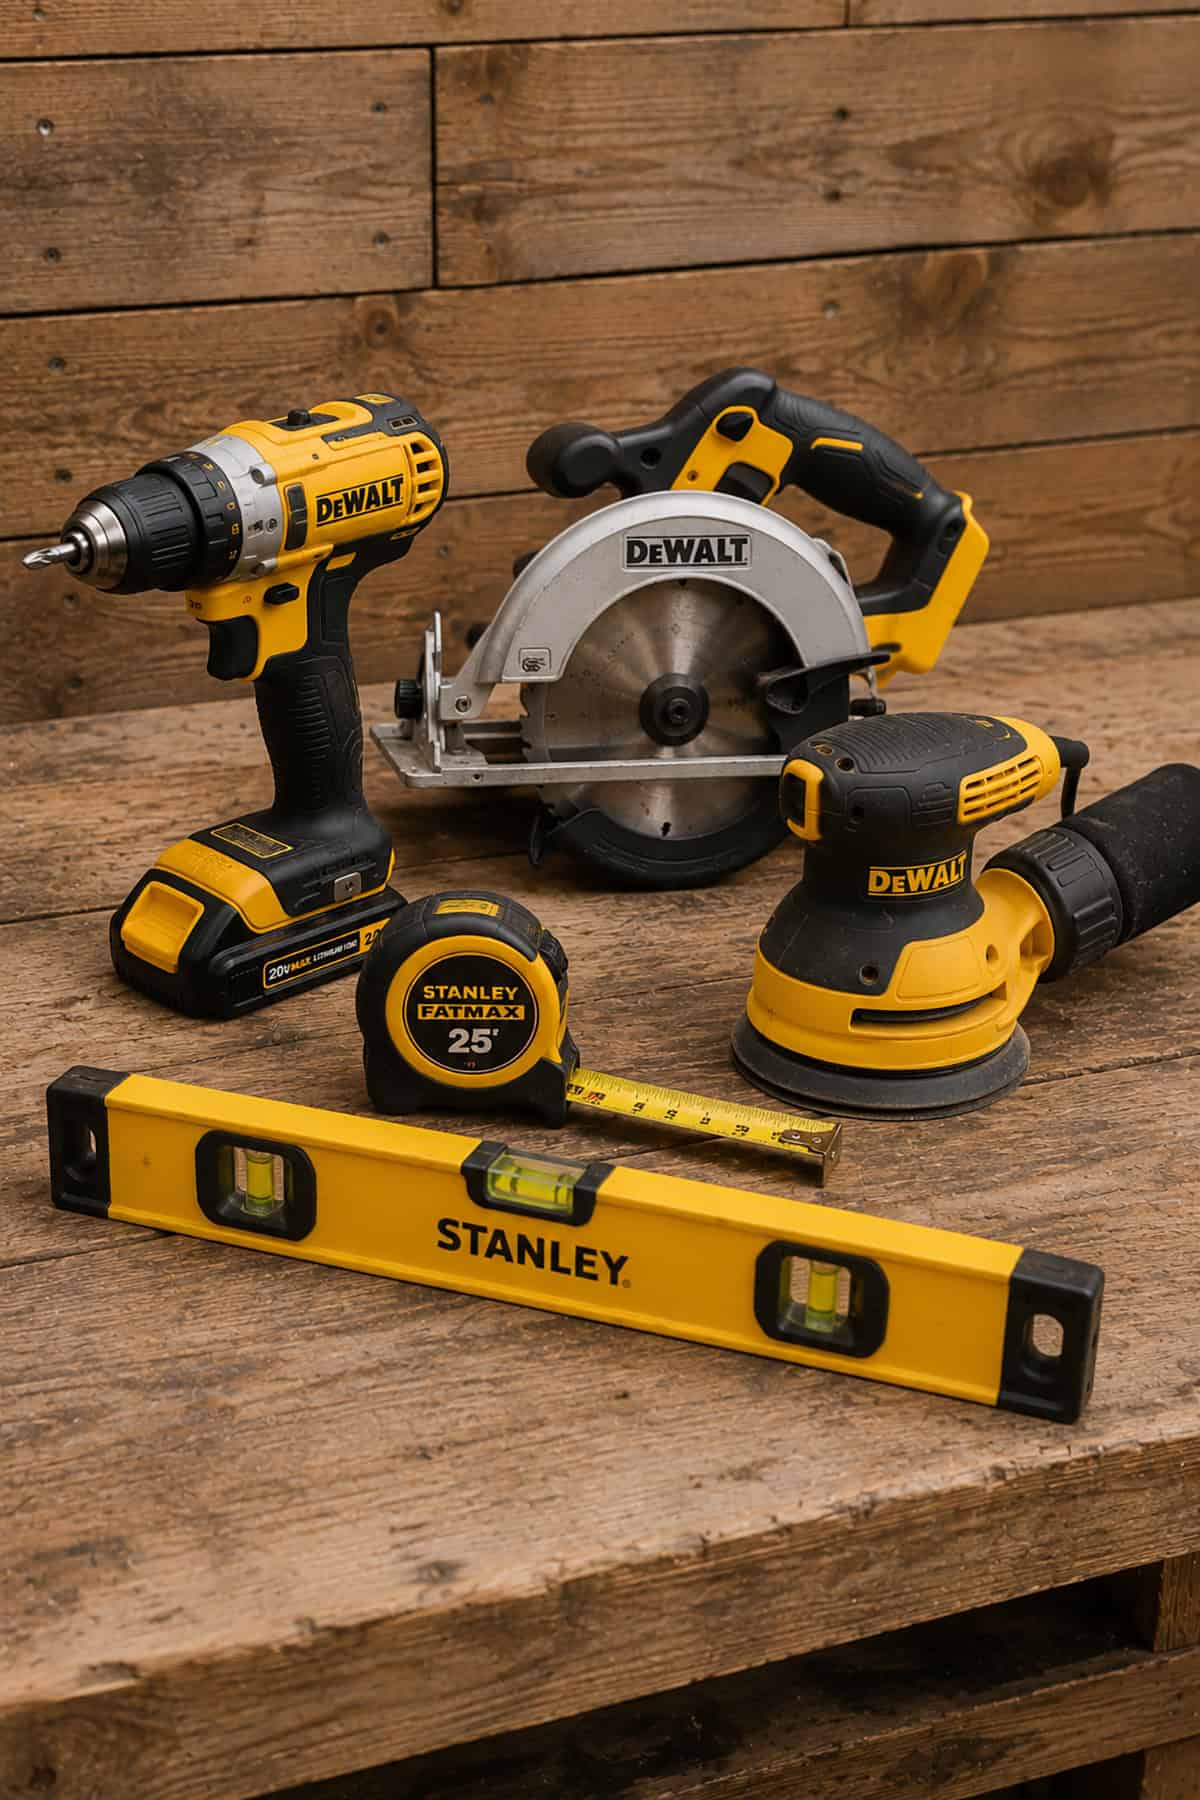
You don’t need a fancy shop to pull this off. A few basic power tools make it smoother, but careful measuring and decent screws matter more than a wall of gadgets.
Drill
Pretty much everything gets screwed together, so a cordless drill/driver is your main tool. Use it for pilot holes and driving screws, plus hardware if you add extras later.
Don’t skip pilot holes, especially near board ends. They keep cedar from splitting and give you cleaner joints.
Saw
Miter saws make quick, straight cuts for framing. A circular saw does the job, too, if you clamp boards and mark your lines well.
No power saw? You can get by with a handsaw—just takes more muscle and patience to keep cuts square.
Measuring Tape
Consistent measurements are everything here. Double-check every cut and measure your sink tub directly—don’t trust the label. Writing each cut right on the board with a marker helps keep things straight when you’ve got a pile of similar pieces.
Sander
Fence boards can be rough. A random orbital sander saves your arms and gives kids a smoother surface to lean, grip, and slide bowls across. Start with 80-grit, then hit it again with 120-grit. Rounding off corners by hand or with the sander really does make a difference.
Level
Keeping things square and upright isn’t just about looks—it’s about stability. A small level helps when you’re setting posts and shelves. Even if your ground’s a bit off, you want the kitchen itself to stand straight. Slip a shim under a leg if you have to.
Materials
You’ll need framing lumber, boards for surfaces, a sink tub, roofing, and exterior screws. Even buying new, you can keep costs reasonable if you don’t go overboard on extras.
Lumber
For the frame and surfaces, here’s a typical list:
- 7 cedar 2x4s
- 8 cedar fence boards, 6 feet long
- 2.5-inch exterior deck screws
- 1.25-inch exterior deck screws
2x4s carry the weight and shape, while fence boards are lighter for counters, shelves, and trim. Easier to cut, too.
Kitchen Components
You’ll want a few basics for the actual play features:
- Plastic tub, dishpan, or utility bin for the sink
- Maybe a second bowl or pan for mud mixing
- Utensil hooks
- Optional: faucet prop, knobs, baskets, bins
Always measure the tub just under the lip before you cut. That’s the number you need for the opening.
Roofing Materials
For the top, gather these:
- Corrugated plastic roof panels
- Roofing screws with rubber washers (or whatever the panel maker recommends)
- Closure strips if your panel type calls for them
Single-slope roofs are simple, and they do a fine job keeping water off the play area.
Step 1: Build The Base Platform
Kick things off with the main rectangular frame for the top. Most builds land around 48 inches long and 20–21 inches deep, but you’ll want to match the depth to your sink tub’s size.
Grab cedar 2x4s for two long sides and a few shorter crosspieces. That sink opening needs to fit the tub snugly under the lip, so measure carefully. If the handles are bulky, pop them off or use a simpler bin.
Lay the frame out on a flat surface, check for square, and drill pilot holes before driving in 2.5-inch screws at every joint.
The basic frame should have:
- Two long side rails
- Two end pieces
- Two center supports to frame the sink opening
Drop the tub in to check the fit before you go any further. It should sit solid, not wobble or drop through. Adjust now—this is the foundation for everything else.
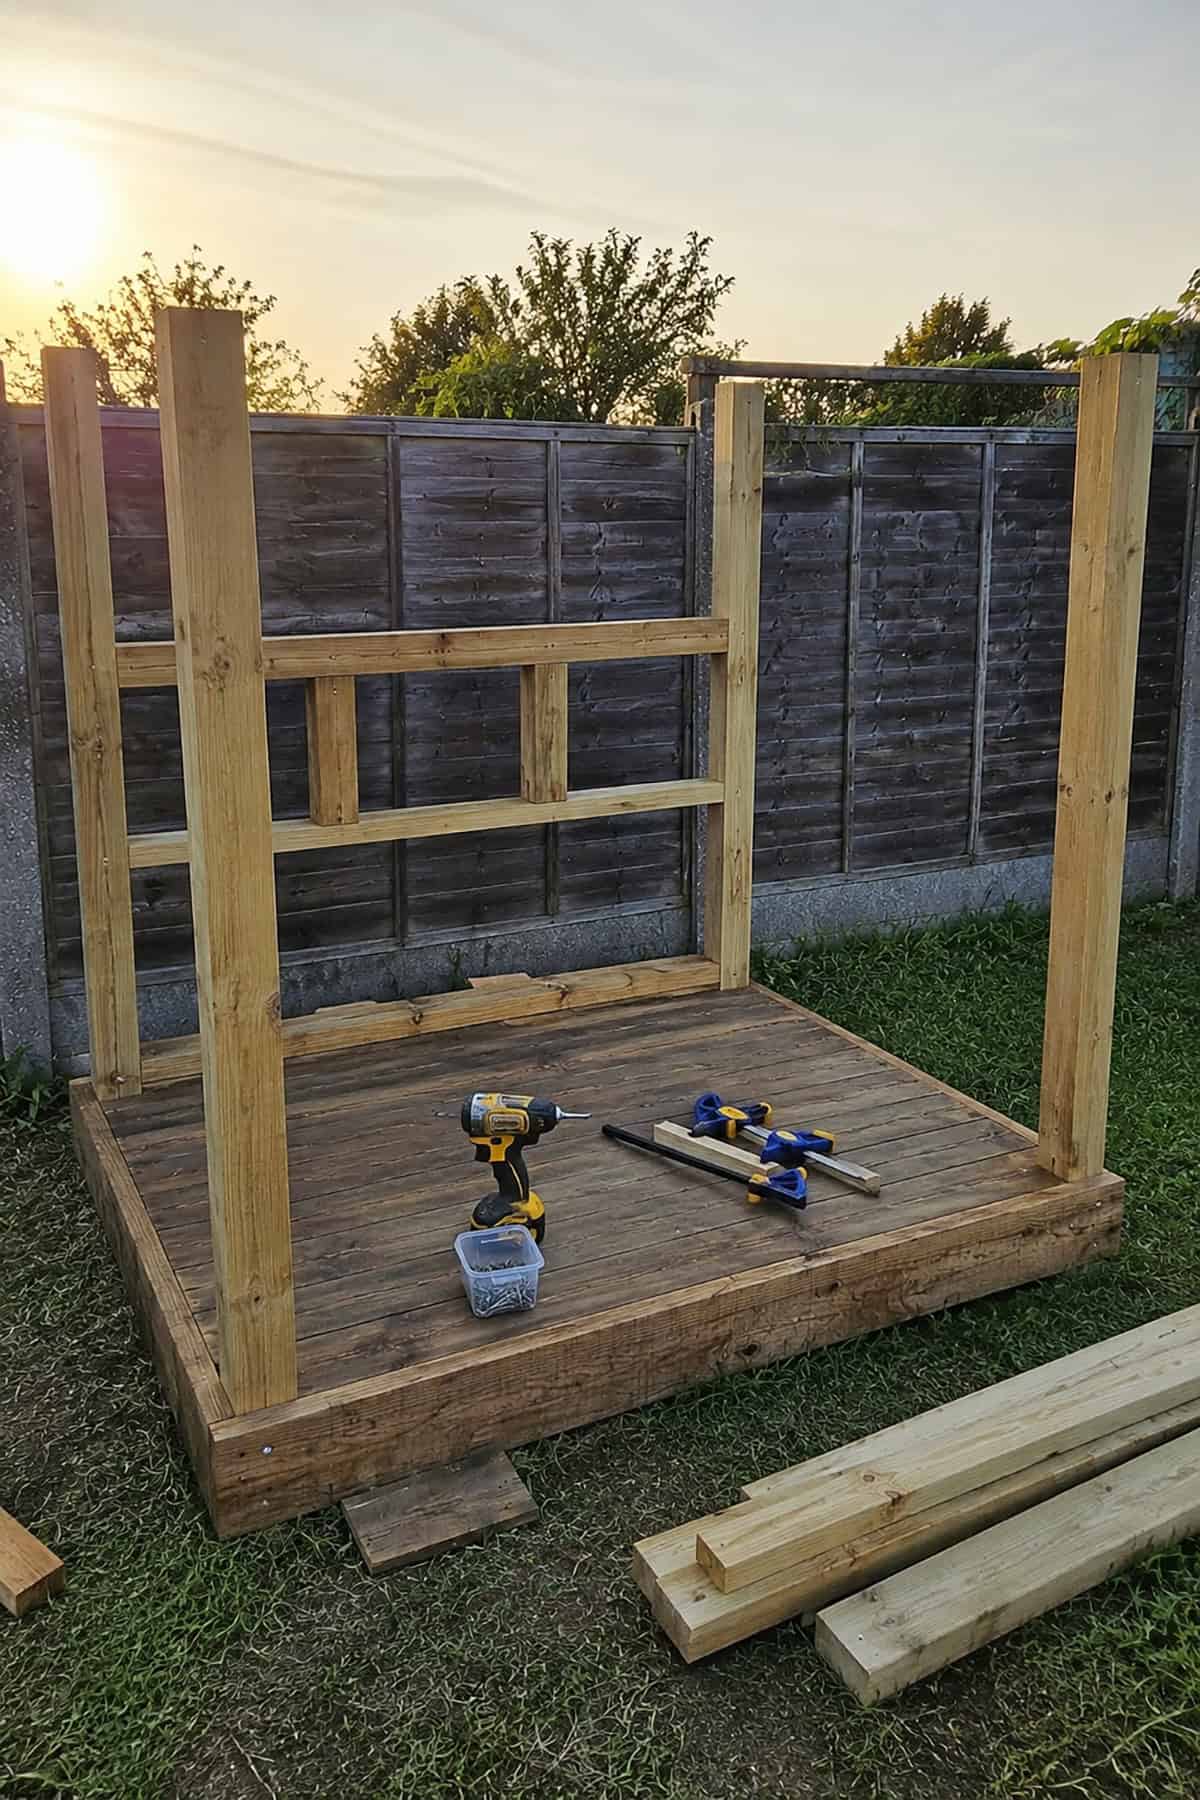
Step 2: Install The Vertical Posts
Counter height is set by the front posts, while the back posts go higher to hold the backsplash and roof.
Front posts at 24 inches tall are a good starting point. Back posts usually run up to about 48 inches, but it depends on how tall you want the whole thing.
Attach front posts inside the frame corners, and back posts at the rear corners—often outside the frame for a bit more play space. Use a level to keep each post plumb before you screw it in.
At least two 2.5-inch screws per post connection, but don’t be stingy if it feels wobbly. If things want to twist, clamp the post while you drive the screws. Once all four are on, stand the frame up and check for any wobble.
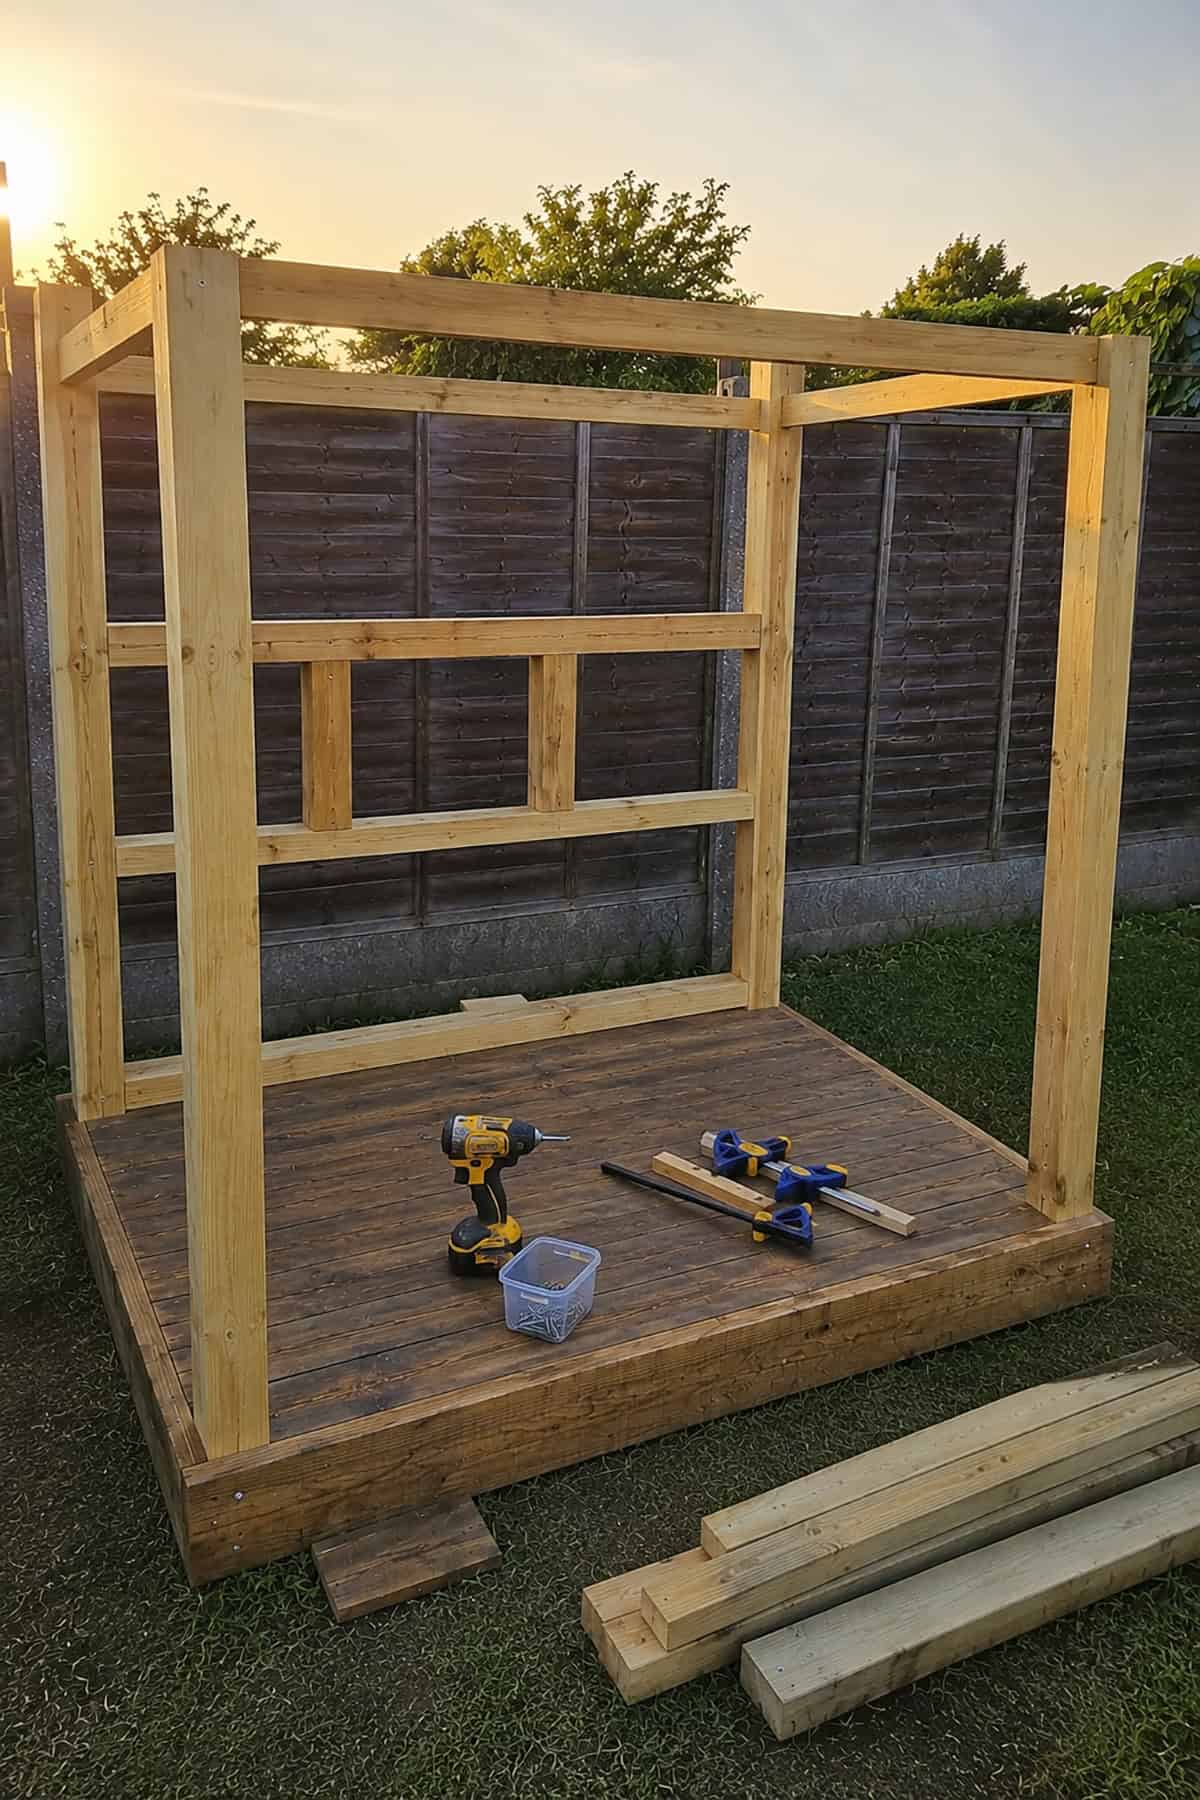
Step 3: Build The Back Wall Frame

The back frame ties the rear posts together and supports the backsplash and upper shelf. It also just makes the whole thing look more finished.
Cut horizontal pieces to fit between the back posts—one near the counter, one near the top. Add a middle rail if you want it more enclosed.
You’re building a rectangle above the counter. Keep it square and level, or you’ll fight it when you add boards and the roof. Once it’s up, attach cedar fence boards horizontally or vertically for the backsplash. Leaving a small gap between boards helps with drainage and gives the wood room to move.
Step 4: Install The Slanted Roof Supports
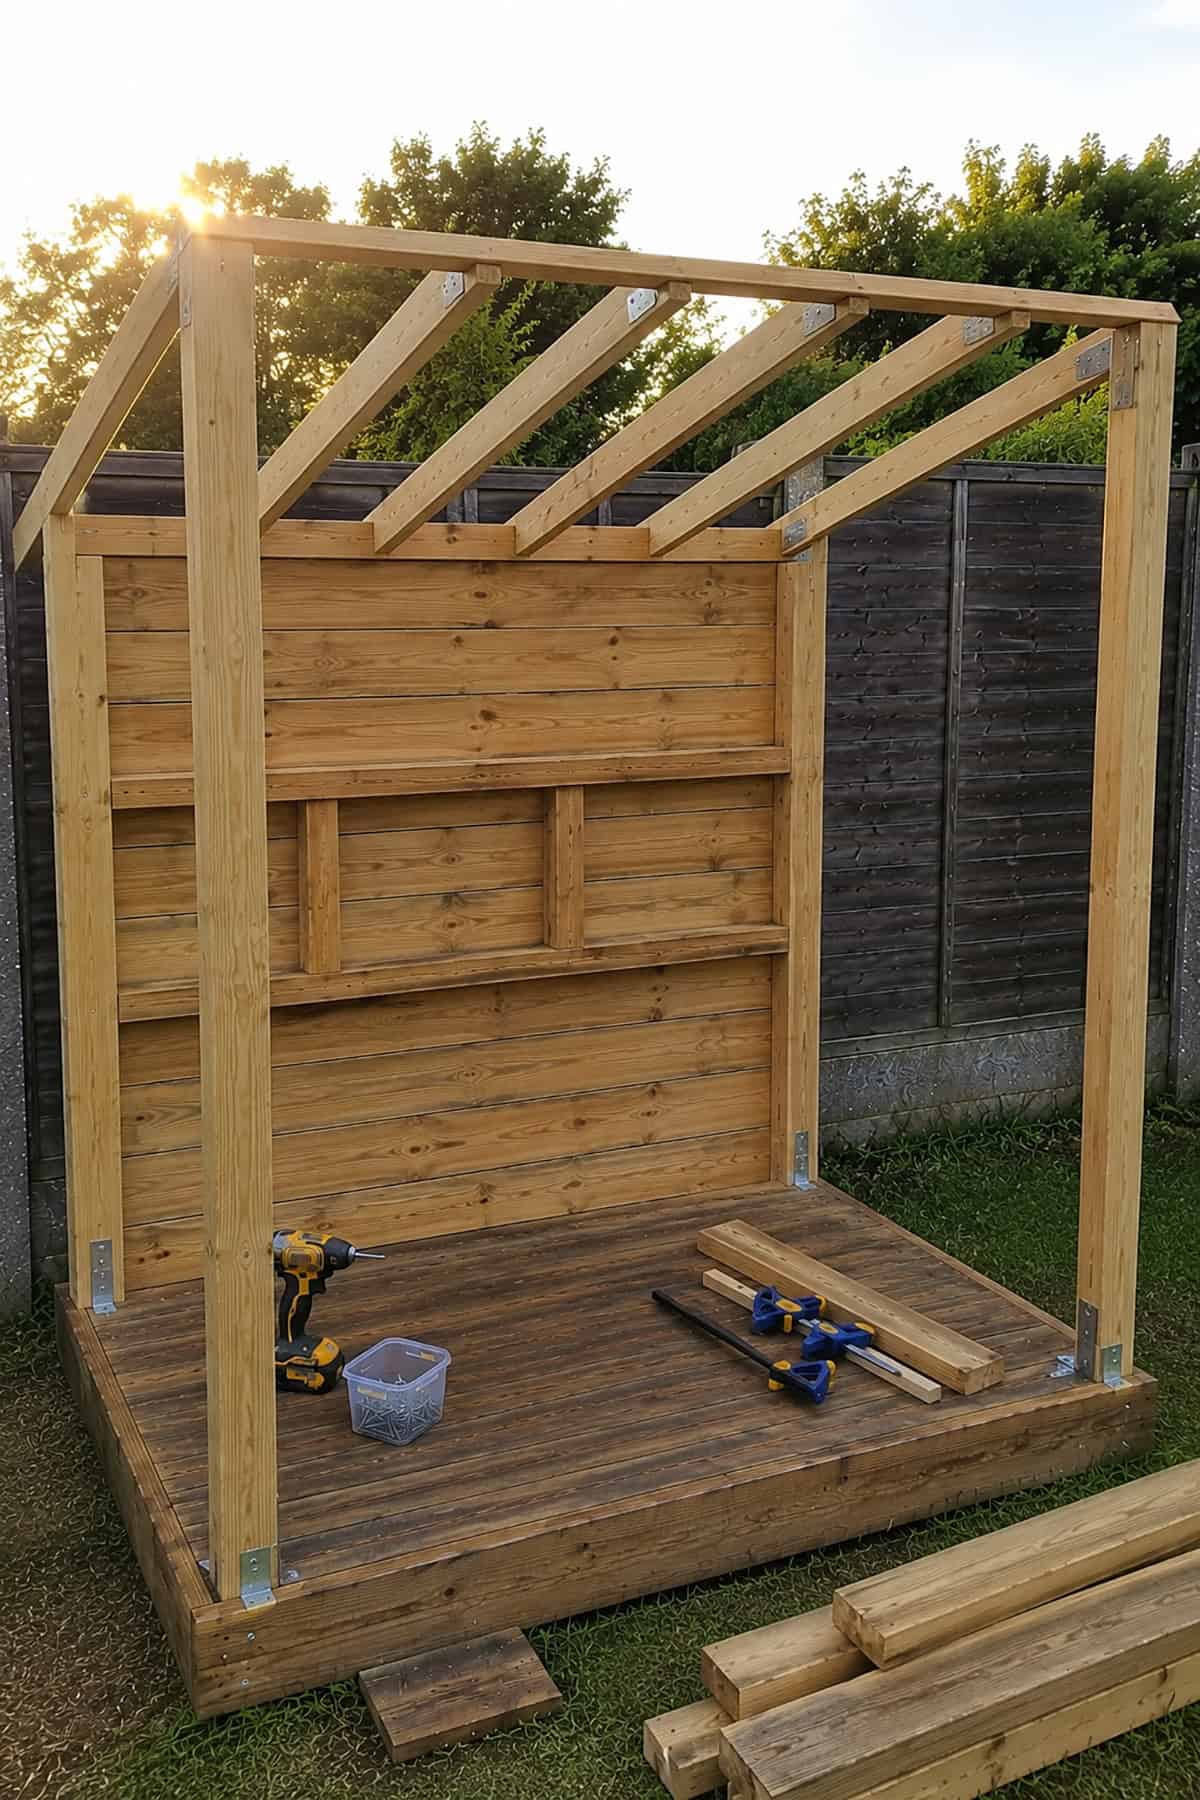
Shade and runoff—those are the reasons for a slanted roof. Plus, it just looks better than a flat top.
Angle or step support pieces from the higher back wall to the lower front. No need for a big pitch—a gentle slope is enough. Before you lock it down, check that the roof line is level from side to side, the slope runs the right way, and the overhang won’t get in the way of play.
Keep the overhang modest—a few inches does the job. Too much and the roof starts to feel wobbly on a lightweight frame.
Step 5: Attach The Corrugated Roof Panels
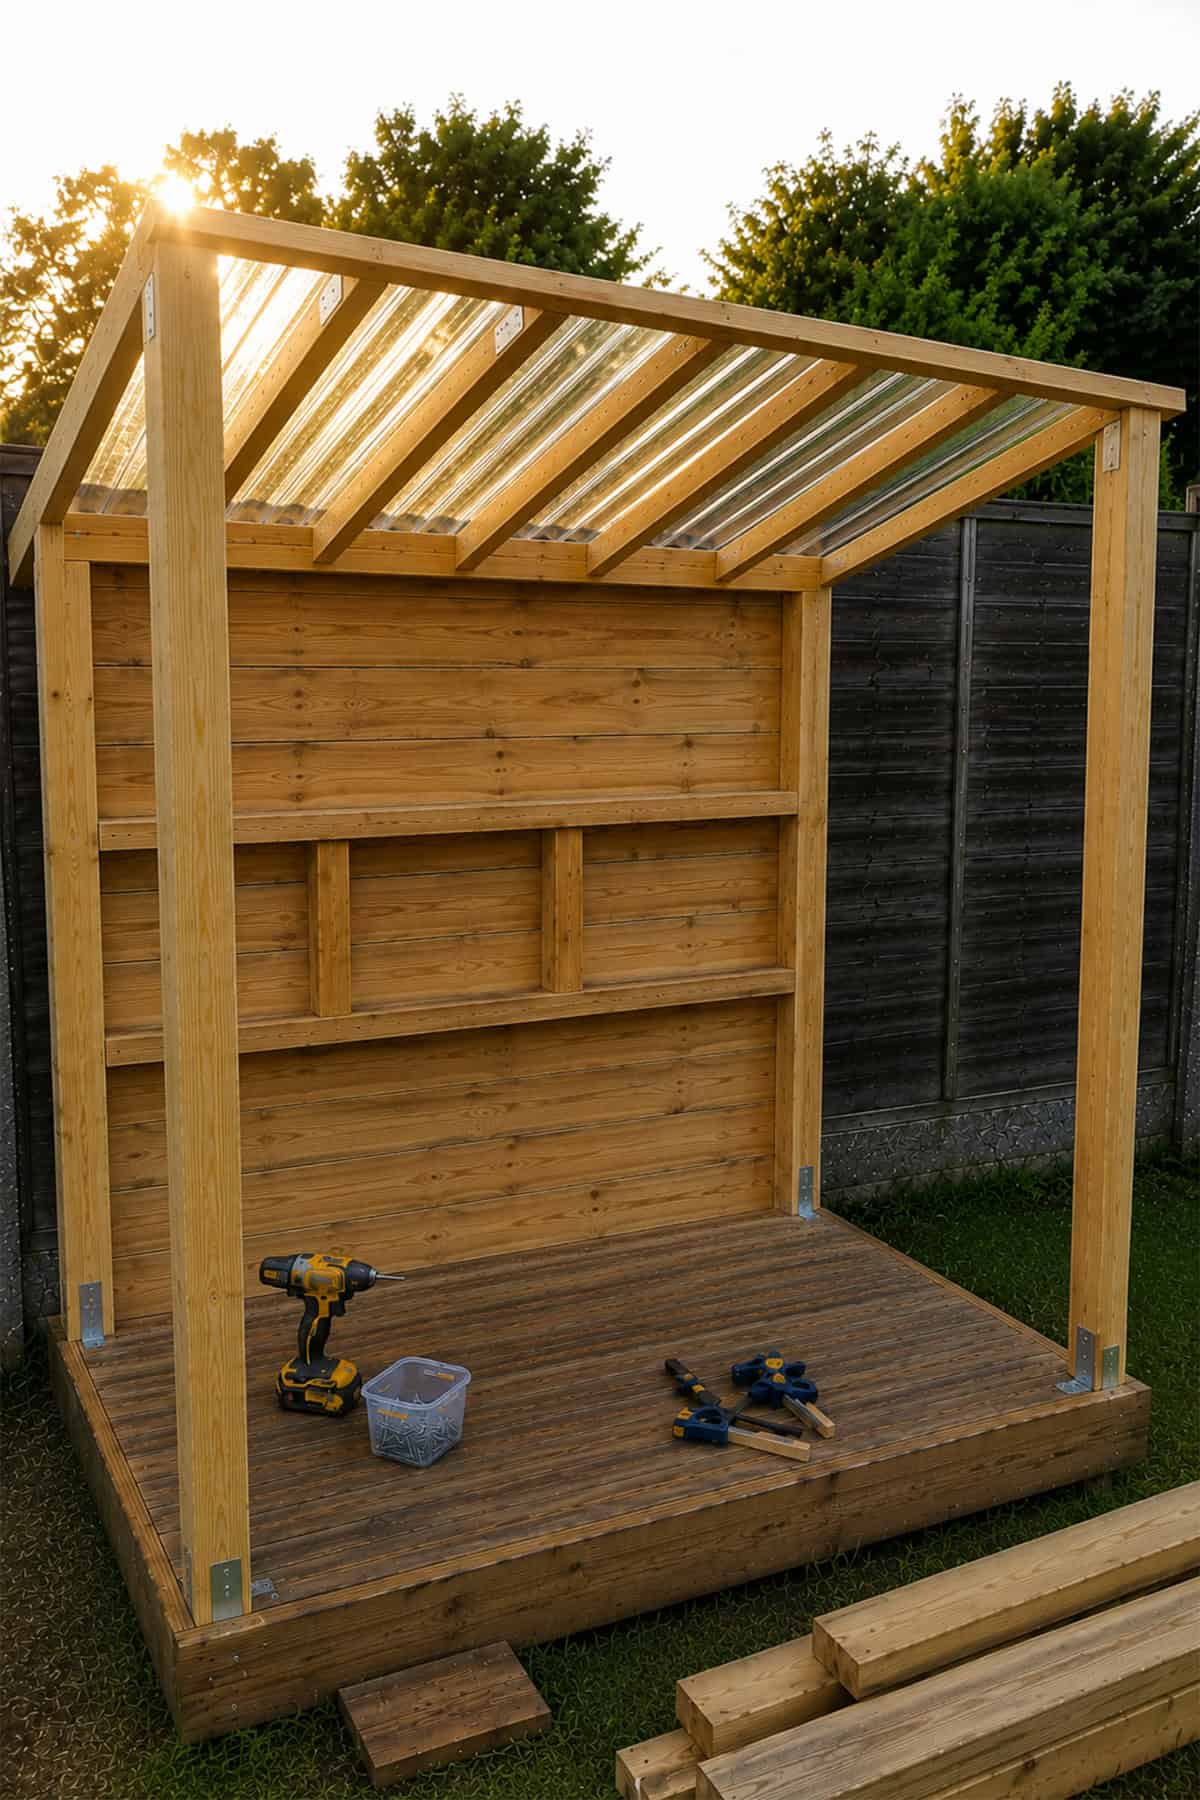
Measure and cut the panels to size as the manufacturer suggests. Support them well while cutting—otherwise, they can crack or vibrate weirdly.
Set the first panel with a slight overhang at the front and sides. If you need more than one panel, overlap them as recommended. Fasten through the right part of the corrugation using screws with washers. Don’t torque them down too tight or you’ll risk cracks and leaks.
Some quick tips: pre-drill if the panel instructions say to, line up fasteners in neat rows, leave a bit of room for expansion, and make sure water runs off away from the back wall and shelves.
Once it’s on, spray the roof with a hose or watering can to check runoff. Water should clear the work areas, not drip down the back or onto the shelves.
Step 6: Build The Sink Counter
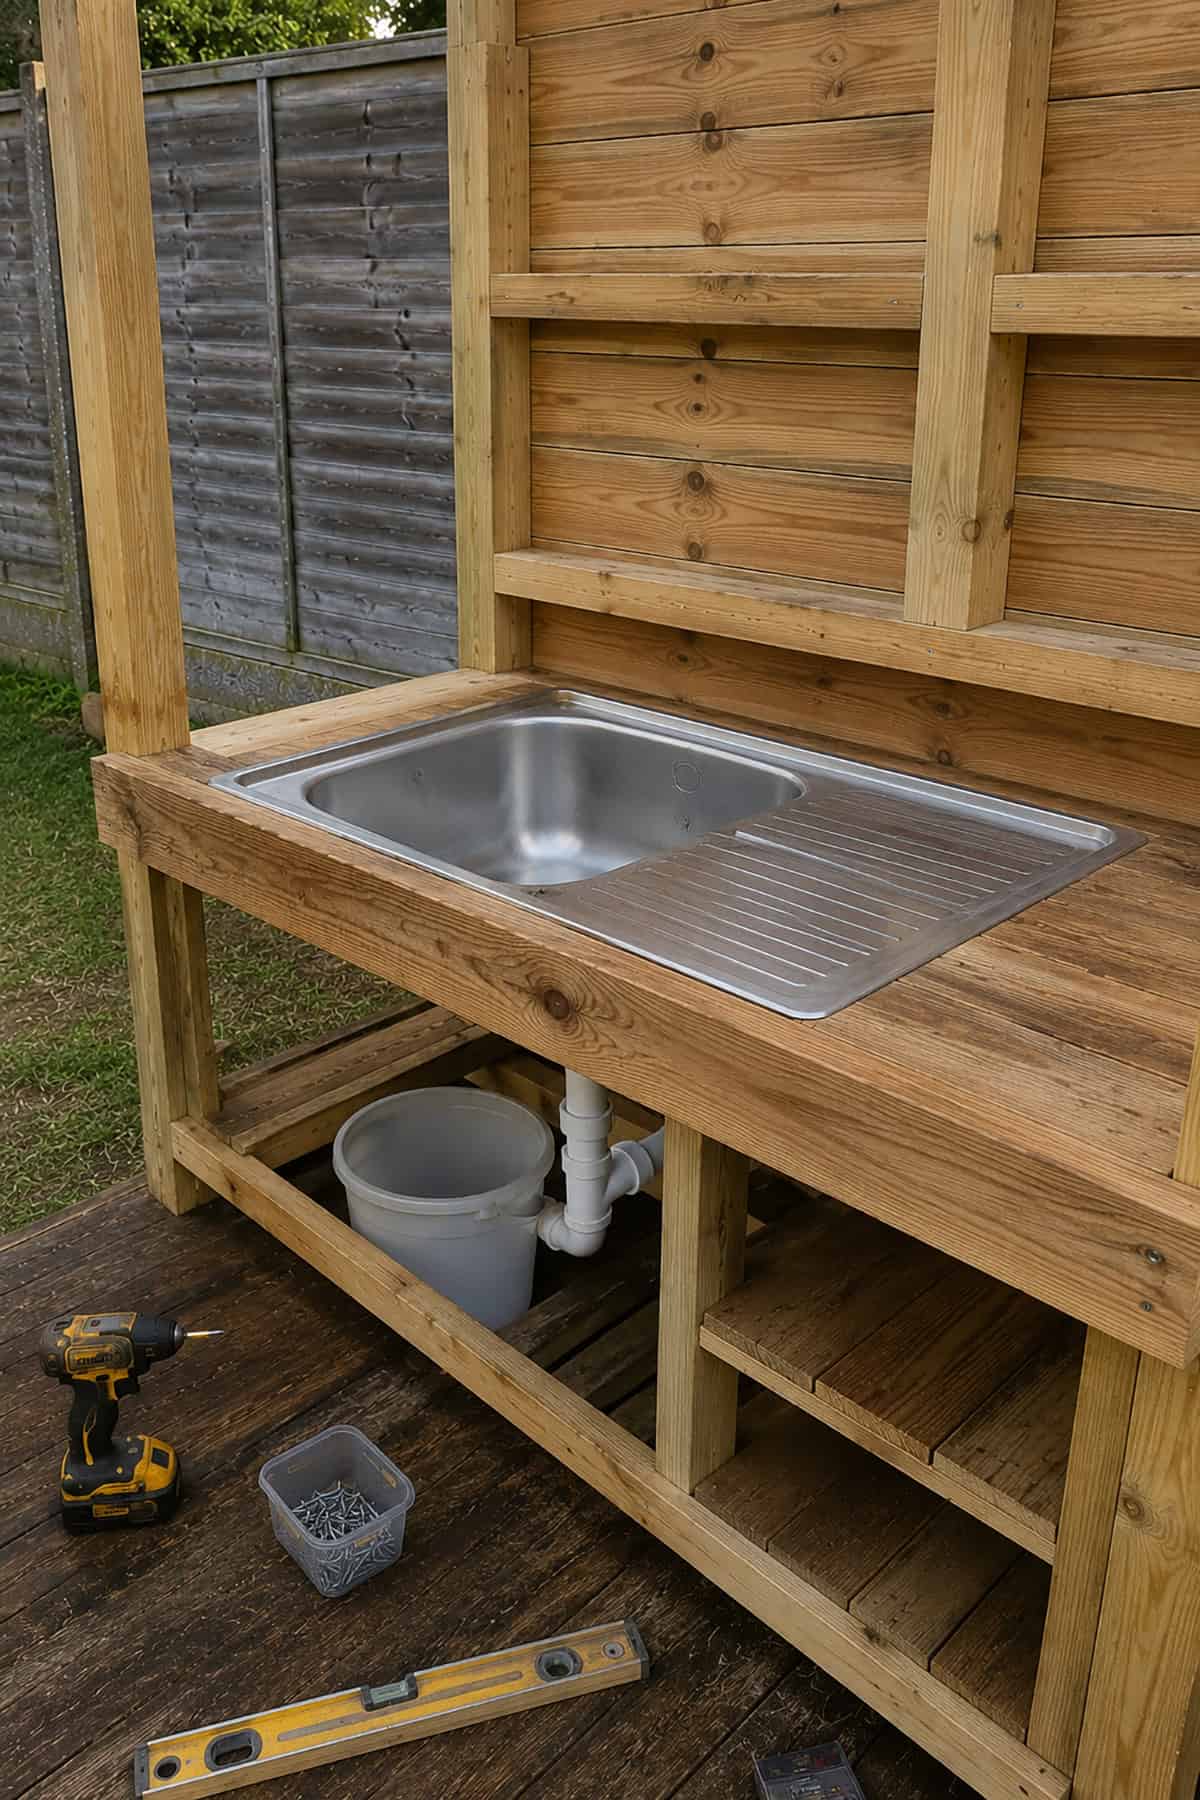
Daily use and messy play put the sink counter through its paces, so it’s worth making this part both sturdy and easy to wipe down. Cedar fence boards work well across the top frame, but leave a cutout for the sink tub—no sense in blocking the fun.
If your frame already outlines the sink, trim boards to fit snugly around that space. Lining up boards from the sink opening and working outward helps keep any gaps looking intentional, not sloppy.
Deck screws (1.25-inch) hold everything in place, but don’t overdo it—just recess the heads a bit so they don’t snag little fingers.
Once all the boards are down, get sanding. Focus on those sink edges, the corners up front, and anywhere hands will land again and again. A smooth counter is way easier to keep clean, and honestly, it just feels better to use.
Step 7: Build The Mud Mixing Station
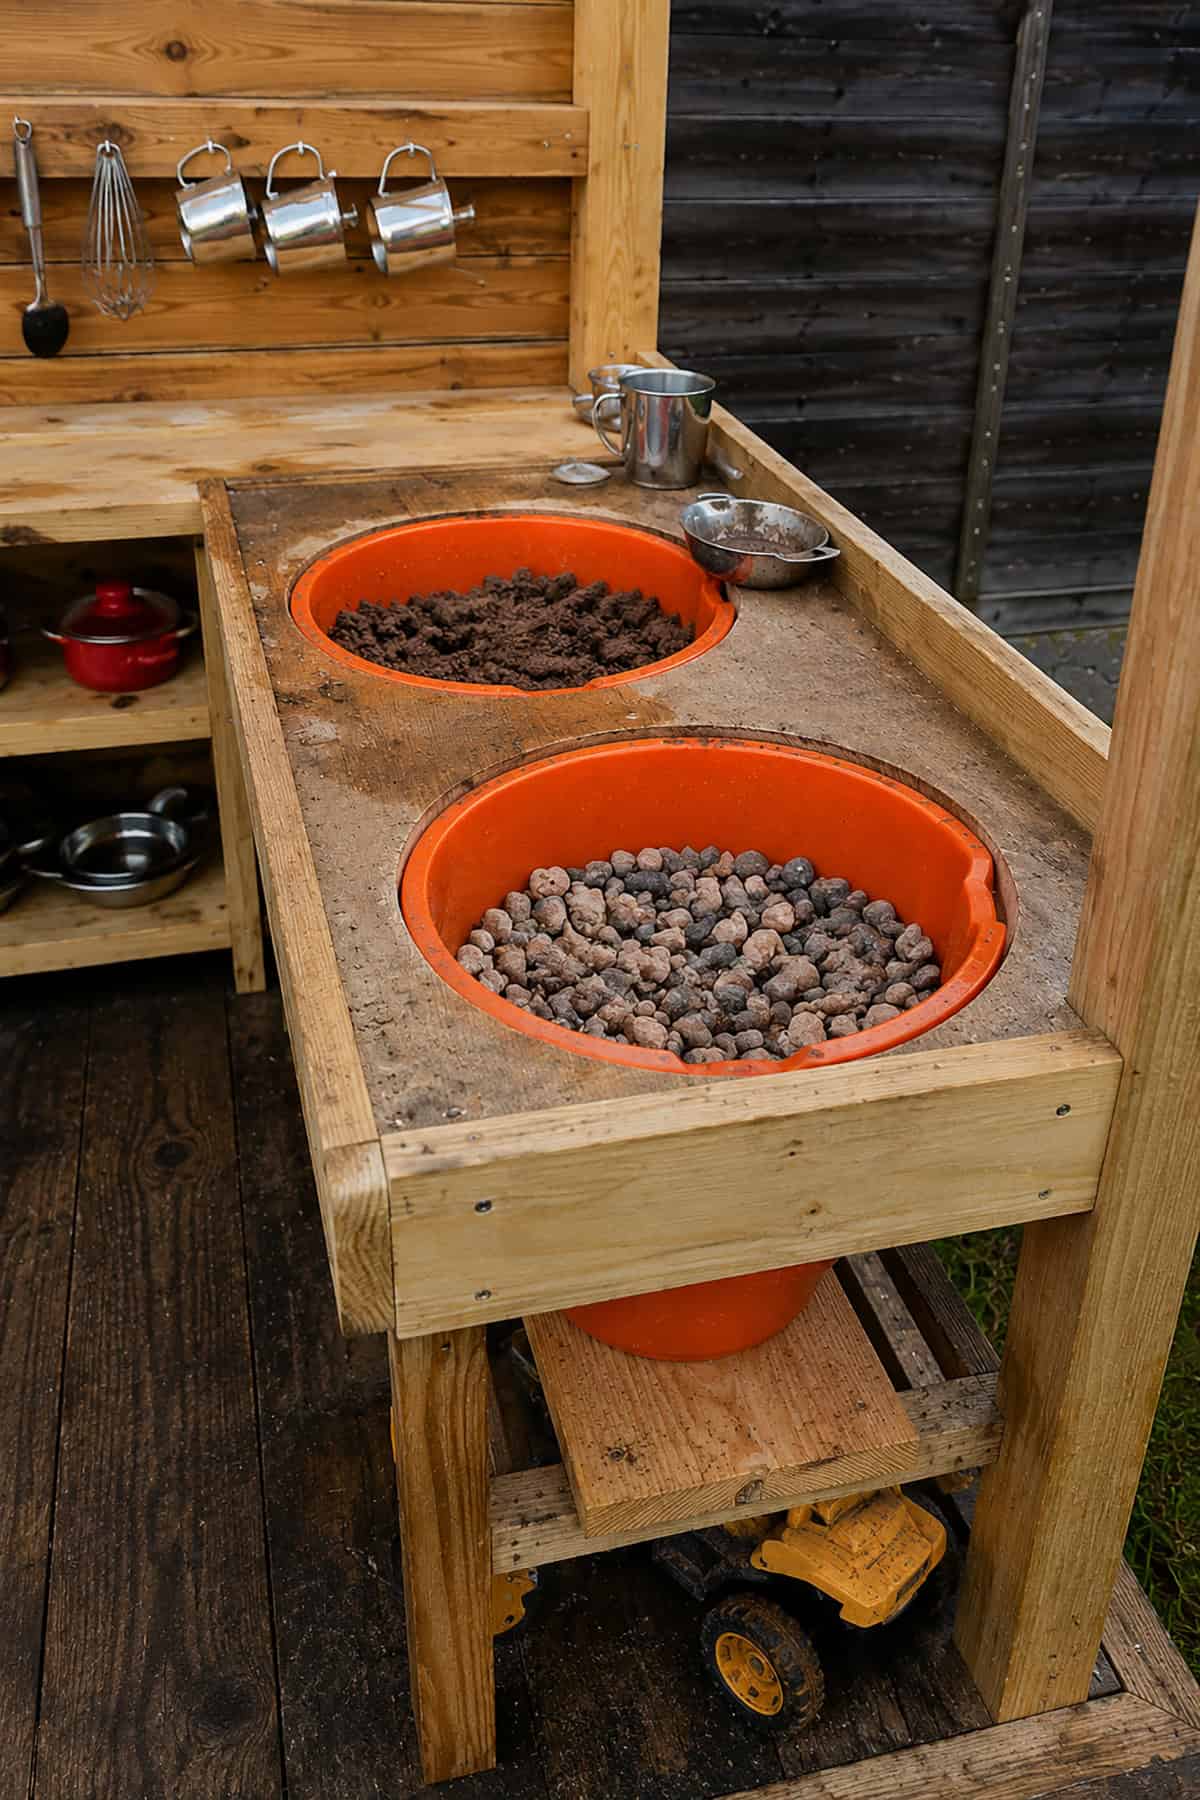
The real action happens at the mixing station—this is where mud pies, leaf stews, and whatever wild concoctions kids invent come together. That spot next to the sink? Perfect for all the messiest experiments.
Reserving a section of counter for mixing gives kids room to spread out. Some folks add a removable bowl for dry stuff like pebbles or seeds, but leaving it open works too—less to clean, more flexibility.
Often, a practical setup means water access on one end, a clear workspace in the middle, and maybe a bowl or tray for ingredients on the far side. If you want to sketch pretend burners, do it after sanding but before sealing—just keep it minimal so cleanup stays simple.
Honestly, the best mixing stations leave space for buckets, muffin tins, and whatever treasures the kids drag over from the yard. Overcrowding with built-ins usually backfires.
Step 8: Add Shelves And Storage
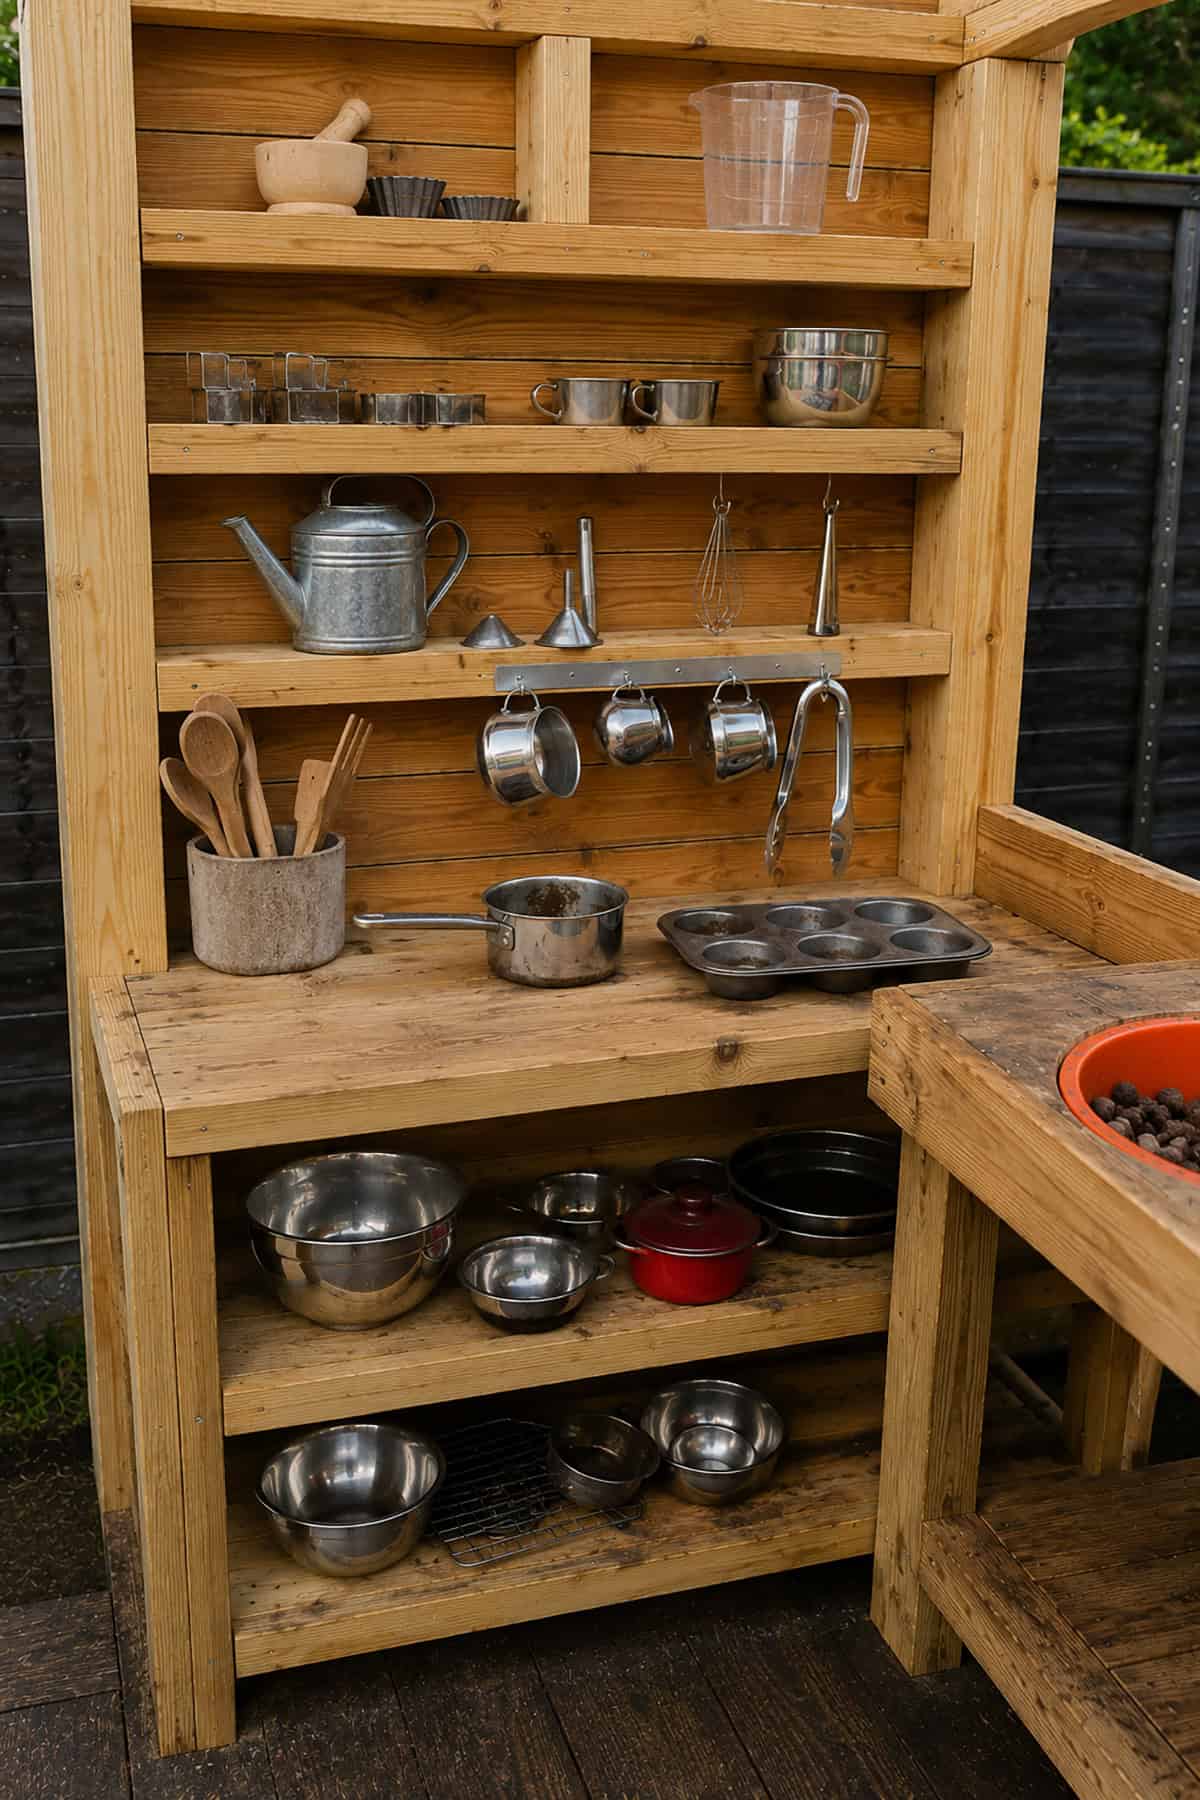
Without storage, cleanup turns into a headache fast. A lower shelf gets my vote first—it’s a quick win for keeping pots, bins, and random kitchen gear off the ground and out of puddles.
Build a basic frame between the legs about six inches up, then lay cedar boards with small gaps for drainage. That’s usually enough for most families.
Some folks go further: a skinny shelf on the back wall, side shelves for little jars, or even baskets underneath. A shallow rack for cups can be handy, but don’t let it block play space. Just make sure anything low stays above standing water—otherwise, you’re replacing boards way too soon.
Step 9: Install Hooks And Hanging Utensils
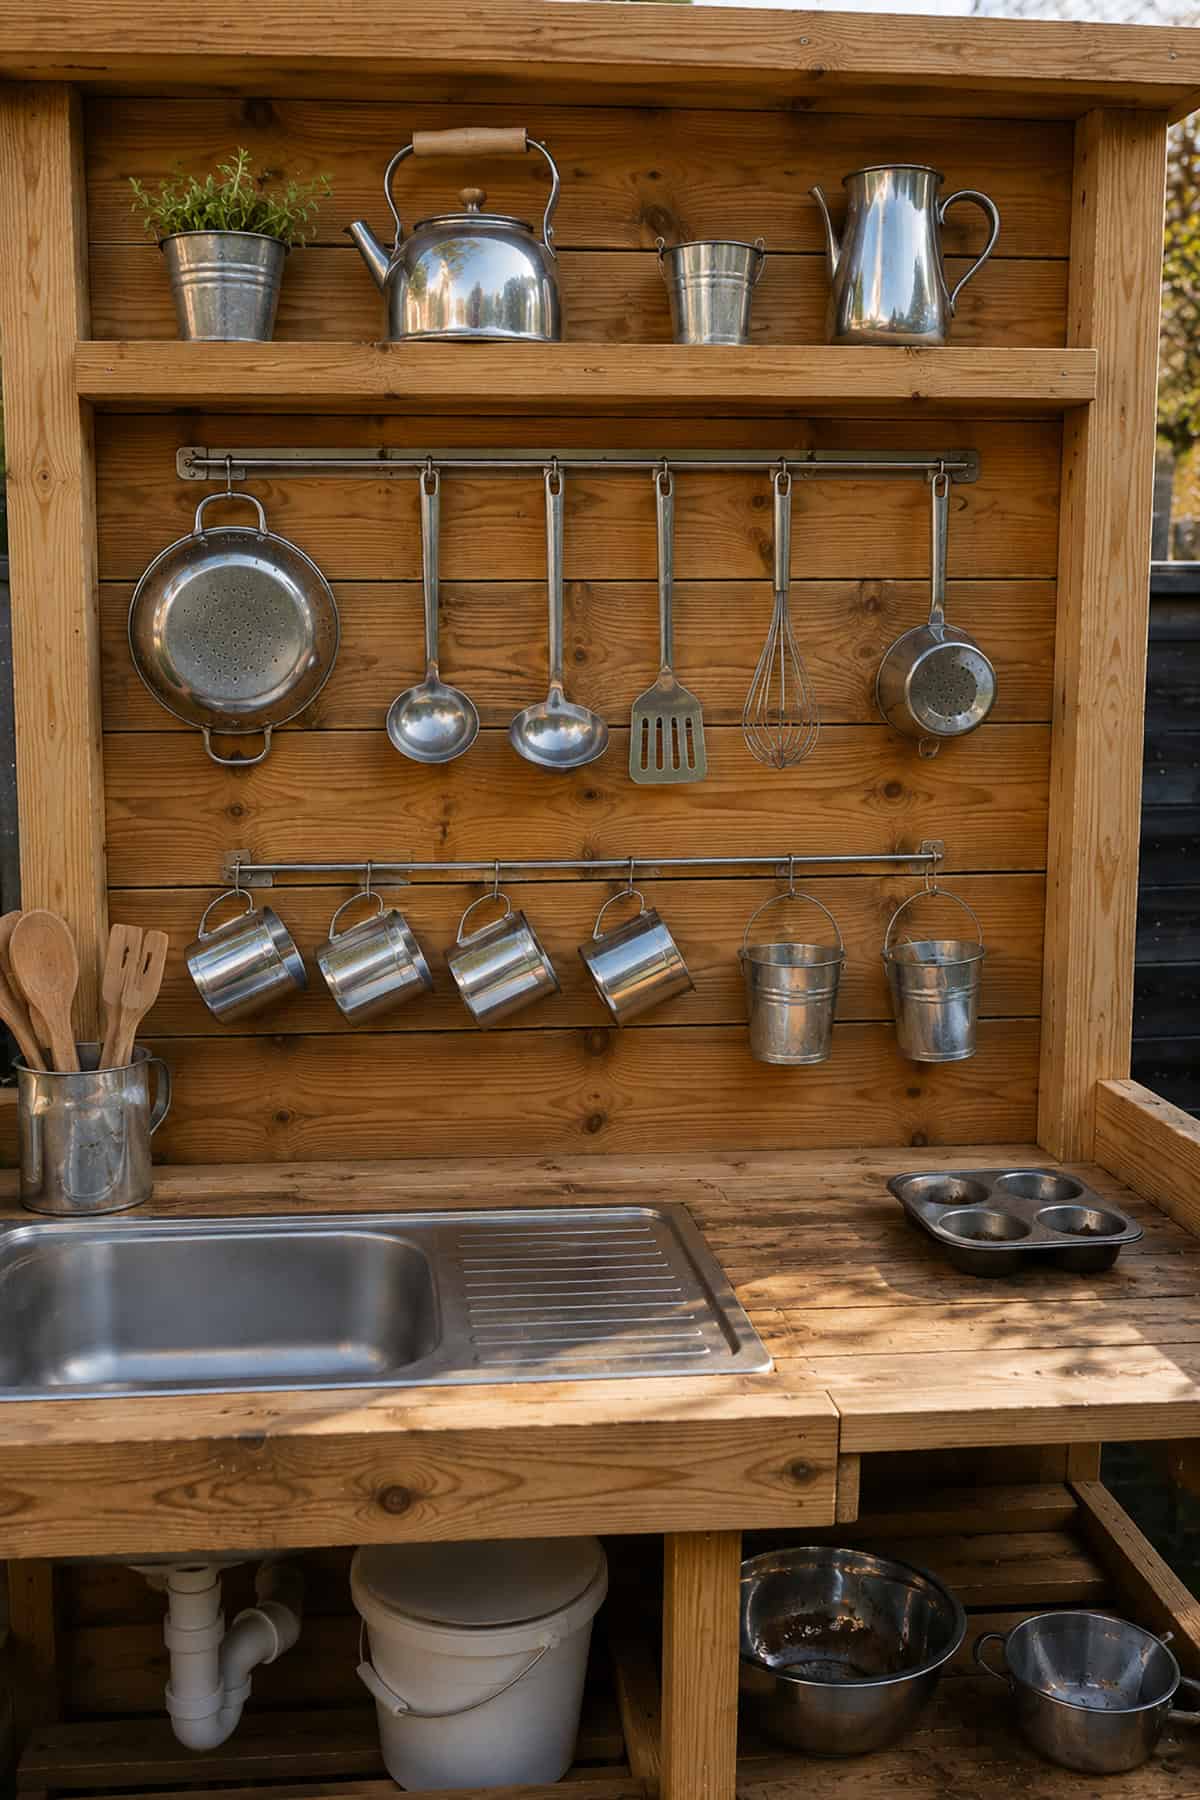
Hooks instantly make the kitchen more functional. Spoons, ladles, and strainers stay off the counter, ready for action and less likely to vanish in the grass.
Mount hooks on the backsplash or tuck them under an upper shelf. Give utensils enough elbow room so they don’t tangle. For younger kids, keep everything within easy reach—independence is half the fun.
Screw-in cup hooks, small utility hooks, or short peg rails all do the trick. Hanging wire baskets can be great for corralling odds and ends, but stick with lightweight tools. Thrift store finds are perfect, just skip anything sharp or heavy enough to thump a toe.
Step 10: Sand And Seal The Wood
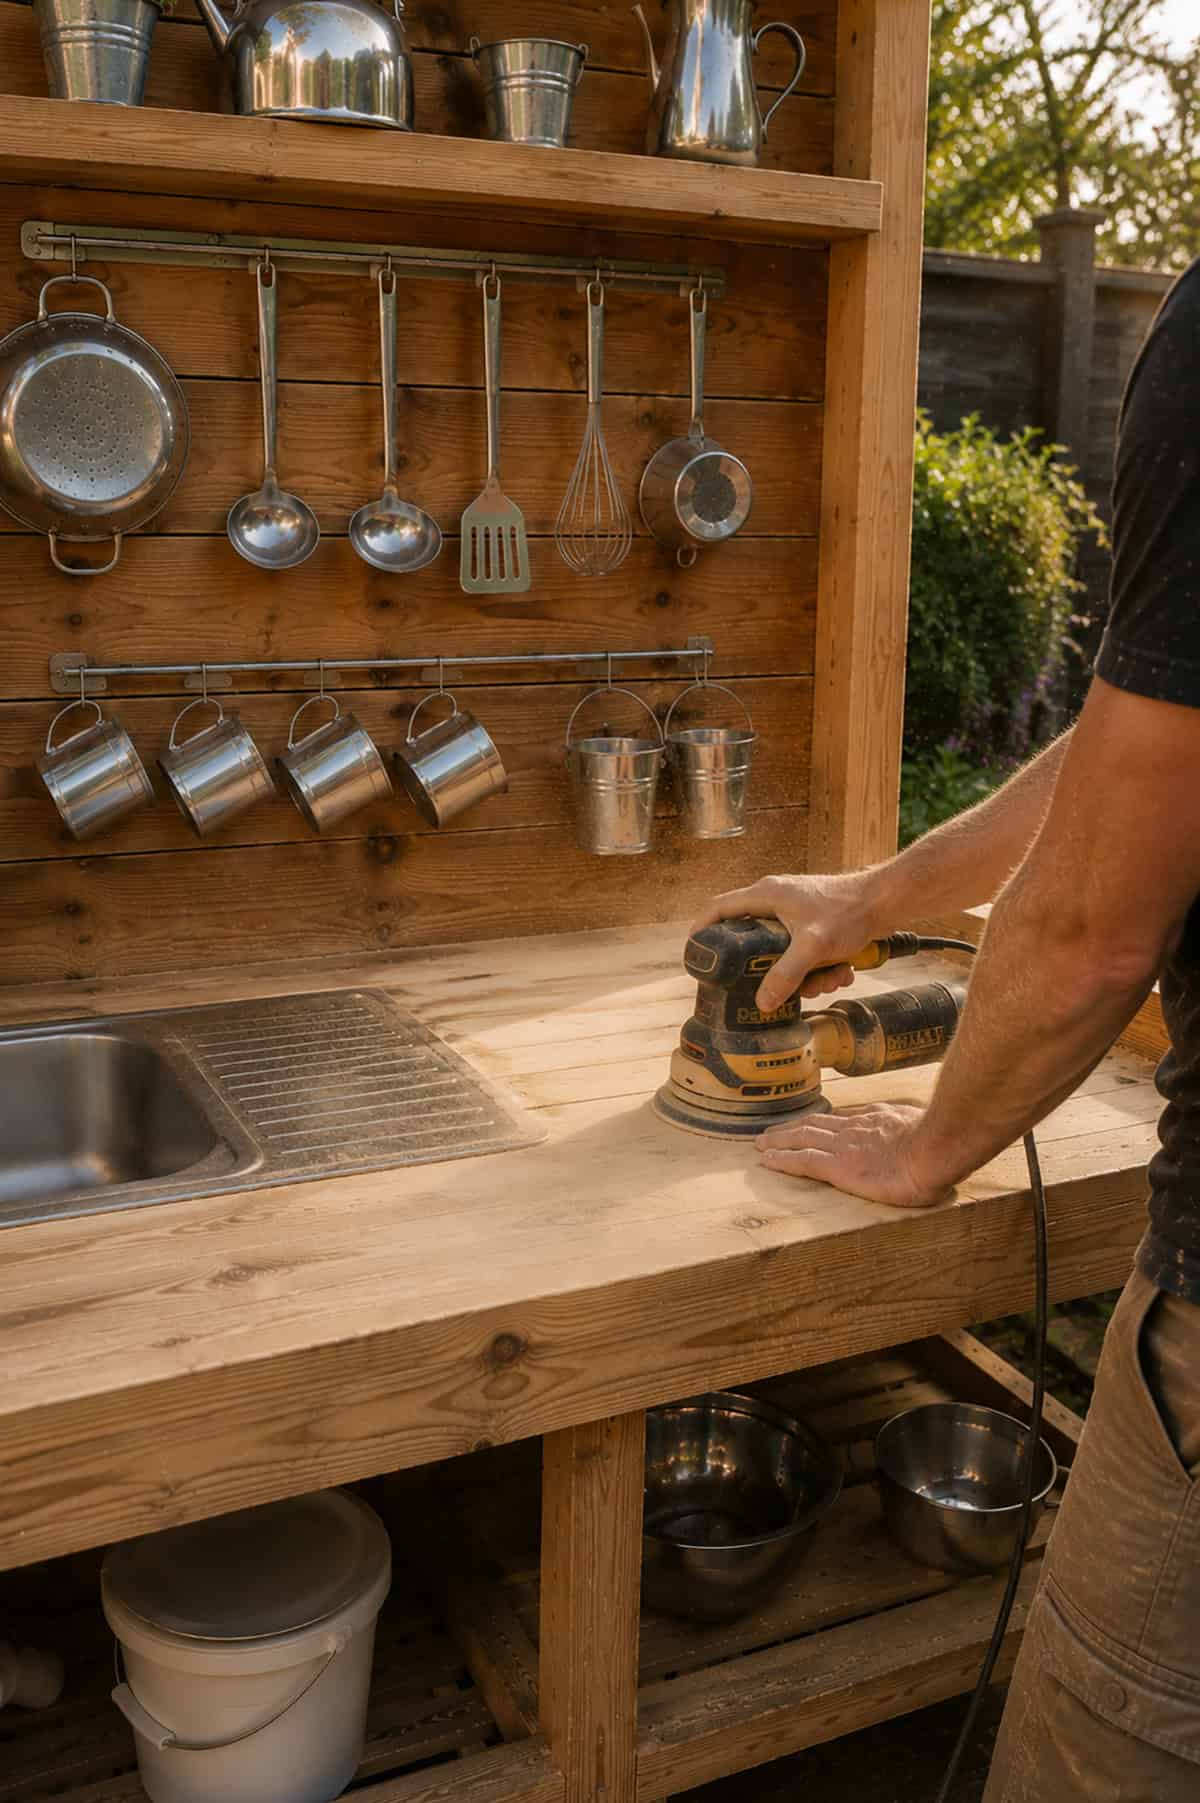
Skipping sanding and sealing is asking for trouble—splinters and soggy boards show up fast. Cedar boards are usually rough out of the package, so start with 80-grit sandpaper if needed, then switch to 120-grit for a smoother finish. Don’t forget the corners, shelf edges, and around the sink opening.
Once you’re done sanding, brush away dust and coat everything with an exterior-grade sealant or stain. Pay special attention to the counter, sink edges, end grain, and anywhere water pools. Leg bottoms and shelf surfaces need it too.
If you painted on burner circles or labels, seal those as well once they’re dry. Let all finishes cure fully—waiting an extra day is usually worth it, especially if it’s humid or hot outside.
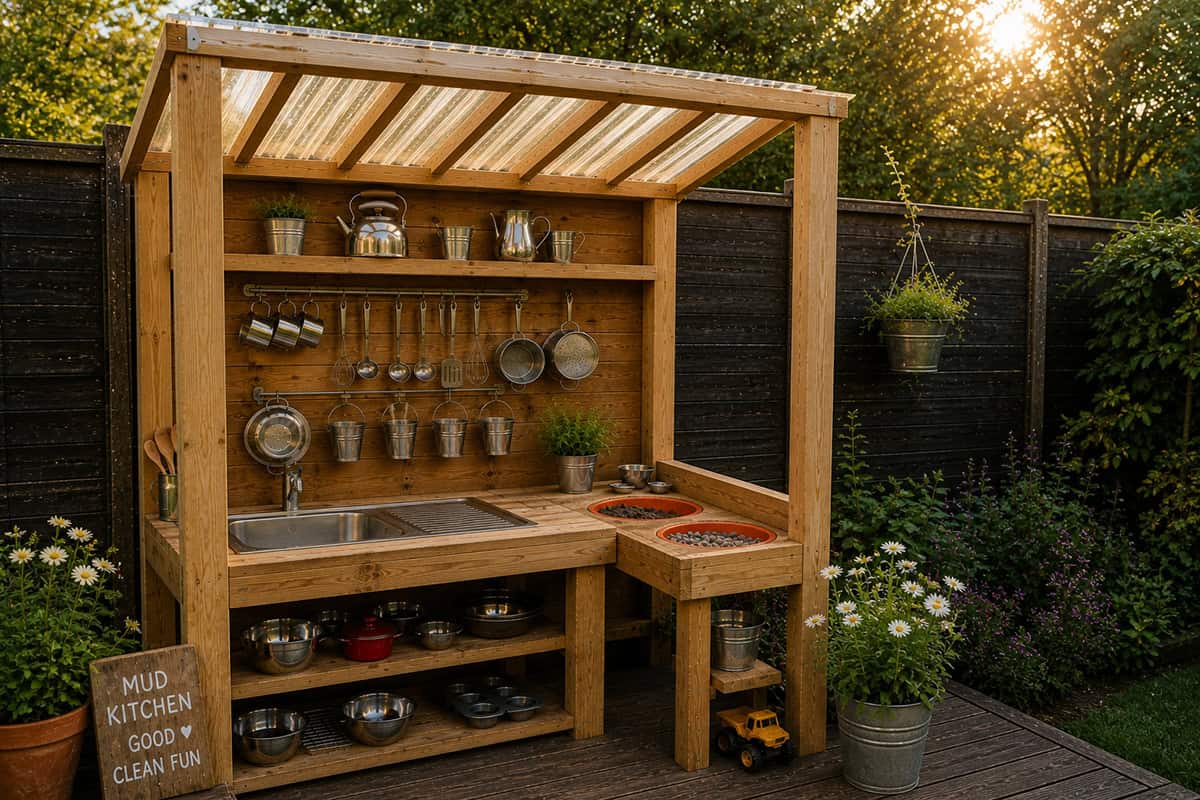
Finished DIY Mud, Kitchen Reveal
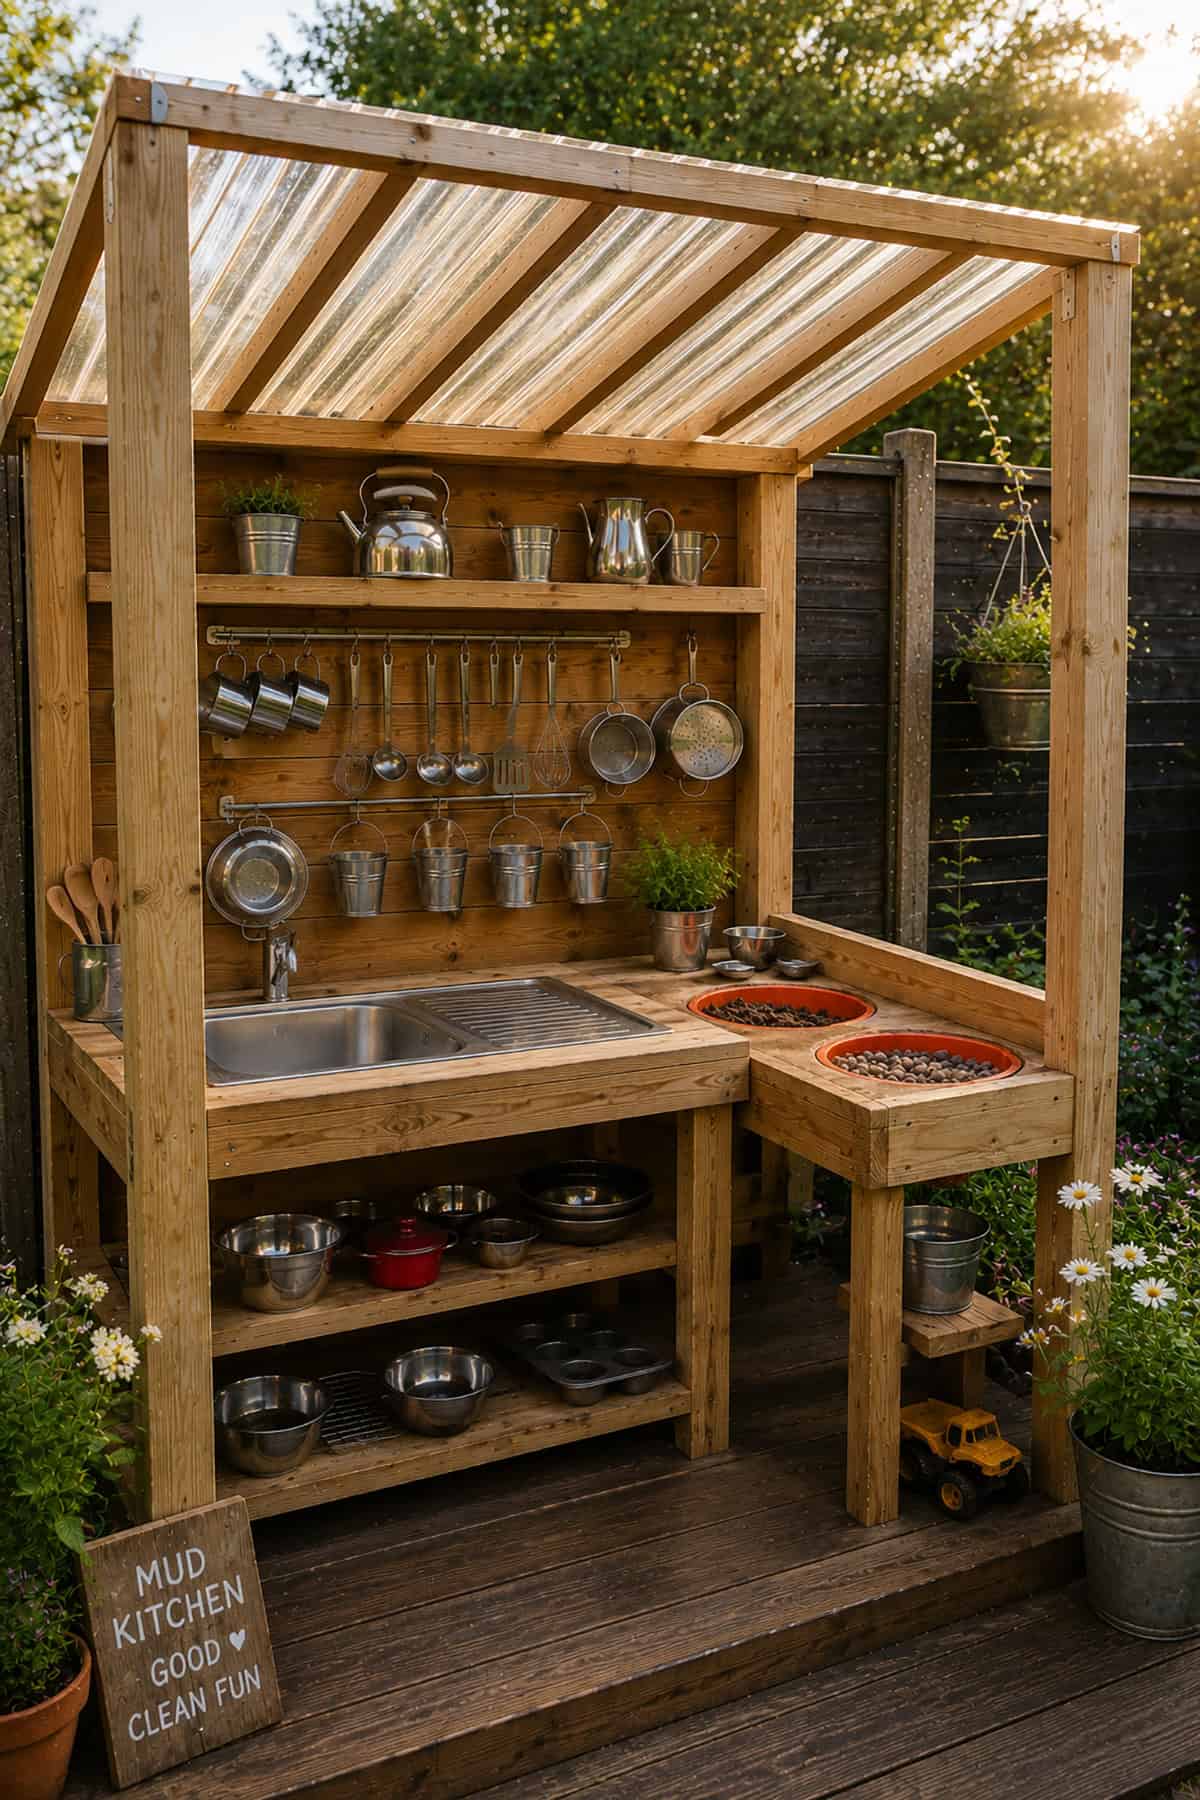
With the last screw in and the finish dry, you’ve got a mud kitchen that can handle daily chaos. Framed base, sturdy sink counter, slanted roof, shelves, and hooks—it’s all ready for whatever the kids dream up.
A quick check before calling it done: does it wobble when you push it? Any sharp edges or splinters? Sink sitting tight? Roof angled enough to drain? Screws flush? If yes, you’re set.
Now toss in a few kitchen tools, step back, and let the kids invent their own recipes. The first creations? Usually a muddy mix of water, grass, dirt, and whatever else is handy. That’s the magic.
Mud Kitchen Accessories To Add
Accessories can make play richer without turning the whole kitchen into a cluttered mess. Just a few well-chosen extras go a long way for water play, storage, and pretend cooking.
Chalkboard Menu
Mounting a chalkboard on the backsplash gives kids a spot for recipes, prices, or whatever the “special” is today. Paint a section with exterior chalkboard paint, or hang a framed board—just keep it away from splash zones.
Water Dispenser
Adding a water dispenser saves trips to the hose and lets kids control the flow. A beverage jug with a spout or an elevated container draining into the sink works well—no plumbing required.
Herb Planters
Herb planters off to one side bring scent and texture into the mix. Mint, rosemary, basil—these are tough enough for outdoor play. If you go with edible herbs, make sure kids know the tasting rules.
Hanging Baskets
Wire baskets hung nearby are perfect for stashing pinecones, cups, or other loose parts. They drain well and survive rain better than fabric bins. Just anchor them so they don’t swing into the play zone too much.
Outdoor String Lights
String lights can turn the kitchen into a cozy spot for late-afternoon play, especially in a shaded corner. Hang them high and out of reach, and only use outdoor-rated sets. Hide cords where curious hands can’t tug them loose.
Best Wood For Outdoor Mud Kitchens
Cedar stands out for outdoor mud kitchens—it shrugs off rot, handles moisture, and isn’t too heavy for a DIY project. Redwood’s good too, if you can get it locally.
Pine is cheap and easy to find, but it demands extra sealing and more upkeep. Pressure-treated lumber works well for the frame or anything touching the ground, but I’d stick to cedar for the surfaces kids touch most.
Untreated wood is fine for a short-term build, though it won’t last as long in the weather. If you go that route, sealing thoroughly and keeping the legs out of puddles is key.
Most folks end up with cedar 2x4s for structure, cedar fence boards for tops and shelves, exterior screws, and a solid sealant. That mix holds up, looks good, and doesn’t need constant maintenance.
How To Waterproof A Mud Kitchen
Waterproofing starts with smart design—think roof, drainage gaps, and legs that stay above soggy ground. That way, the kitchen dries out quickly after rain or a wild day of play.
For the wood itself, sand first so the finish sticks. Use a weatherproof stain, sealer, or outdoor oil. Two or more coats on the counter and sink area won’t hurt. Seal any exposed end grain and screw holes if you can, and plan to recoat high-traffic spots as they wear.
For counters that see constant water and mud, a tougher topcoat like exterior polyurethane can help—just let it cure as long as the label says, or maybe a bit longer if it’s humid.
Check the finish a couple times a year. If water stops beading or the wood looks dry, it’s time for another coat. That bit of upkeep keeps the kitchen looking good and feeling safe for a lot longer.
Mud Kitchen Safety Tips
Sturdy construction matters more than you might think—no one wants a wobbly setup or splinters mid-play. Problems usually sneak in through rough-cut boards, sketchy screws, or random sharp bits left where little hands can find them.
Some basics to keep in mind:
- Take the time to sand every surface, and don’t forget to round off corners that could jab
- Drive screws all the way in and double-check for any that might poke through
- Level things out or anchor the kitchen if your ground isn’t flat
- Toss out utensils that look rusty, cracked, or could cut
- Pick a non-toxic finish (and let it cure completely before playtime)
- Give it a once-over now and then for splinters, wiggly boards, or splits
- Dump standing water from tubs—mosquitoes love the stuff
- Stick around when little ones are getting especially muddy or splashy
Messy, tactile play like this does more than entertain—it’s a sneaky way to sharpen fine motor skills. Scooping, pinching, stirring, and pouring keep kids busy and learning, all while their hands get gloriously dirty.