A fairy garden doesn’t need a big yard or a complicated plan. A pot, a patch of soil, or even a wooden box can become a dreamy escape filled with tiny details. Explore these 33 fairy garden ideas to spark your creativity and start building.
Table of Contents
- Enchanted Retreats
- Tree-Centric Designs
- Magical Village Scenes
- Creative Planters
- Multi-Level Fairy Garden Planters
- Mini Fairy Garden Bowl with Wildlife
- Garden Guardian with Living Hair Planters
- Upcycled Tire with Decorative Entry Sign
- Mini Fairy Garden On an Elevated Birdbath
- Repurposed Wheelbarrow Fairy Garden
- Large Fairy Garden Pot with Mushroom and Pebble Pathway
- Fairy Garden Built Inside Hollow Log Planter
- Mini Fairy Garden in Rustic Metal Tub
- DIY Fairy Garden Using Colorful Stone Houses
- Tiny Fairy Garden Built Inside a Teacup
- Broken Pot Fairy Garden with Staircase Design
- Enclosed Fairy Garden Inside Glass Jar
- Garden Pot Fairy Scene with Flowers and Cottage
- Stacked Flower Pot Fairy House Tower
- Evening and Fantasy Themes
Enchanted Retreats
Sometimes, the right miniature structure can transform a patch of moss or a shady spot into a scene straight out of a storybook. Bark, stone, and flowers become tiny homes that look like they’ve always belonged.
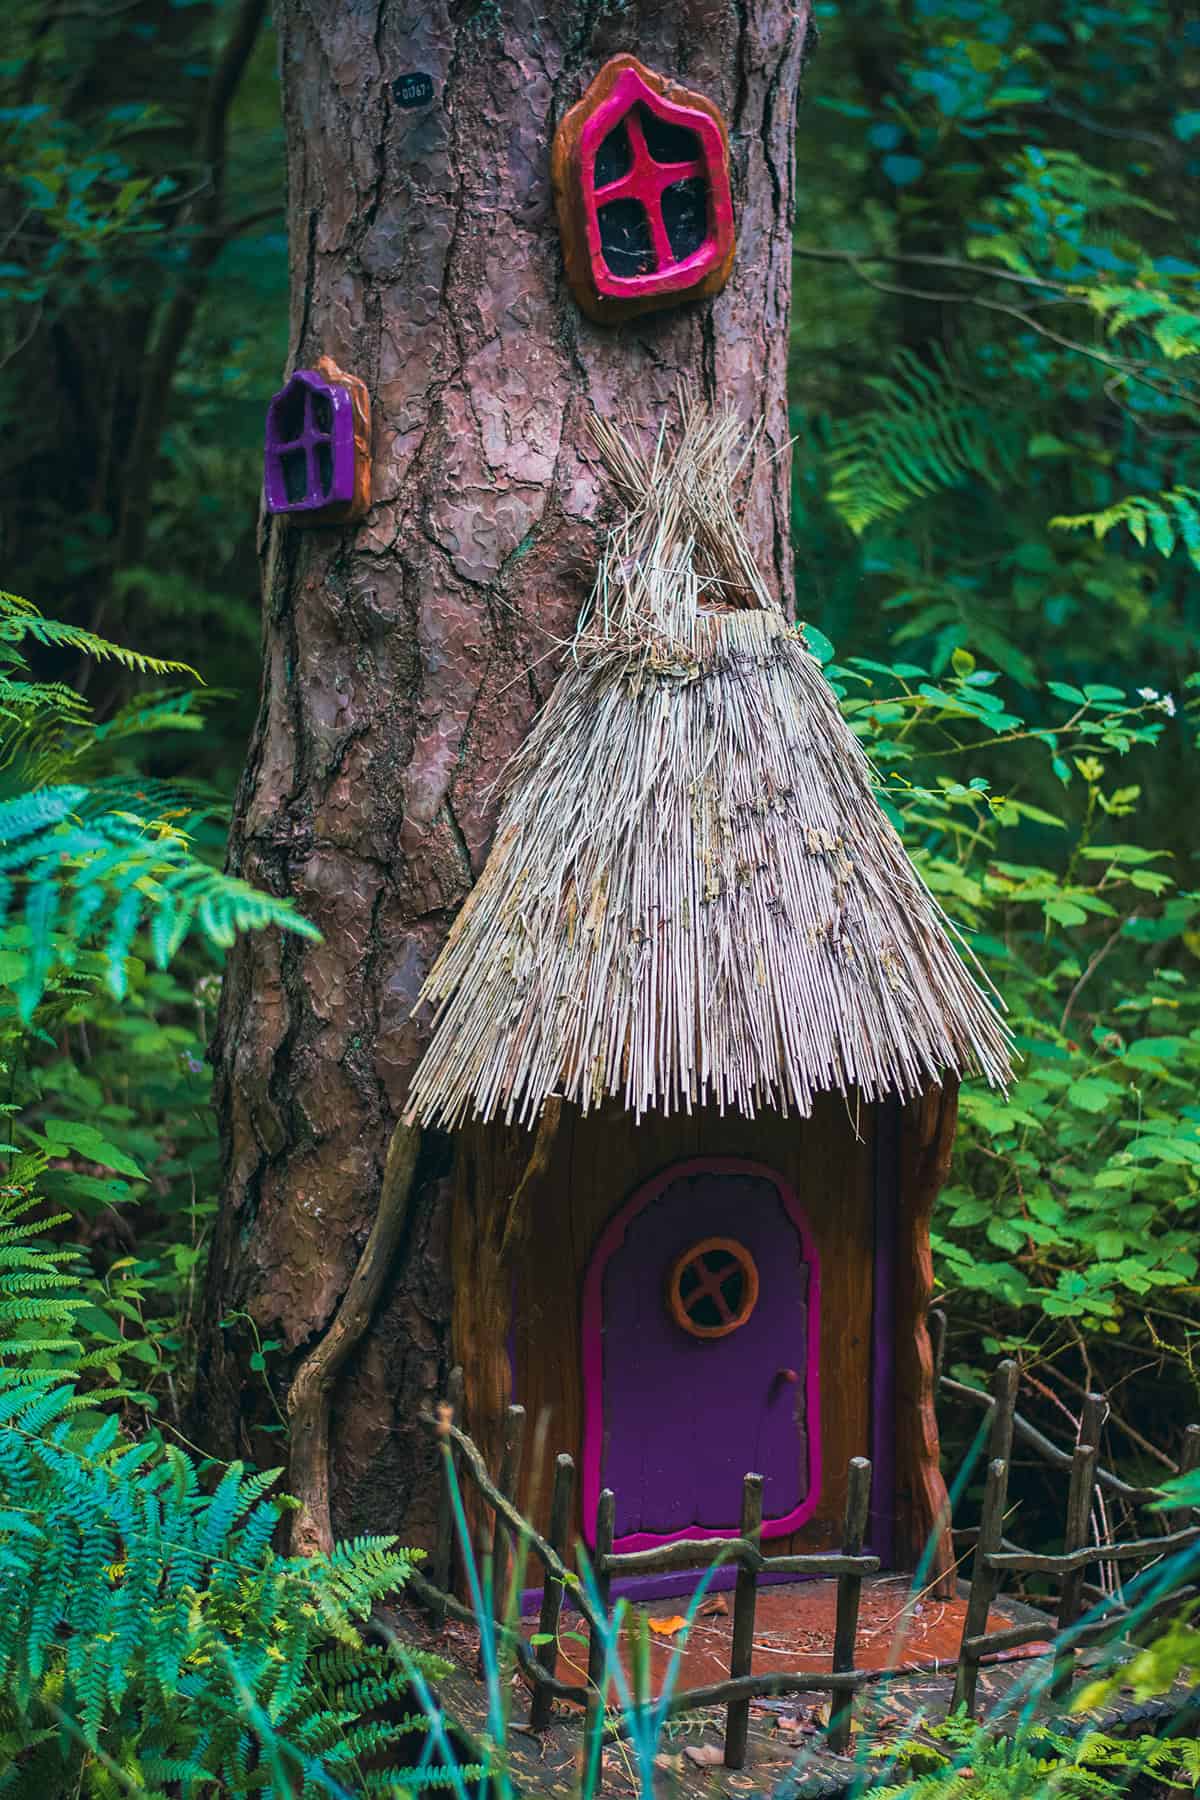
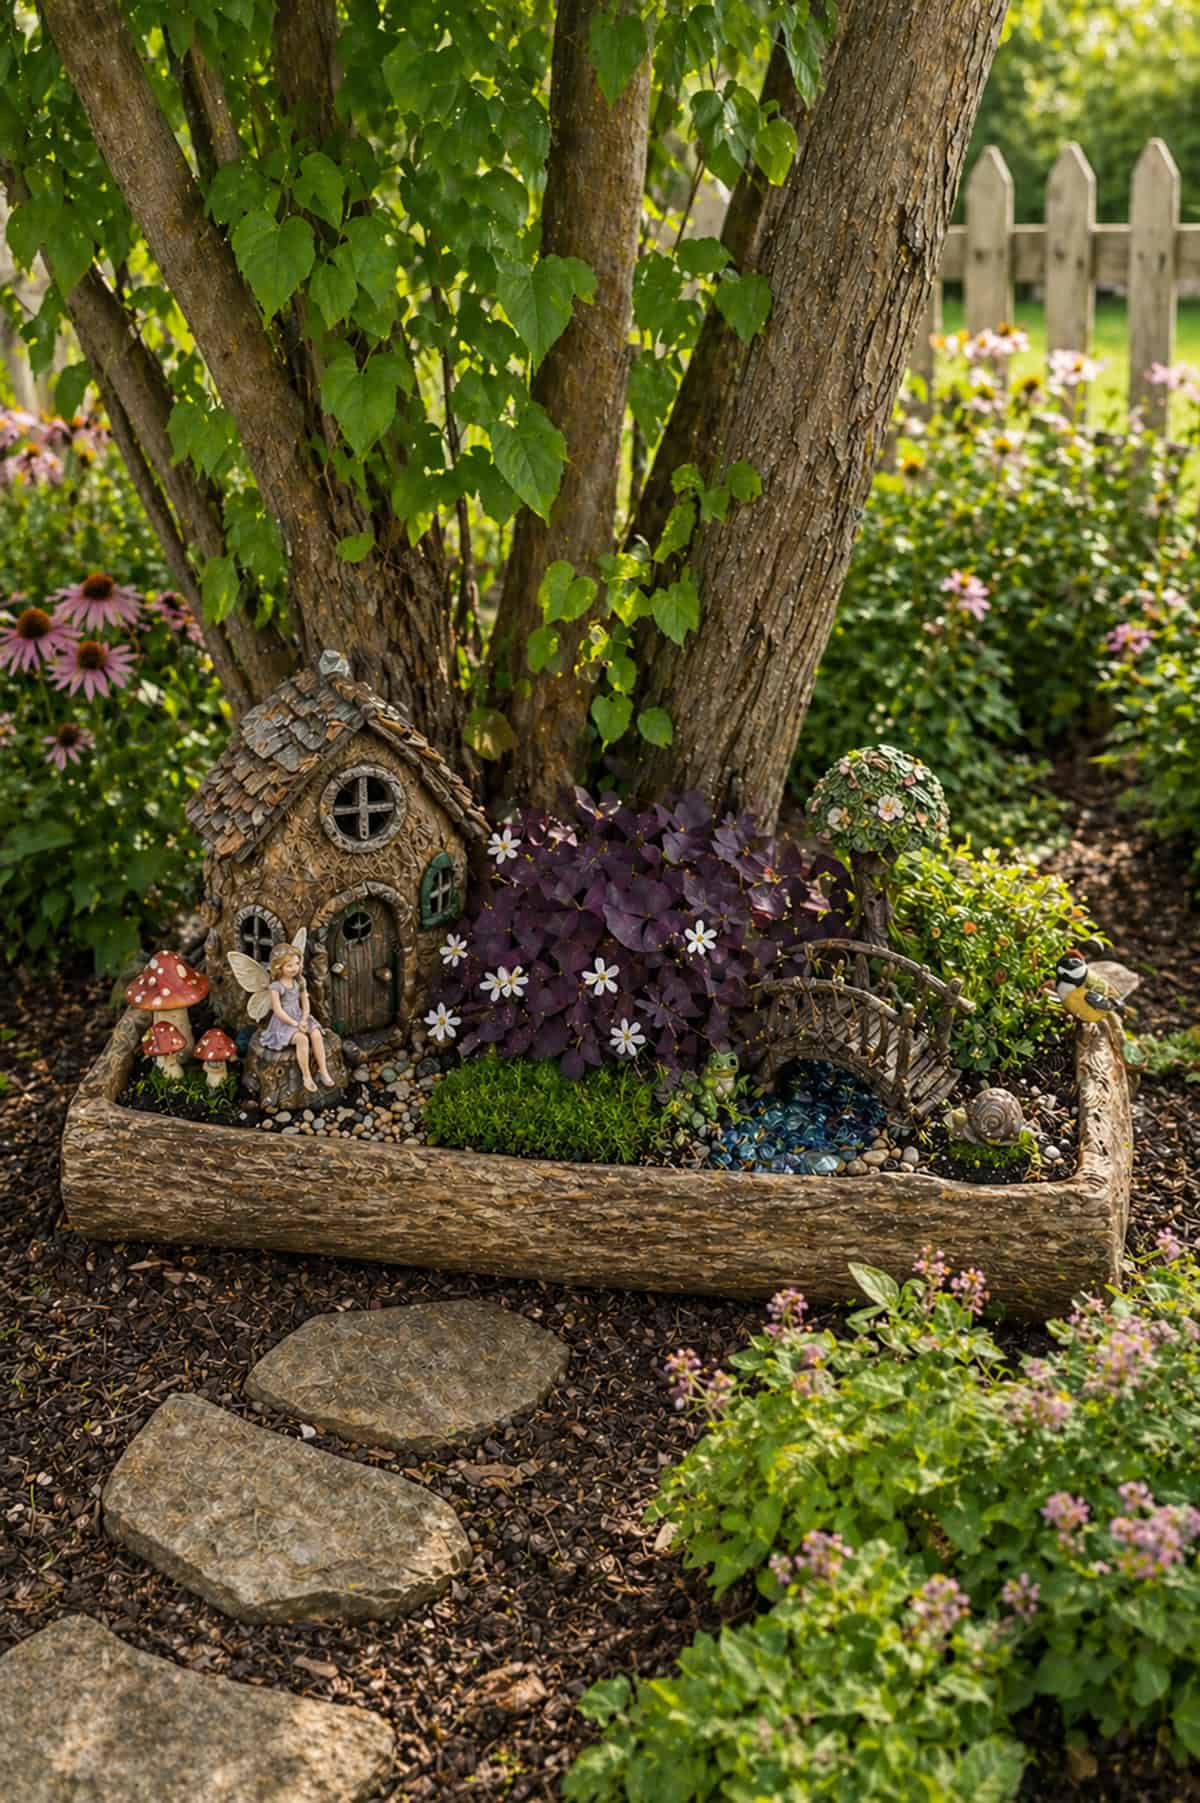
Woodland Fairy House Built into Tree Trunk
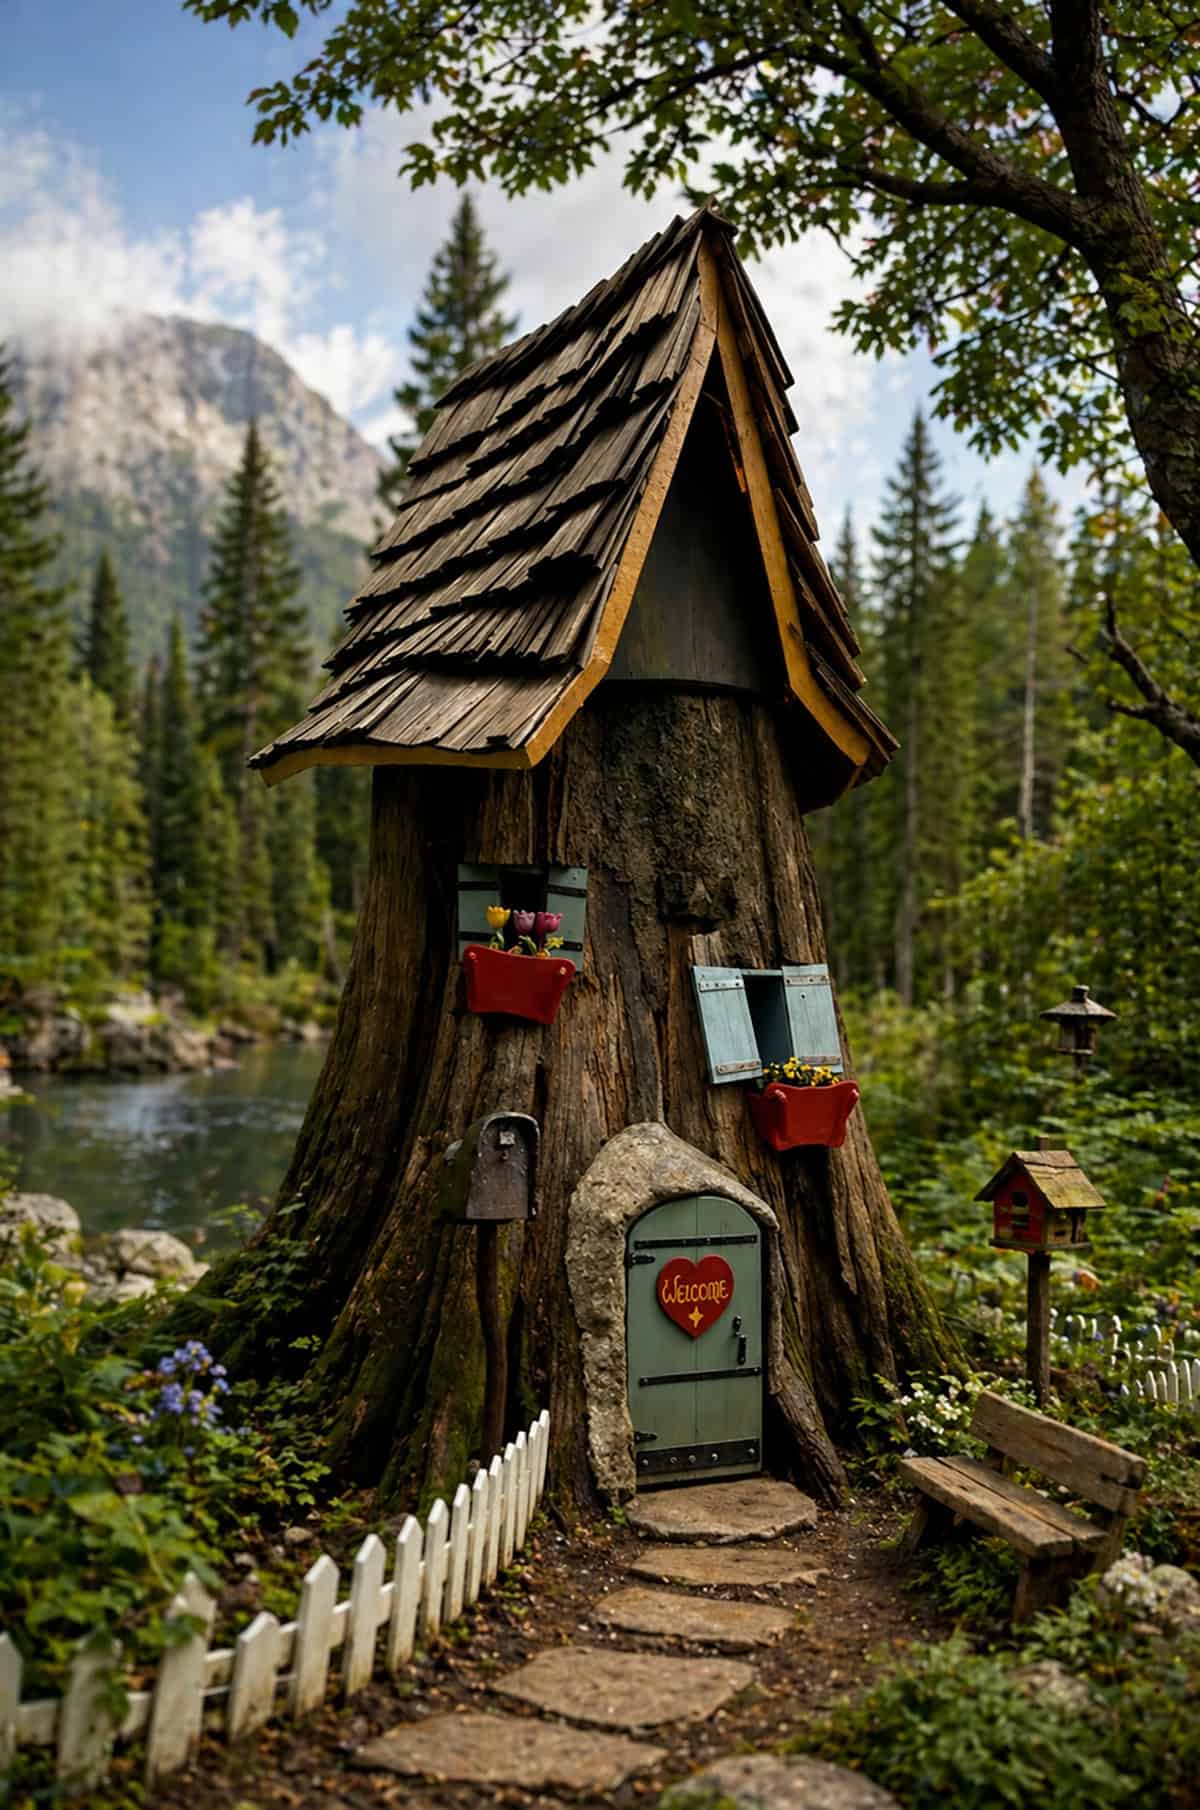
Using a living tree or a weathered stump as the backdrop, you can slip a small fairy door onto a sheltered, dry section. A dab of exterior adhesive usually does the trick.
Mossy edges around the door soften the look, while a pebble path leading up to the entrance draws attention and helps the scale feel right.
Acrylic or colored glass windows tucked into the bark keep things subtle. A nearby bench or a few mushroom stools suggest that someone—or something—might actually stop by.
Don’t forget to check how damp things get. It’s worth sealing decorations so they last through rain and bugs.
Glowing Fairy Village with Mushrooms
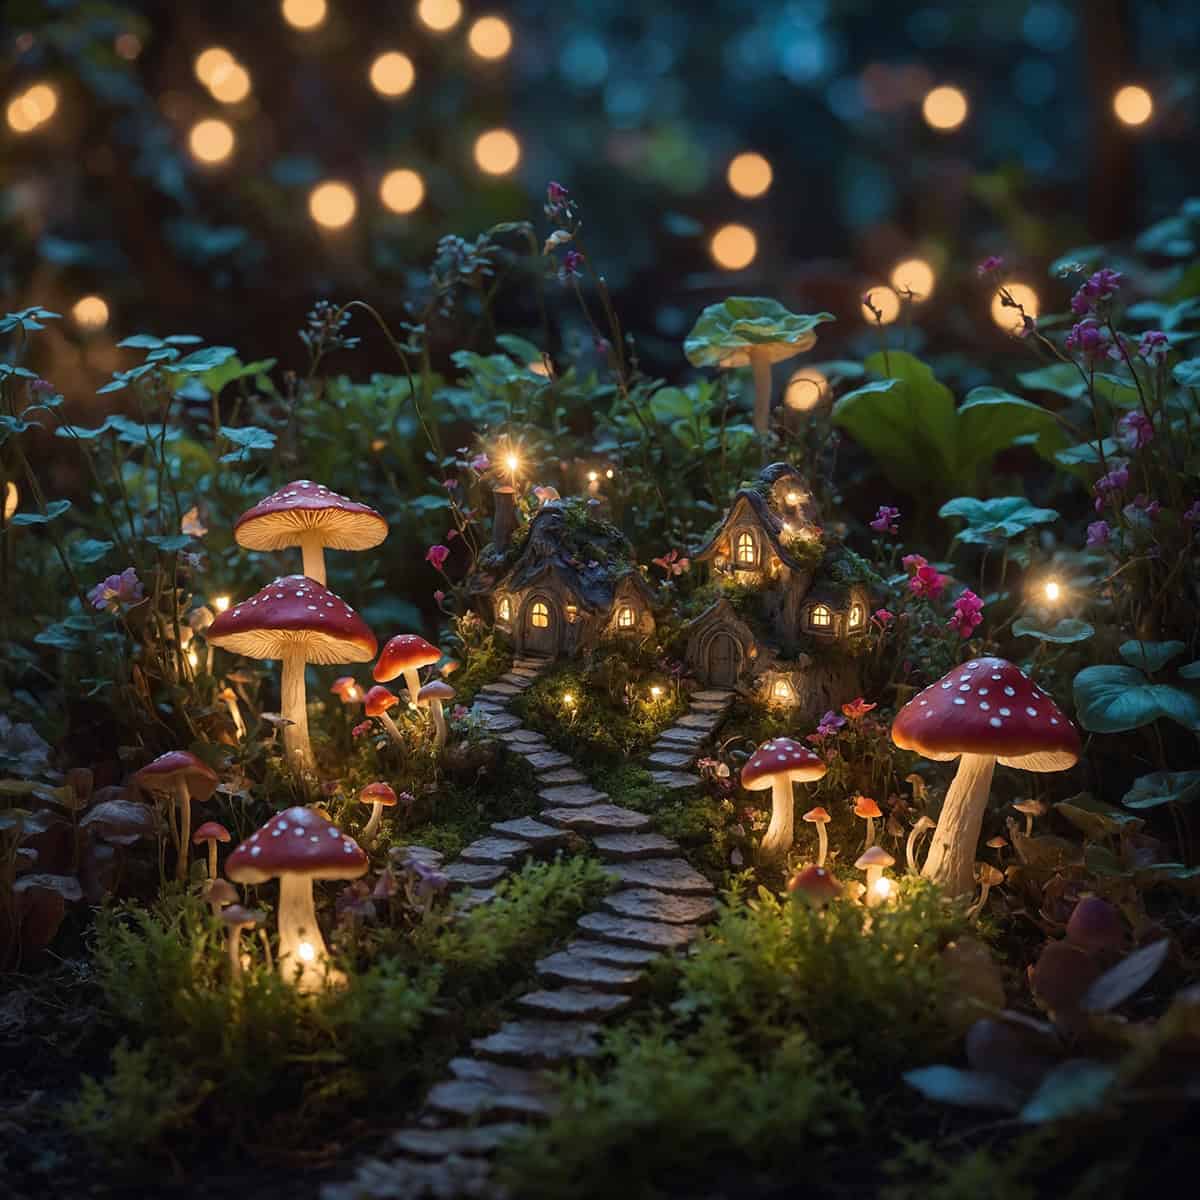
Clusters of tiny houses, each perched at a slightly different height, turn a patch of garden into a lively little neighborhood. A central open space helps the whole thing breathe.
Soft, solar-powered micro lights tucked behind houses or under faux mushrooms add a gentle glow after dark—no blinding spotlights here.
Big mushroom stools, especially in red or soft browns, pop against all that green. A wood-slice table surrounded by these stools hints at a gathering spot.
Stick to low-growing plants like dwarf thyme or Irish moss. They form a lush carpet and let the lighting do its thing.
Mini Stone Fairy Cottage in Garden
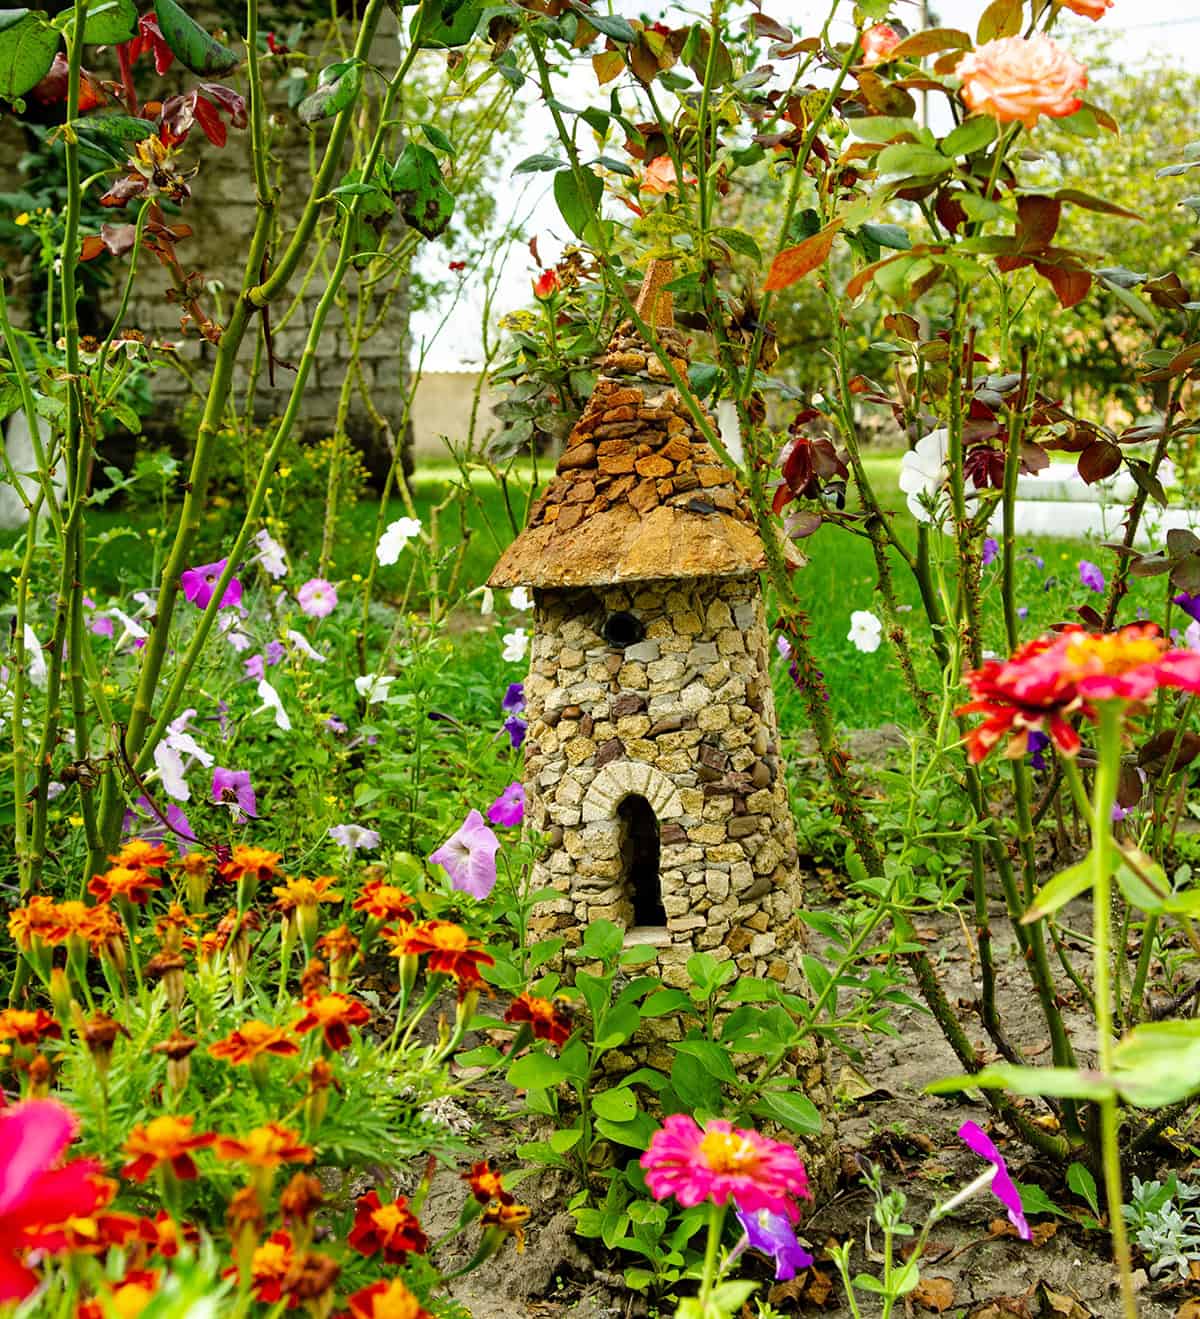
Stone, whether it’s gravel, flat pebbles, or bits of broken terracotta, lends a sense of permanence. Stack them with outdoor mortar into a simple shape—rectangular, round, whatever fits your space.
For the roof, dried grass or coconut fiber gives texture without weighing things down.
Placing the cottage near actual rocks in your yard helps anchor it visually. Moss tucked between stones makes everything look a little older and more settled.
A small stone arch at the entry stands out, especially if you use darker stones for contrast.
Flower-Covered Barrel Fairy Houses
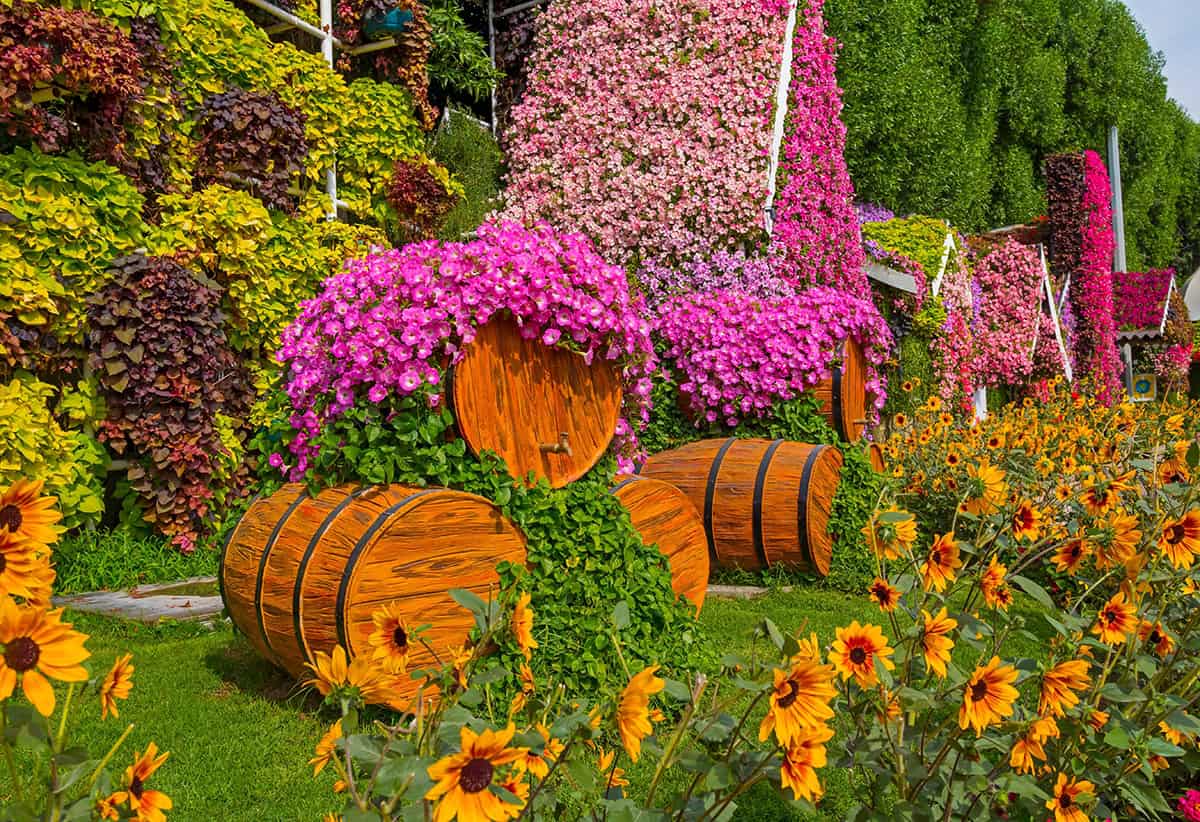
Half barrels or old casks make sturdy bases for fairy homes. Lay one on its side, cut out a door, and you’ve got the start of something fun.
Pile soil into the top and back, then plant trailing flowers like alyssum or calibrachoa so they cascade over the edge—a living roof, basically.
Lightweight shutters and a rounded door hint at a cozy interior. Avoid heavy hardware; it’ll just pull on the wood.
Set the barrel up on bricks for drainage, then ring the base with moss and a short stone path to blend it into the bed.
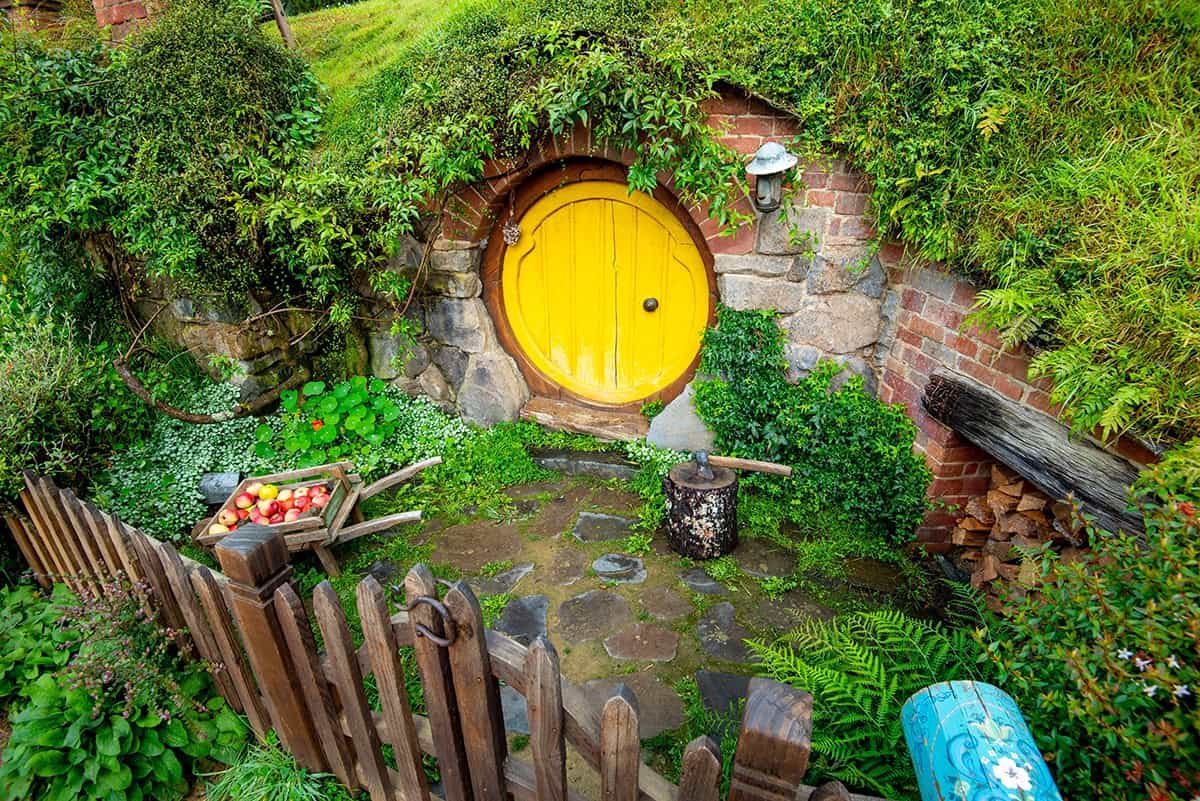
Earth-Covered Hobbit-Style Fairy House in a Hill
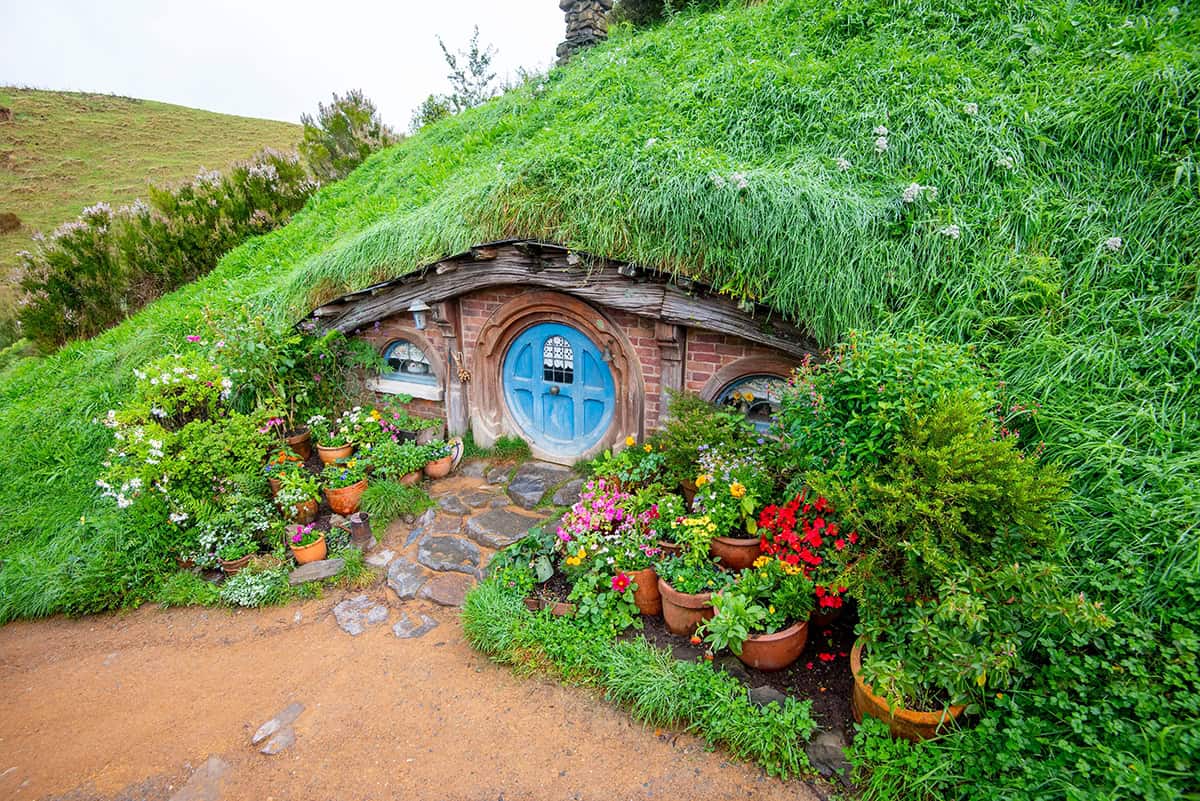
Building a little hill out of packed soil and tucking a fairy cottage inside brings a touch of the Shire to your yard. A dome of plastic or clay under the mound keeps things from collapsing.
Sheet moss or creeping groundcover over the top secures the soil and helps the house blend in.
A round, painted door—green, blue, or red—sets off the earth tones. Flat stone steps lead up, but keep them small so the door remains the star.
Woodland Fairy House Built Into Bark
Vertical bark slabs make a striking backdrop when mounted against a fence or planter wall. Carve a little opening, fit in a pre-made fairy door, and secure it with waterproof glue or tiny brads.
Moss tucked along the seams hides any rough edges. Twigs double as railings or window trim, no fancy tools needed.
Scatter leaf litter, ferns, and a few mushroom stools at the base for that wild, woodland vibe.
Tree-Centric Designs
Sometimes, all you need is a sturdy tree to set the stage. The trunk, bark, and roots give you endless spots to tuck doors, fences, or even a whole vertical garden.
Vertical Fairy Homes on One Tree
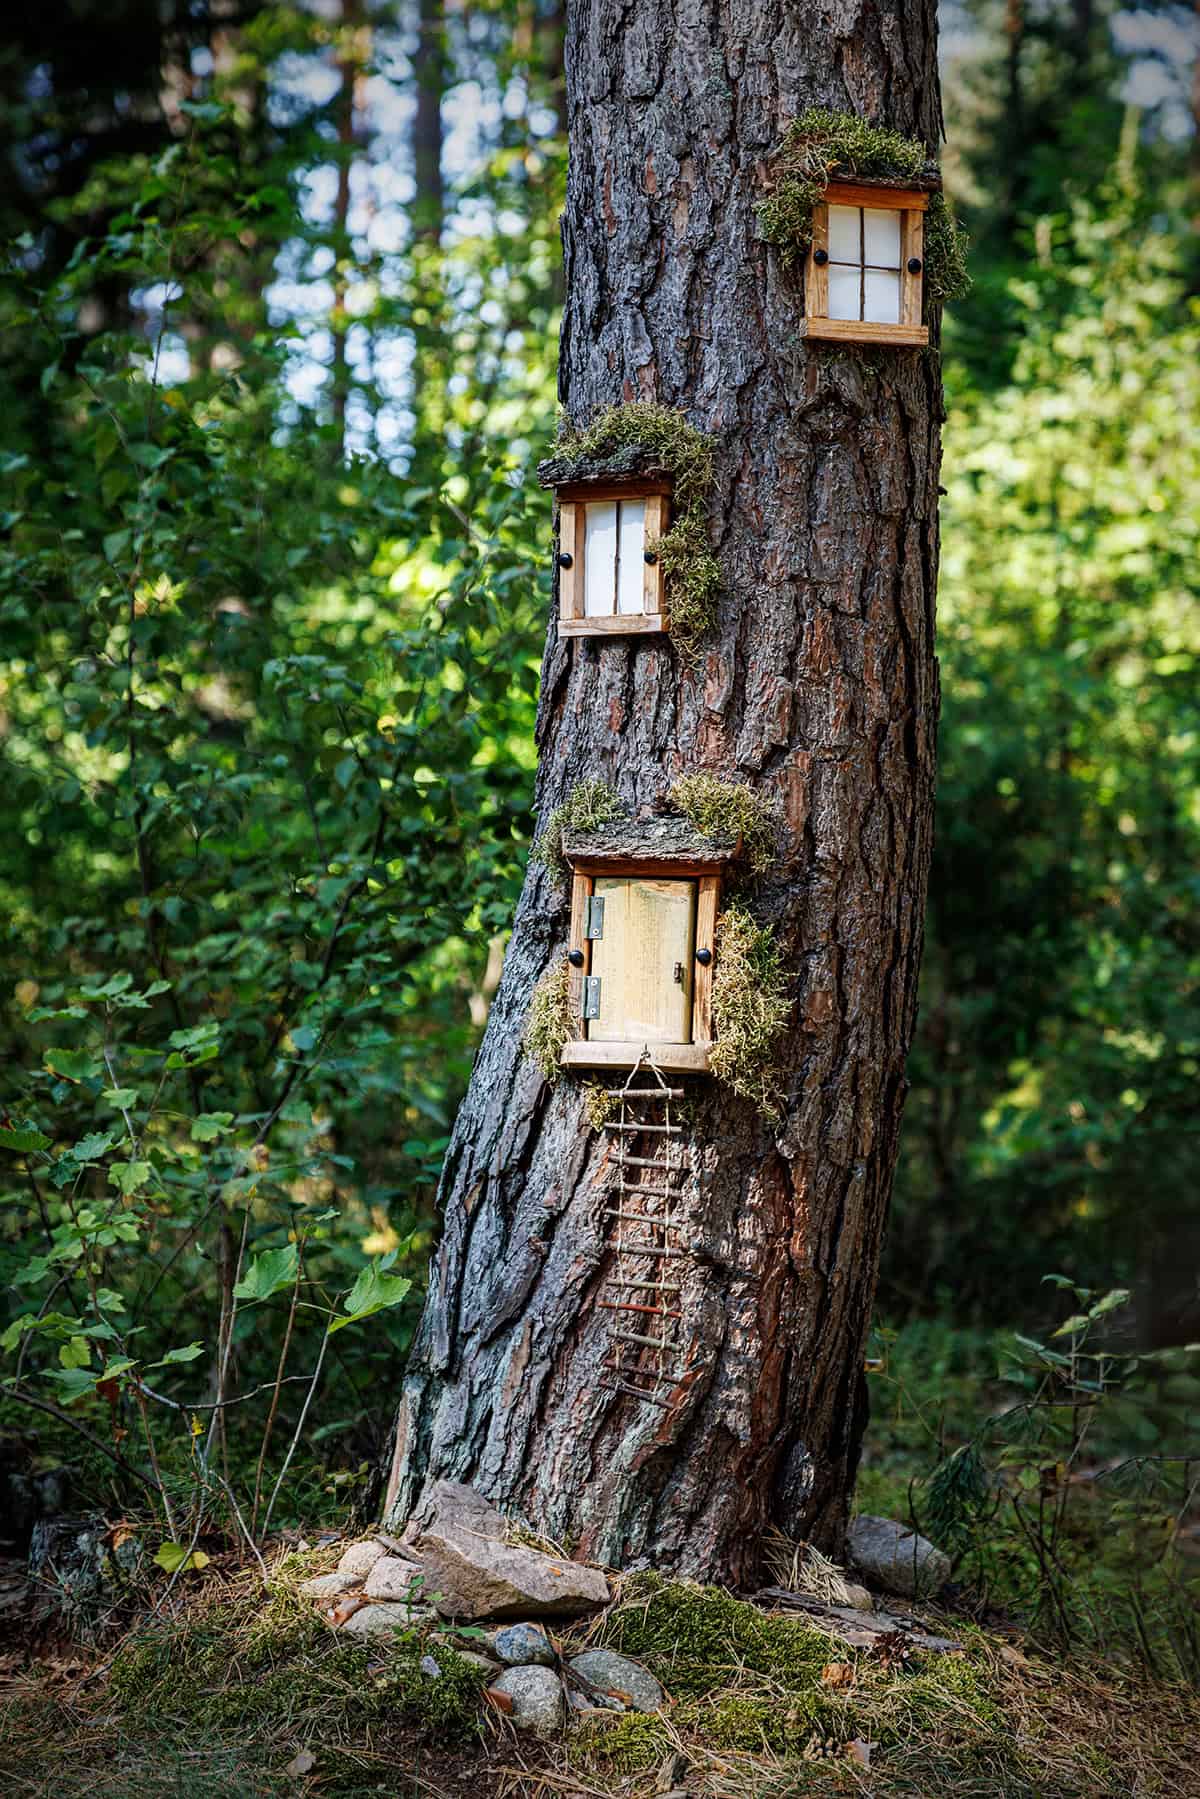
Why not stack fairy homes up a single trunk? Lightweight platforms can be attached with care—always using hardware that won’t harm the tree. Wood or resin keeps the load light.
Doors at different heights suggest whole neighborhoods. Rope bridges or ladders link the levels, but keep everything scaled down so the tree’s still the main act.
Think of it as a vertical garden, too. Small ferns or moss in shallow pockets look great near each door, but don’t let moisture collect against the bark.
Scatter the features around the trunk rather than in a straight line. It’s more interesting and encourages folks to walk around and explore. Three or four homes are plenty.
Tree Base Fairy Entry with Fence
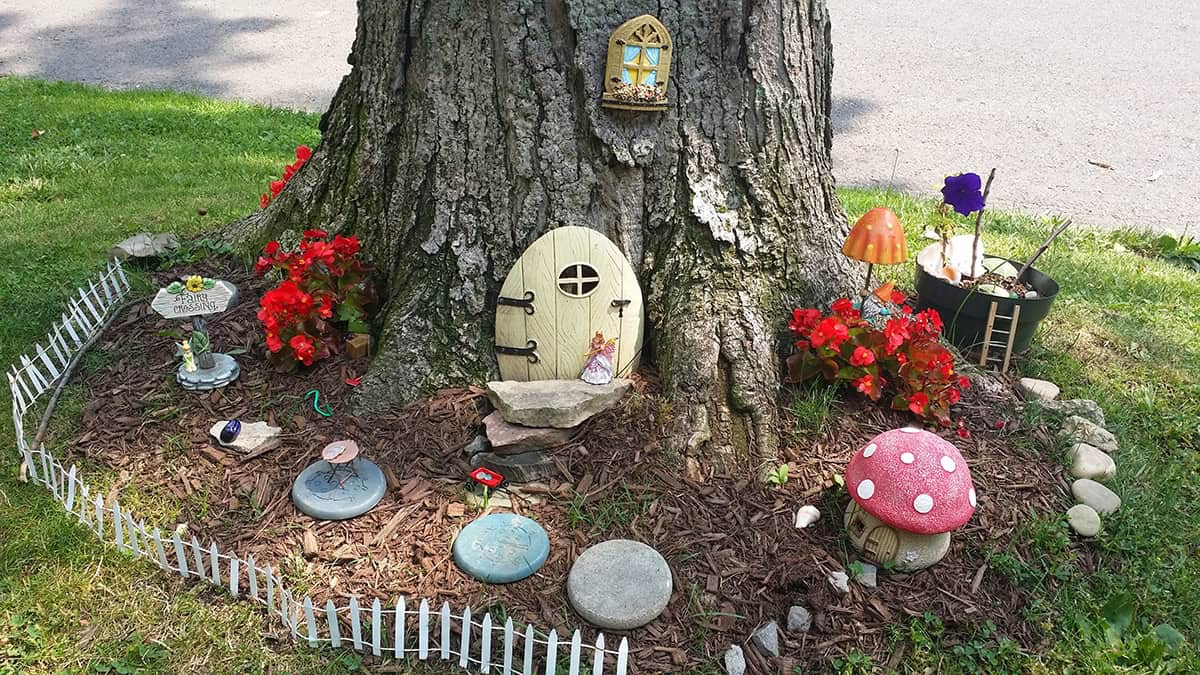
The root flare at a tree’s base makes a natural alcove for a fairy entry. Pick a door that blends with the bark, and set it against the trunk for instant character.
A low fence, maybe from craft sticks or twigs, curves around the base. Keep it under three inches so it doesn’t overwhelm the scene.
A tidy path—gravel, sand, or flat stones—leads from the gate to the door. Press it in so it doesn’t shift around.
Short plants or succulents near the entrance keep the doorway visible. Trim as needed for a neat look.
Hidden Fairy Door at Tree Base
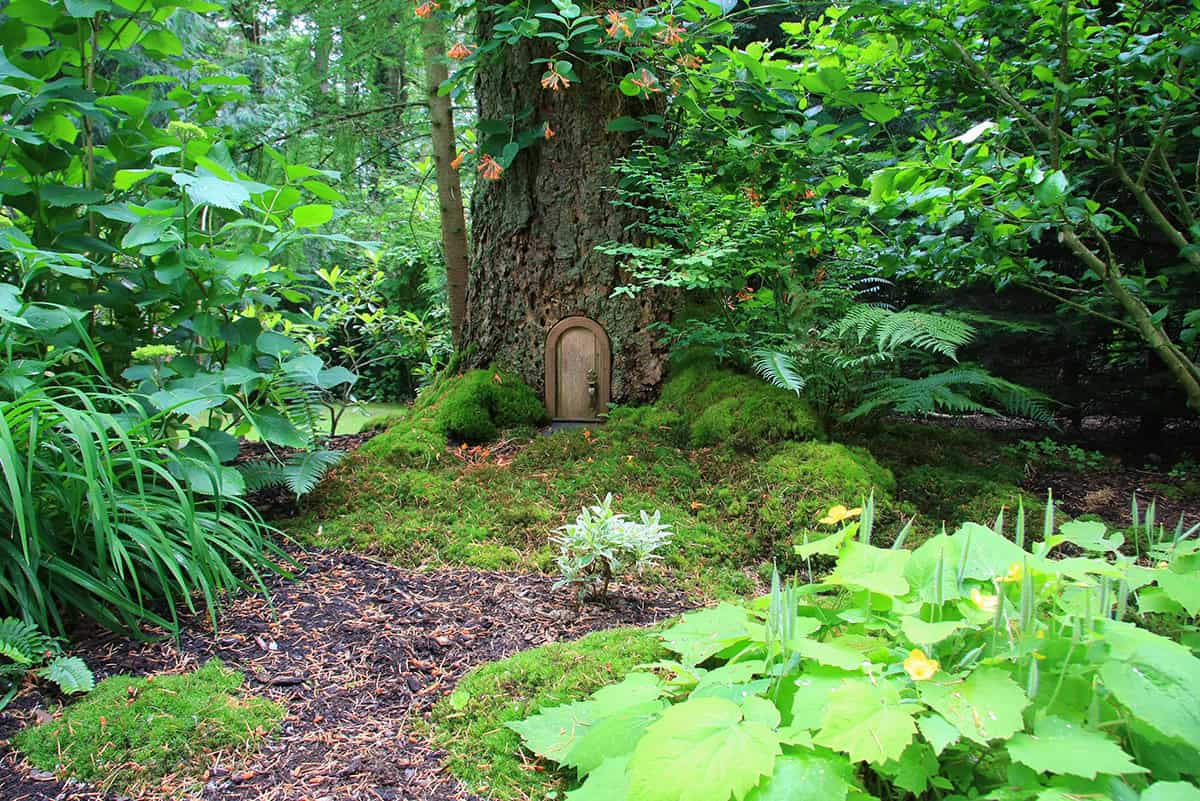
For a bit of mystery, tuck a fairy door into a crevice or behind a root. Stick to muted colors so it fades into the background.
Bark strips or small stones can frame the entrance without making it too obvious. Keep extras to a minimum.
Low moss or compact plants soften the area, but don’t hide the door completely. The point is to invite a second glance, not hide everything away.
This style fits best in gardens that already lean natural. Skip the bright paints and big props.
Fairy Door Garden Built Around a Tree Trunk

Encircle a trunk with a whole fairy garden ring, centering the main door toward your favorite viewing spot.
Edge the bed with stones or bricks, and keep it tight—two to three feet wide is usually enough.
Layer in accessories: door at the trunk, a short path, then a few seats or figures at the edge. Leave some open soil so it doesn’t get too crowded.
If you want to add a vertical garden, keep it small and use shallow frames. Secure everything well so the tree isn’t damaged.
Magical Village Scenes
Miniature villages tell stories in a single glance. Houses, fairy figures, tiny water features, and even birdhouses come together in scenes that feel lively and complete.
Busy Fairy Village with Characters
Cluster a few houses around a winding gravel or sand path. Maybe a fairy bridge spans a pebble “stream.”
Fairy figures go about their “lives”: one lounges on a patio set, another swings from a twig arbor. Mixing roof colors and house heights keeps the scene from looking flat.
Scatter lanterns, benches, or market carts for a sense of daily bustle. Keep everything to scale so nothing looks out of place.
Leave space between buildings for maintenance and a more open feel. Plus, it gives you room to swap things out for the seasons.
Mini Village Corner with Garden Birds
A single corner of a container or garden bed can become a tiny village. Two or three houses and low groundcovers set the scene.
Attract actual birds with a shallow water dish—just keep it visible but out of reach of your miniatures. Bird seed stays separate to avoid a mess.
A tiny fence or clipped hedge frames the space. A fairy figure watching the birds adds a nice touch, as does a little bench or furniture set.
Skip tall pieces that block light. Low plants and squat houses keep things bright and open. This subtle setup is great if you want a hint of fairy life without going overboard.
Raised Birdhouse Village Fairy Garden Setup
Mounting birdhouses on a post or fence draws the eye up. Soft paint colors tie them to the miniature homes below.
At ground level, use a wide planter to build a base village. Stones can make steps or terraces that connect to the raised birdhouses. A fairy bridge between levels adds whimsy.
Place fairy figures near ladders or stairs to suggest activity. Fill in empty spots with barrels or crates.
Stability and drainage matter—raised pieces shouldn’t topple or flood. This setup adds depth without taking up extra ground space.
Fairy Garden with Birdhouses and Water Feature
Pairing birdhouses with a mini waterfall or fountain creates a soothing, lively backdrop.
The waterfall usually works best at the back of a container, with stones guiding water into a shallow “pond.” A fairy bridge might cross a narrow bit for added interest.
Stagger houses at different distances from the water, and keep fairy furniture on higher ground to avoid splashes. Use waterproof accessories near the water feature.
Test the pump and drainage before setting everything in place. A steady flow keeps things tidy and prevents soil from washing away. Works especially well on patios where power’s handy.
Wheelbarrow Fairy Farm with Wooden Houses
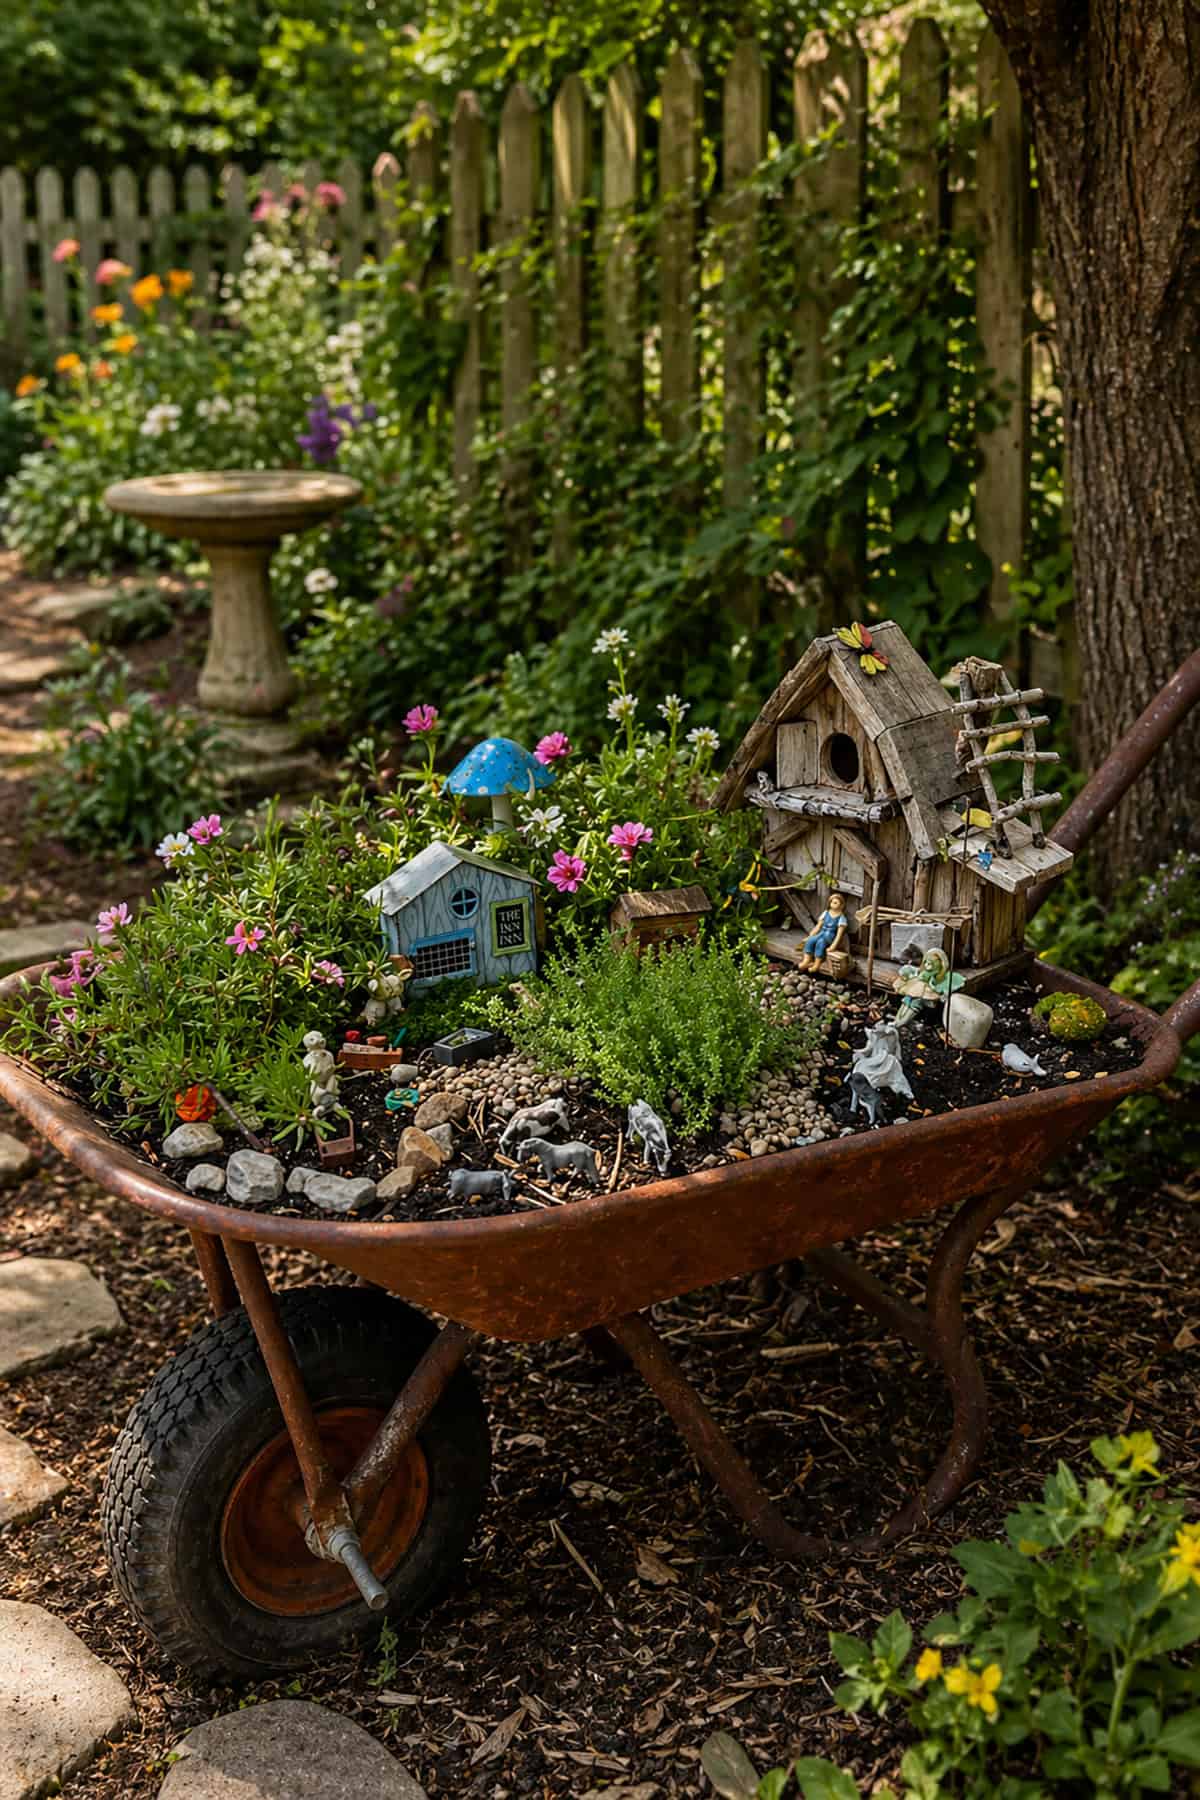
Old wheelbarrows make surprisingly good fairy farm settings. Fill one with soil, park it in a sunny spot, and you’re set.
Simple wooden houses, a tiny fence, and a patch of low herbs make it feel like a working farm. Twigs can become a rustic bridge across a narrow dirt path.
Fairy figures in farm poses, plus watering cans or tool racks, add to the theme. Swings can hang from the handle for a playful touch.
The best part? You can wheel the whole thing out of the weather or into the spotlight as needed. Plus, it’s easy to get a closer look without bending over.
Creative Planters
Container choice shapes the whole vibe of a fairy garden. Size, shape, and drainage all steer what plants and accessories will work.
Multi-Level Fairy Garden Planters
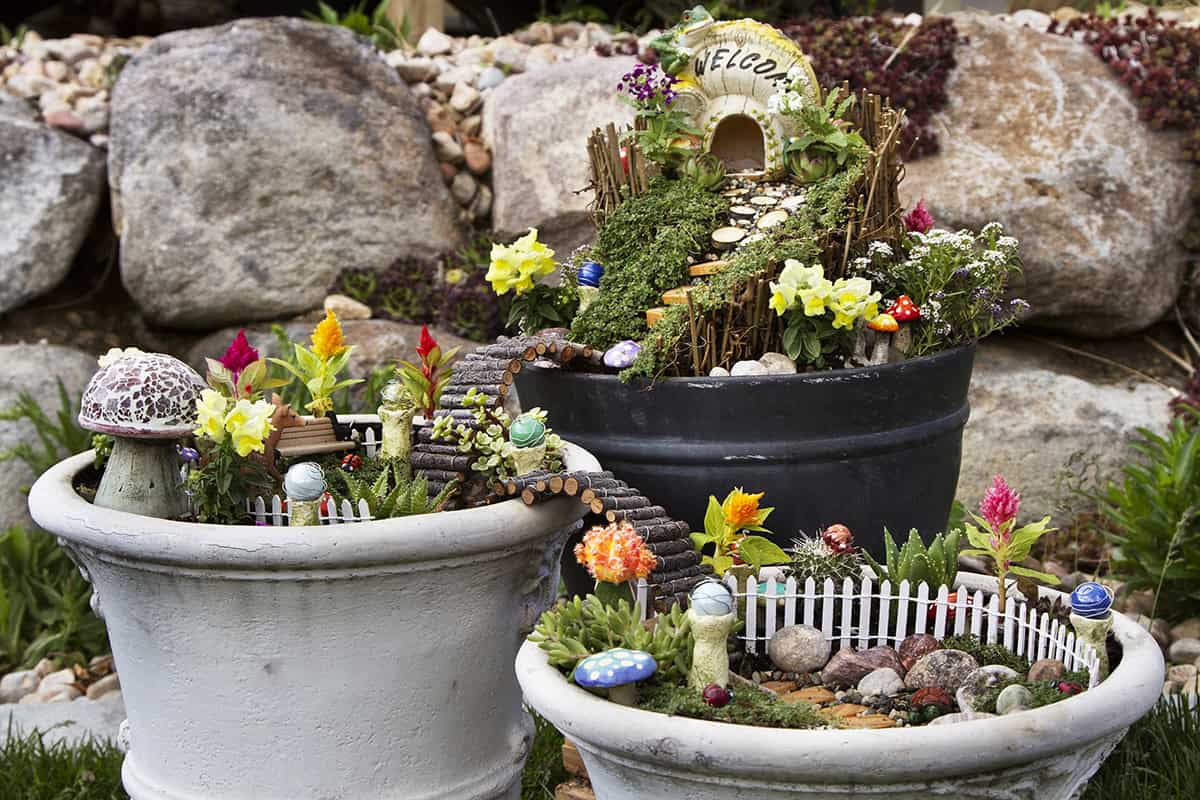
Tiers bring instant drama. Stacked terracotta pots or vertical planters with wide pockets let you play with height.
Heavier succulents go on the bottom for stability. Edges of each level look best softened with creeping thyme or small lavender.
Pathways of pebbles or flat stones connect the levels, guiding the eye upward and giving the design a bit of order.
Drainage is key—drill holes if needed. Succulents and mini plants can’t take standing water, so keep soil loose and well-aerated.
Mini Fairy Garden Bowl with Wildlife
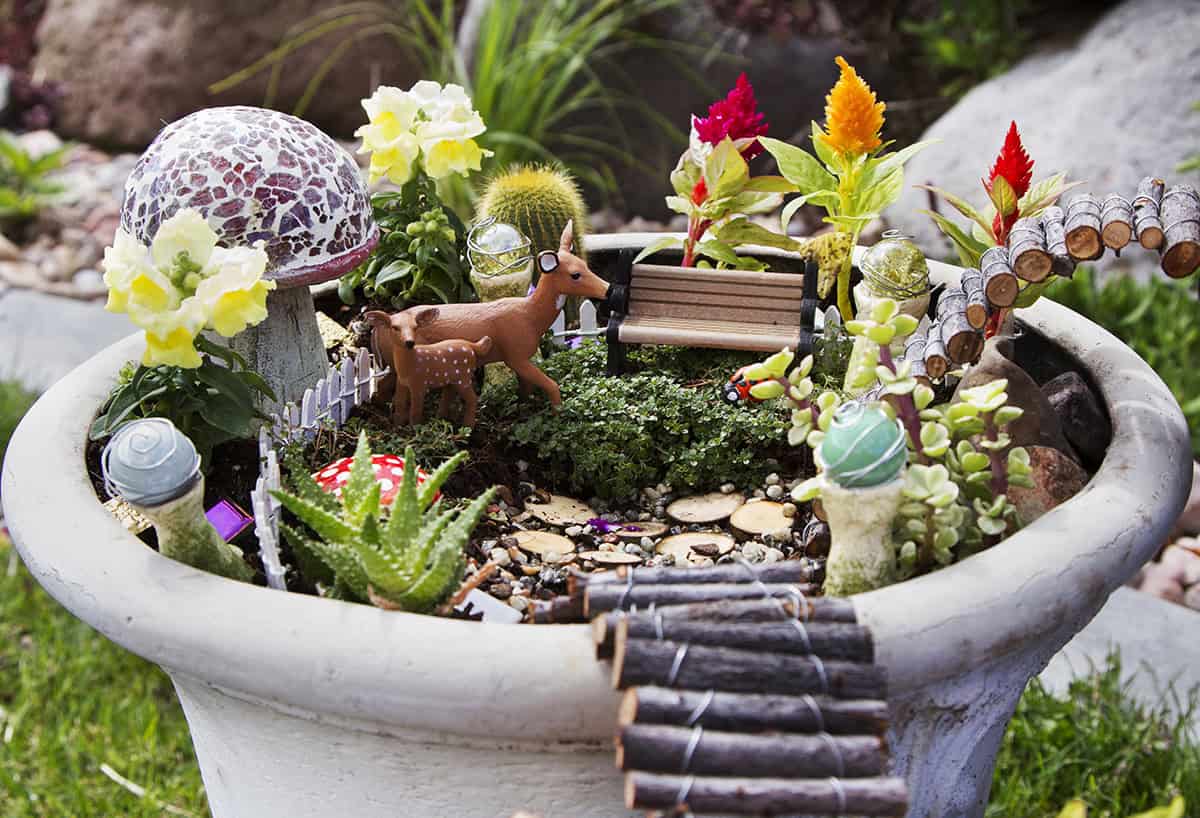
Low, wide bowls—think ceramic or concrete—let you carve out little pockets for greenery and trinkets. Spread out enough space so plants and décor don’t get crowded or lost.
Trailing thyme and tiny succulents hug the edges, while a handful of blue glass pebbles in the middle hint at a miniature pond. The contrast feels playful and clean.
Scatter a few animal figures—maybe a rabbit here, a bird there—for a dash of whimsy. Stones and moss keep the look grounded and natural, not too precious.
Partial sun is usually best. Most succulents want good light, but relentless afternoon rays can be a bit much.
Garden Guardian with Living Hair Planters
Planters shaped like heads? They bring a cheeky vibe you can’t fake. Concrete or resin versions are easy to find, and the “hair” possibilities are endless.
Try upright succulents or a mop of thyme for that wild, living hair. You’ll want to give it a trim now and then so the face doesn’t disappear.
Pebbles at the base frame the expression, maybe a tiny bench or sign nearby for a hint of story. A little detail goes a long way.
Watch for drainage—these planters aren’t always built for plants. Drill a hole if you need to, and keep the soil light so roots don’t get soggy.
Upcycled Tire with Decorative Entry Sign
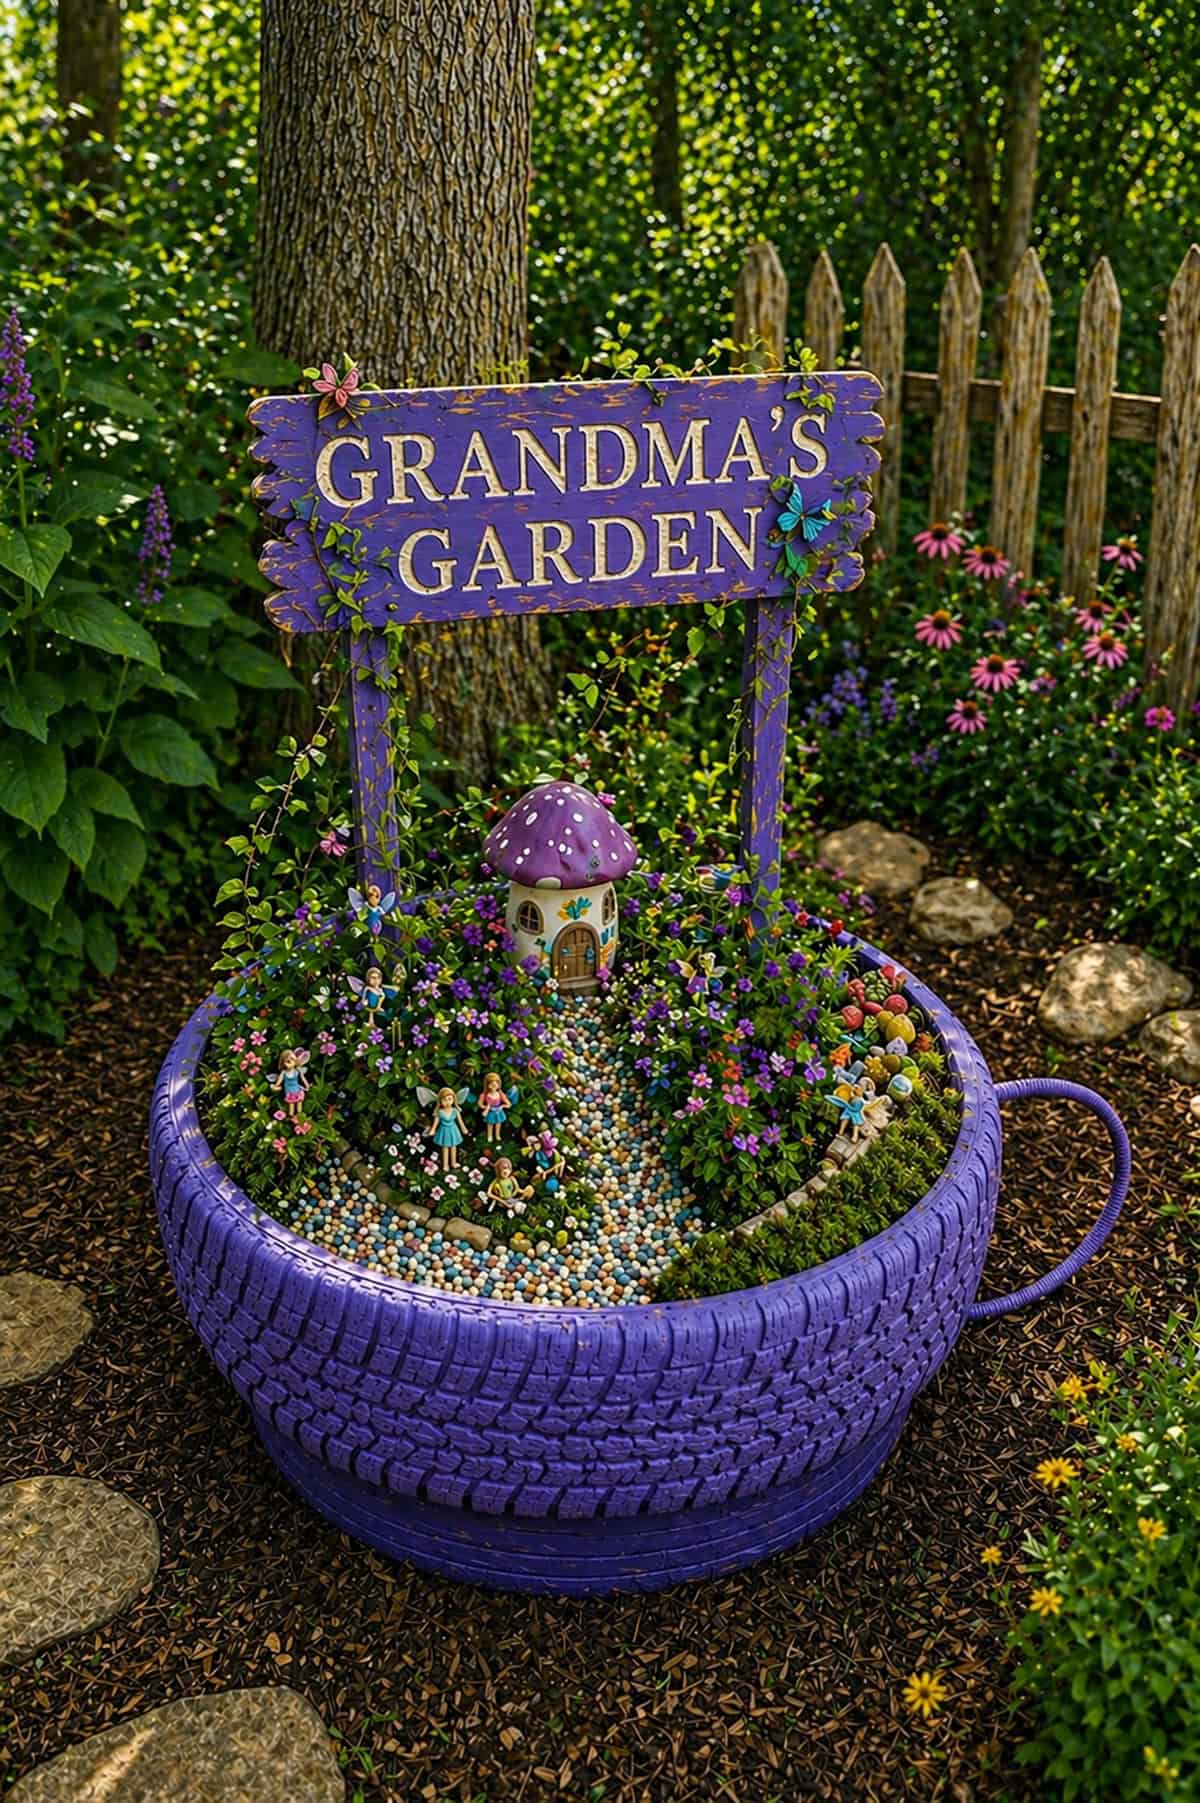
Old tires, once painted in a subdued color, carve out a bold border without stealing the show from your plants. They’re sturdy and surprisingly roomy.
Well-draining soil and compact lavender make the center lively and fragrant. The structure’s tough, but the plantings stay soft and inviting.
Define the entrance with a little pathway—flat stones or brick chips work well—and a welcoming sign. It’s a subtle nudge to step into a different world.
Set the tire on gravel for stability. In bigger yards, this kind of fairy garden can really stand out.
Mini Fairy Garden On an Elevated Birdbath
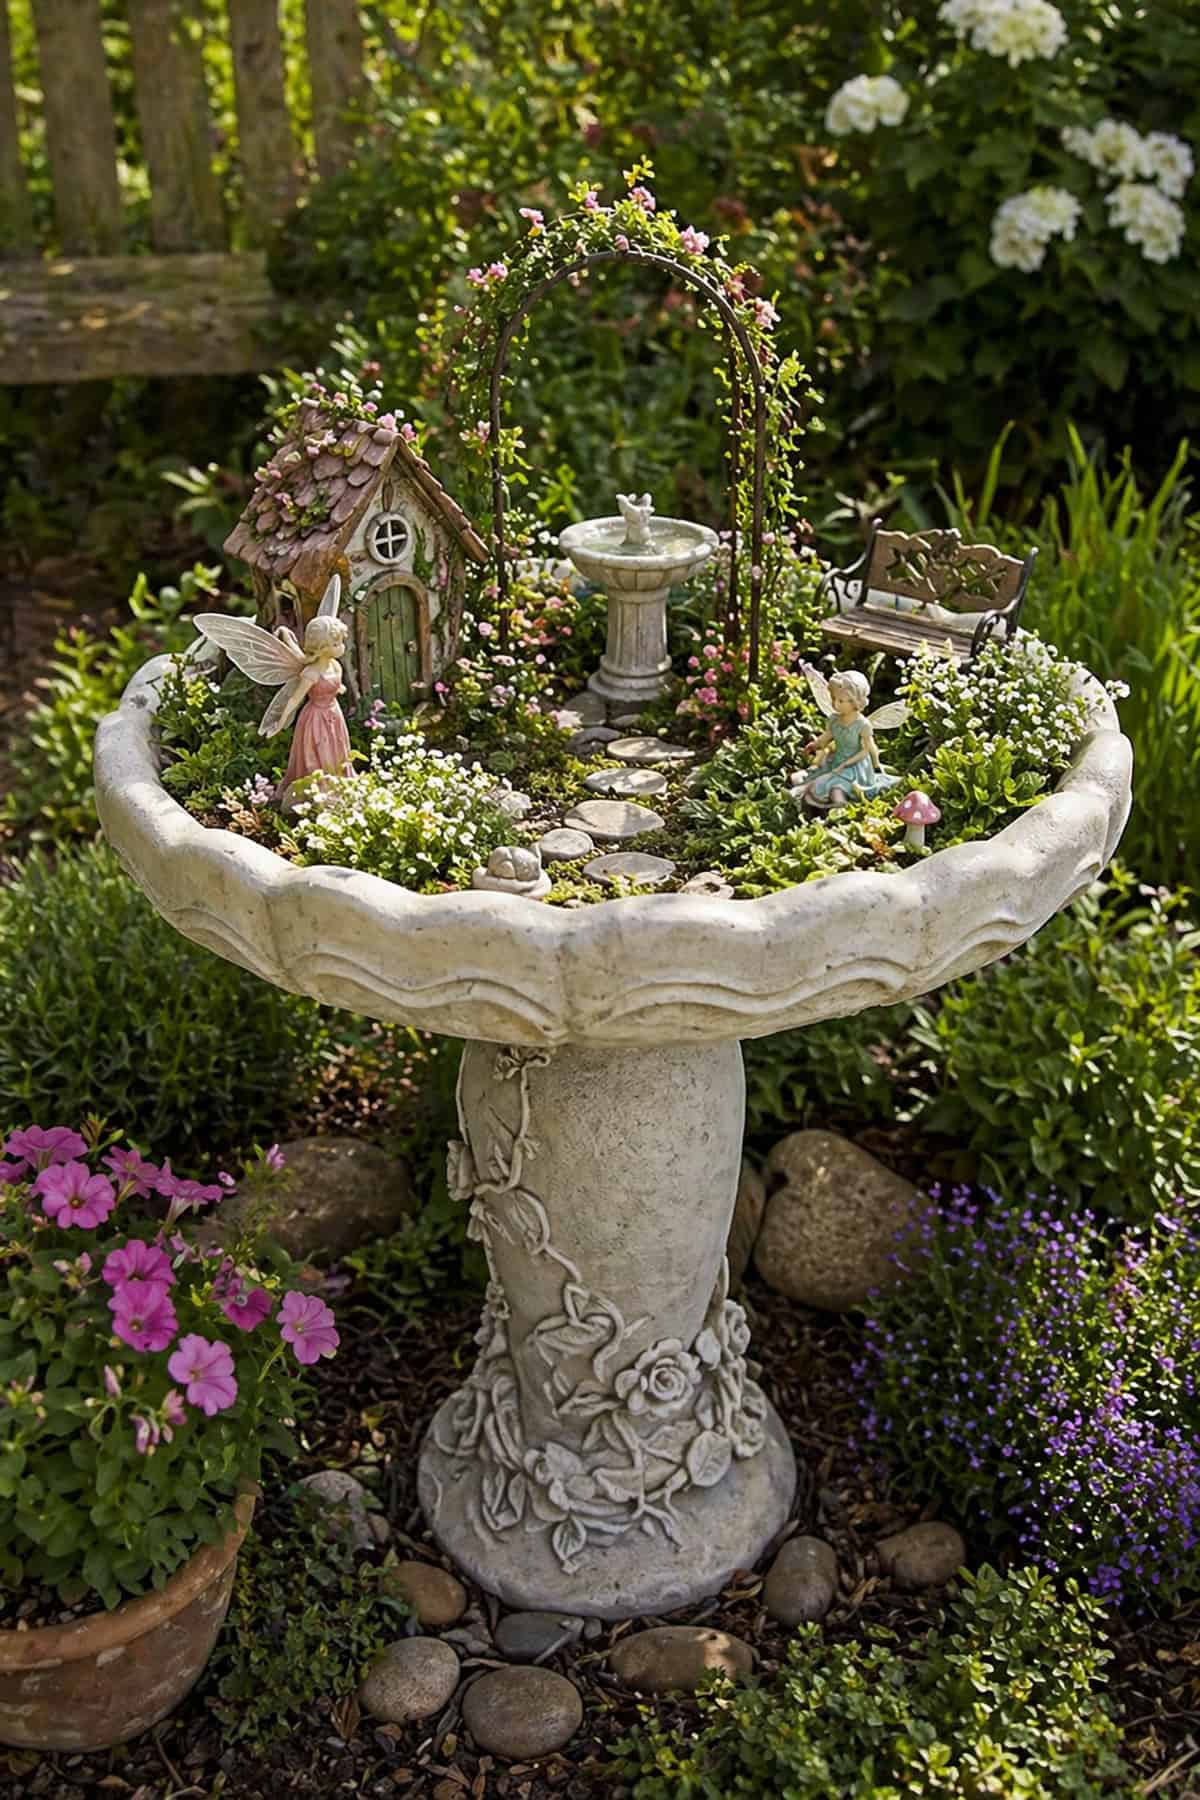
Elevated displays like a birdbath bowl catch the eye—and save your back. Details pop because you’re not hunched over.
Stick with shallow-rooted succulents and ground covers. Too much soil can get heavy and messy.
Start with pebbles for drainage, then a thin layer of succulent-friendly soil. It’s not complicated, but it matters.
Curved stepping stones lead toward a miniature bench or cottage. If it’s breezy, anchor everything; nobody wants fairy furniture flying away.
Repurposed Wheelbarrow Fairy Garden

Wheelbarrows, whether metal or wood, make moving your fairy scene a breeze. You can chase the sun—or hide from it—whenever you like.
Don’t forget drainage holes. A base of gravel helps keep roots from drowning, especially after a rain.
Winding stone paths add movement, with taller plants tucked in back and trailing ones spilling over the rim. It’s a little wild, a little tidy.
The weathered metal against soft foliage and vivid blooms? That contrast just works.
Large Fairy Garden Pot with Mushroom and Pebble Pathway
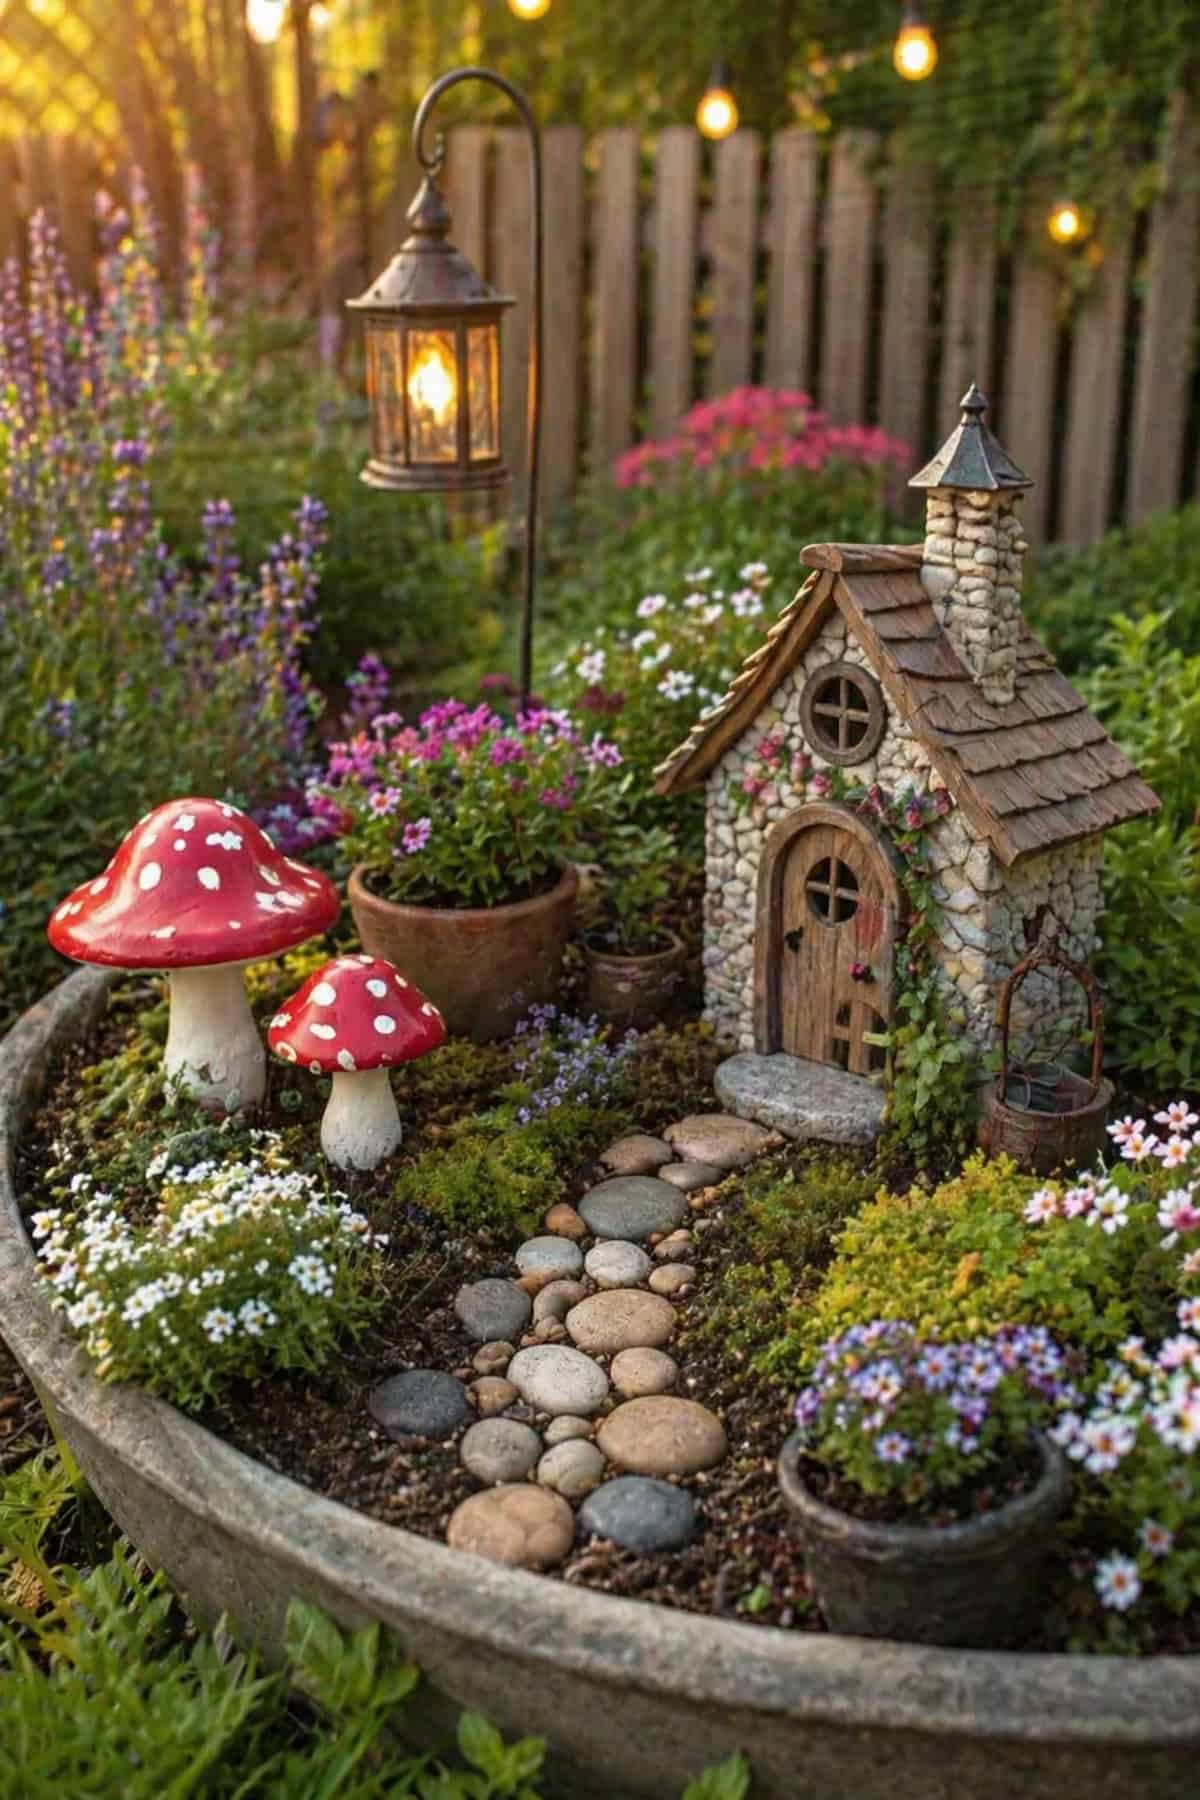
Deep pots open up planting possibilities—terracotta gives you that classic, breathable texture.
A mushroom house sits at the heart of the scene, with a pebble path swirling out like a storybook illustration.
Mix in succulents and squat flowering plants, keeping everything in scale. Too big or too small, and the illusion breaks.
Fine gravel on top manages moisture and makes those path edges crisp. Details like that pull it all together.
Fairy Garden Built Inside Hollow Log Planter
A hollowed log, real or resin, frames a scene with earthy charm. It’s got that straight-from-the-woods vibe.
Fill the space with light soil and petite plants. Moss and creeping thyme thrive and look right at home.
Tiny stepping stones wind along the inside curve, bumping up against rough bark and smooth pebbles. The textures play off each other.
Setting the log on bricks lifts it up and keeps moisture from settling in—nobody wants a rotten fairy log.
Mini Fairy Garden in Rustic Metal Tub
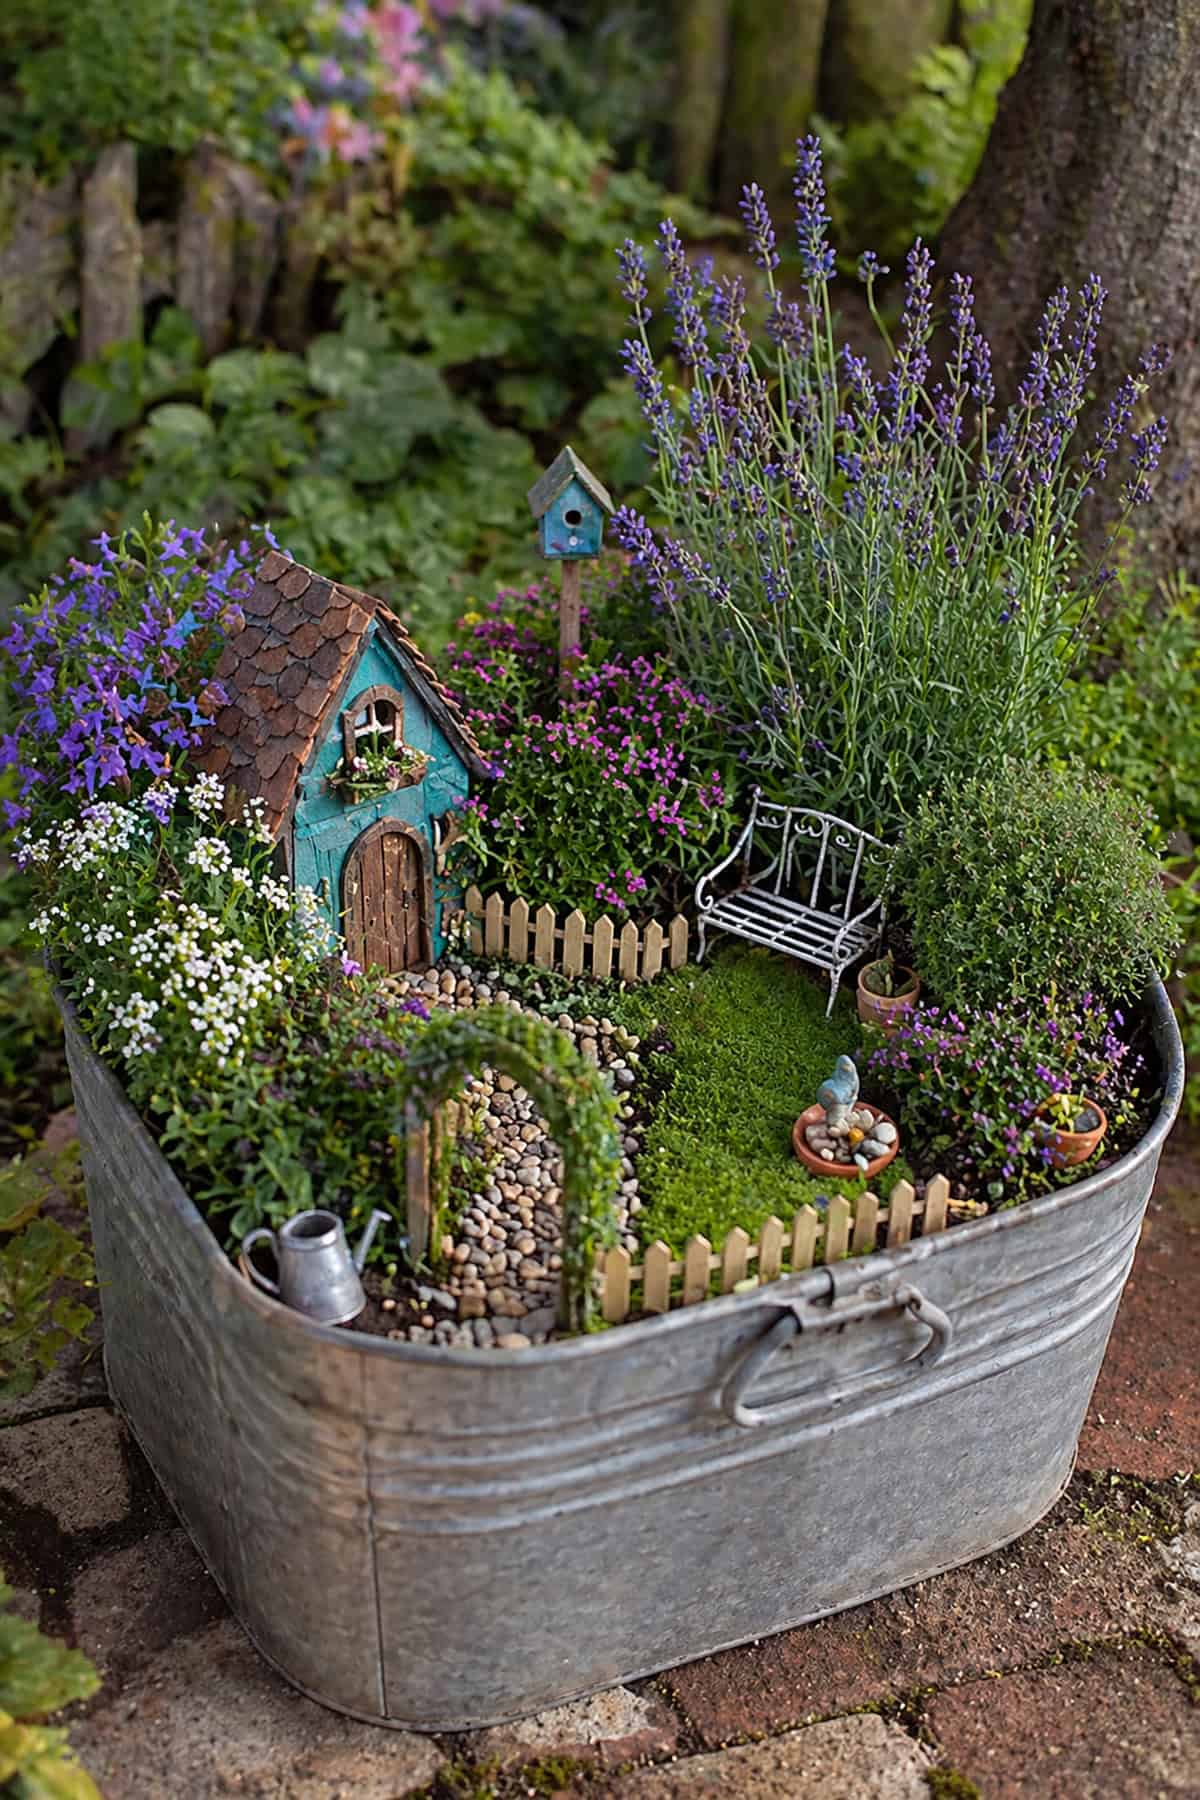
Galvanized tubs feel sturdy and a bit industrial, perfect for patios or balconies where you want something solid but not fussy.
Make sure drainage is sorted—drill holes and toss in coarse gravel. Succulents are picky about sitting in water.
Use stone borders to break up the space: maybe a cottage on one side, a lavender patch on the other. It doesn’t have to be symmetrical—just balanced.
Muted accents keep the look cohesive, letting the greenery shine against the metal backdrop.
DIY Fairy Garden Using Colorful Stone Houses
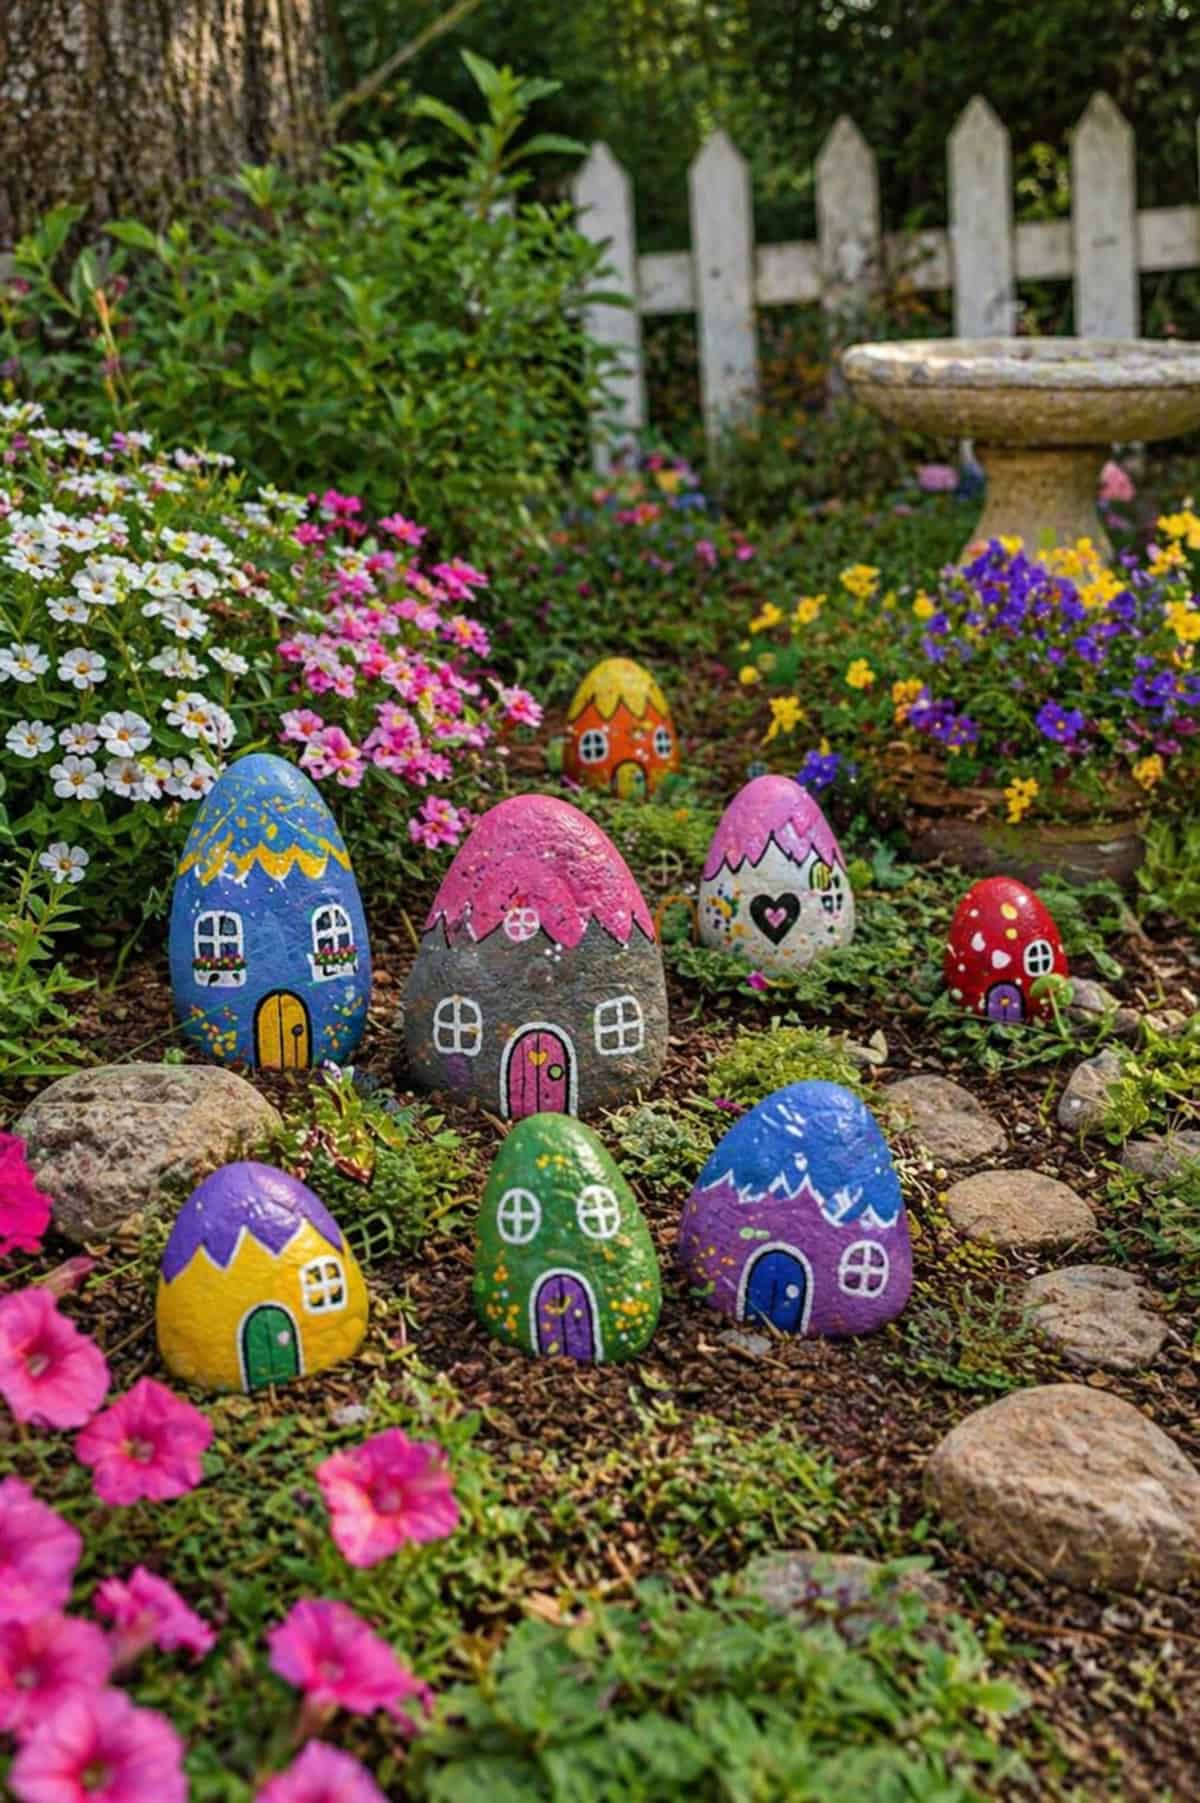
Hand-painting stone houses means every detail is yours. Just seal them well if they’re going outside.
Cluster the houses together, linking them with narrow pebble paths. It feels like a lived-in village, not just scattered bits.
Low plants—succulents, thyme—won’t hide your handiwork. Clear sight lines help the scene breathe.
Keep the setup somewhere sheltered from heavy rain. Tiny stones can go missing fast if they’re not anchored.
Tiny Fairy Garden Built Inside a Teacup
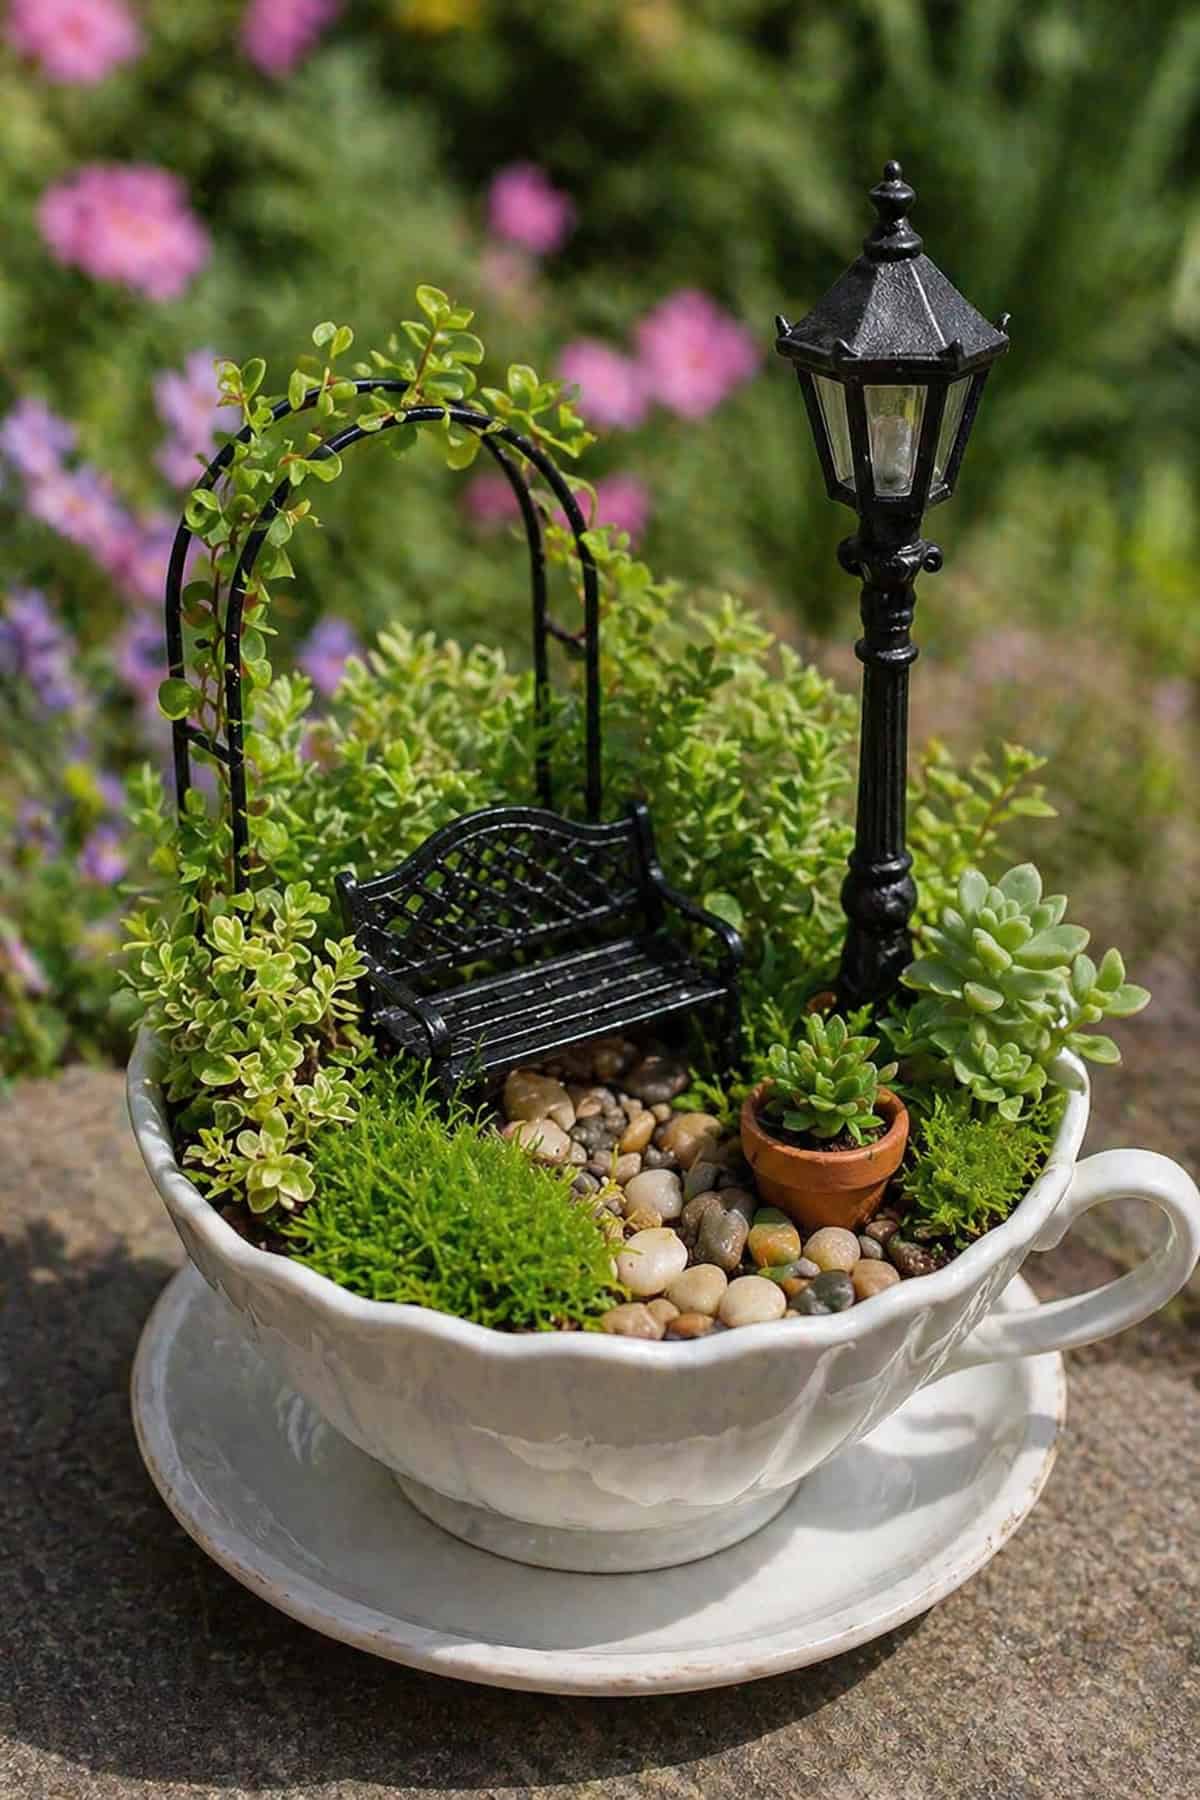
Teacups are charming but tiny, best for spots indoors. A wide mouth makes planting less of a headache.
Layer in coarse sand for drainage, then just enough soil for tiny succulents. Don’t overpack it.
Crushed pebbles form a quick path, and décor stays simple—maybe one house, a bench, and that’s it.
Water sparingly. Small containers dry out fast, but they don’t forgive overwatering either.
Broken Pot Fairy Garden with Staircase Design
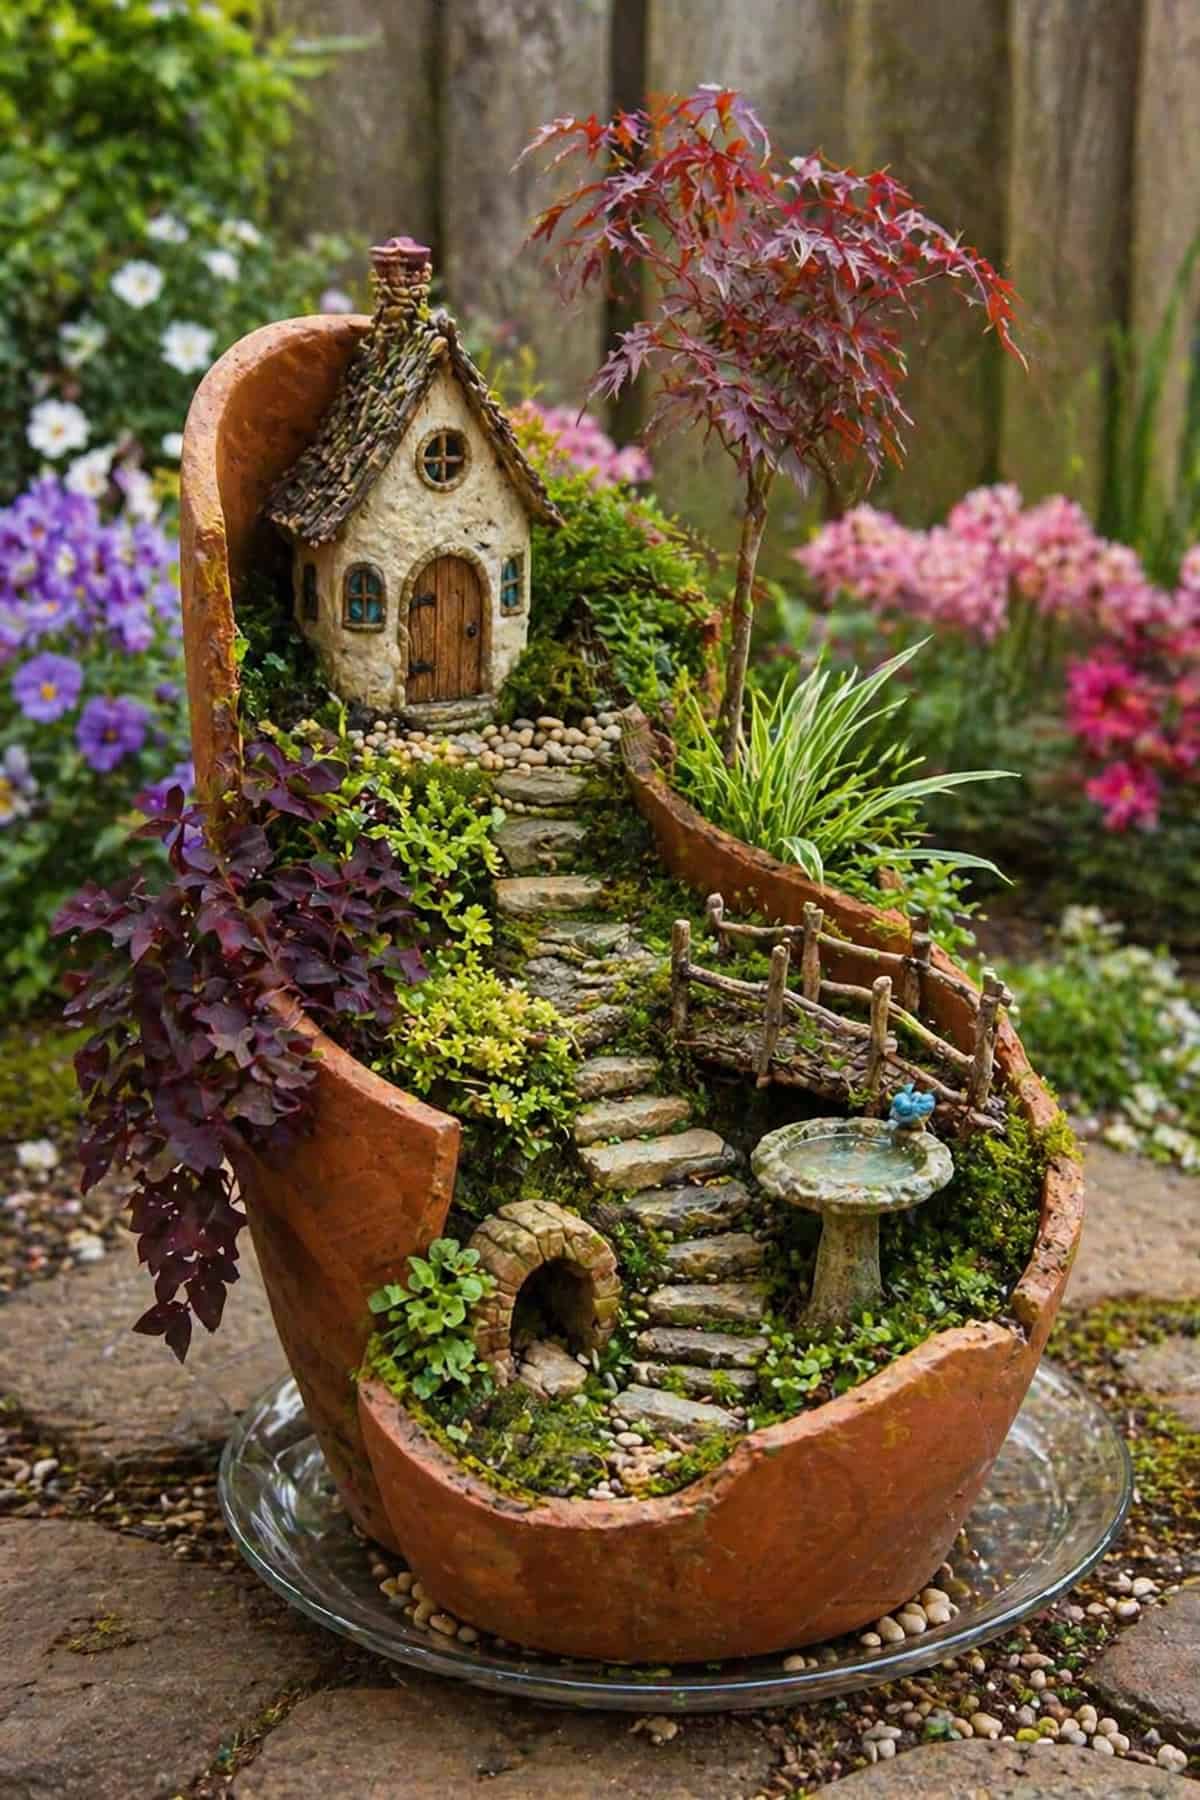
Cracked pots become accidental architecture. Break them with care so you get big, useful pieces.
Layer the shards to build terraces, securing with soil and pebbles. The tiers create instant depth.
Fashion a staircase from flat fragments, lining each step with pebbles for definition. It doesn’t have to be perfect—quirky works.
Succulents along the tiers bring life without overwhelming the structure.
Enclosed Fairy Garden Inside Glass Jar
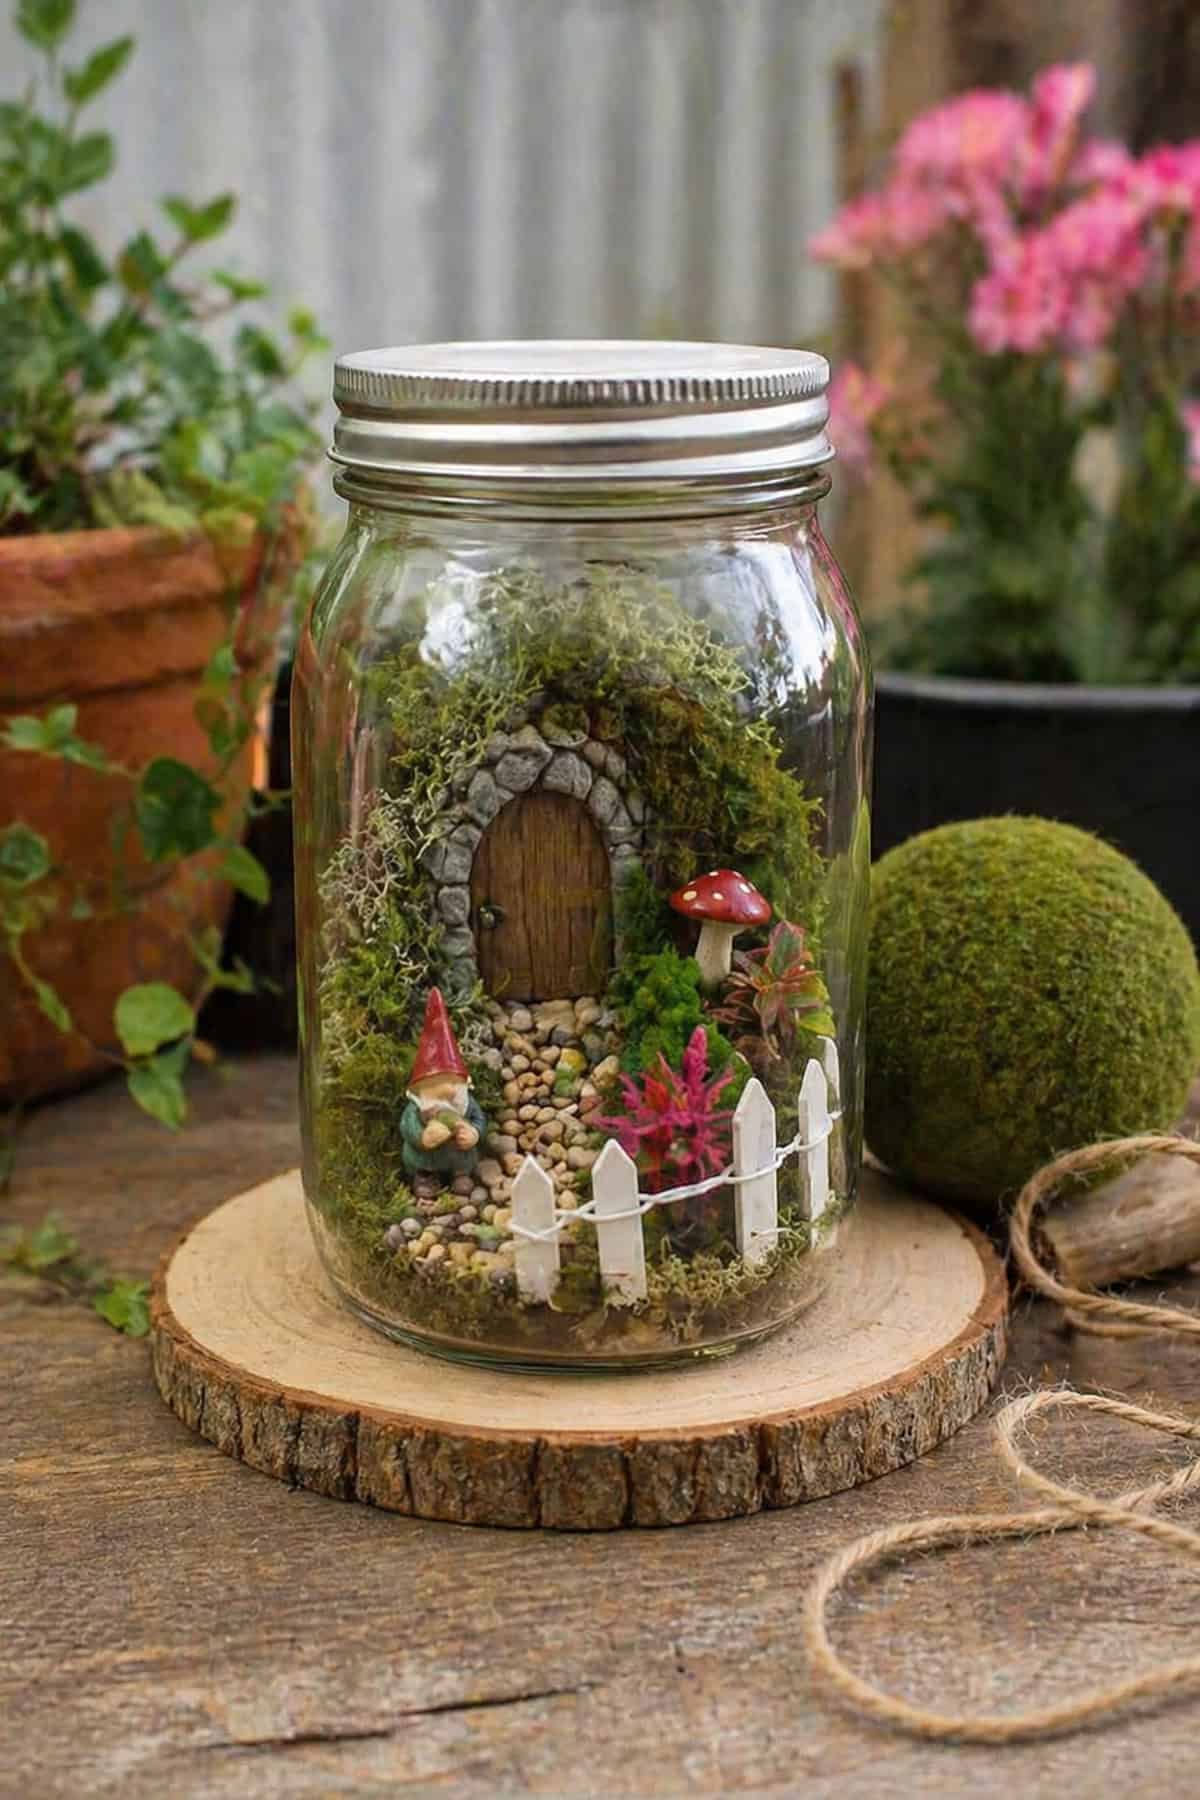
Glass jars—think mason jars—turn fairy gardens into little worlds under glass. Perfect for indoors, where temps stay steady.
Start with gravel, then a sprinkle of activated charcoal to keep things fresh. It’s a small step, but it matters.
Pick plants that don’t mind humidity. Skip big succulents; they’ll just sulk in the damp.
Keep décor minimal. Crowding ruins the effect—less is genuinely more here.
Garden Pot Fairy Scene with Flowers and Cottage
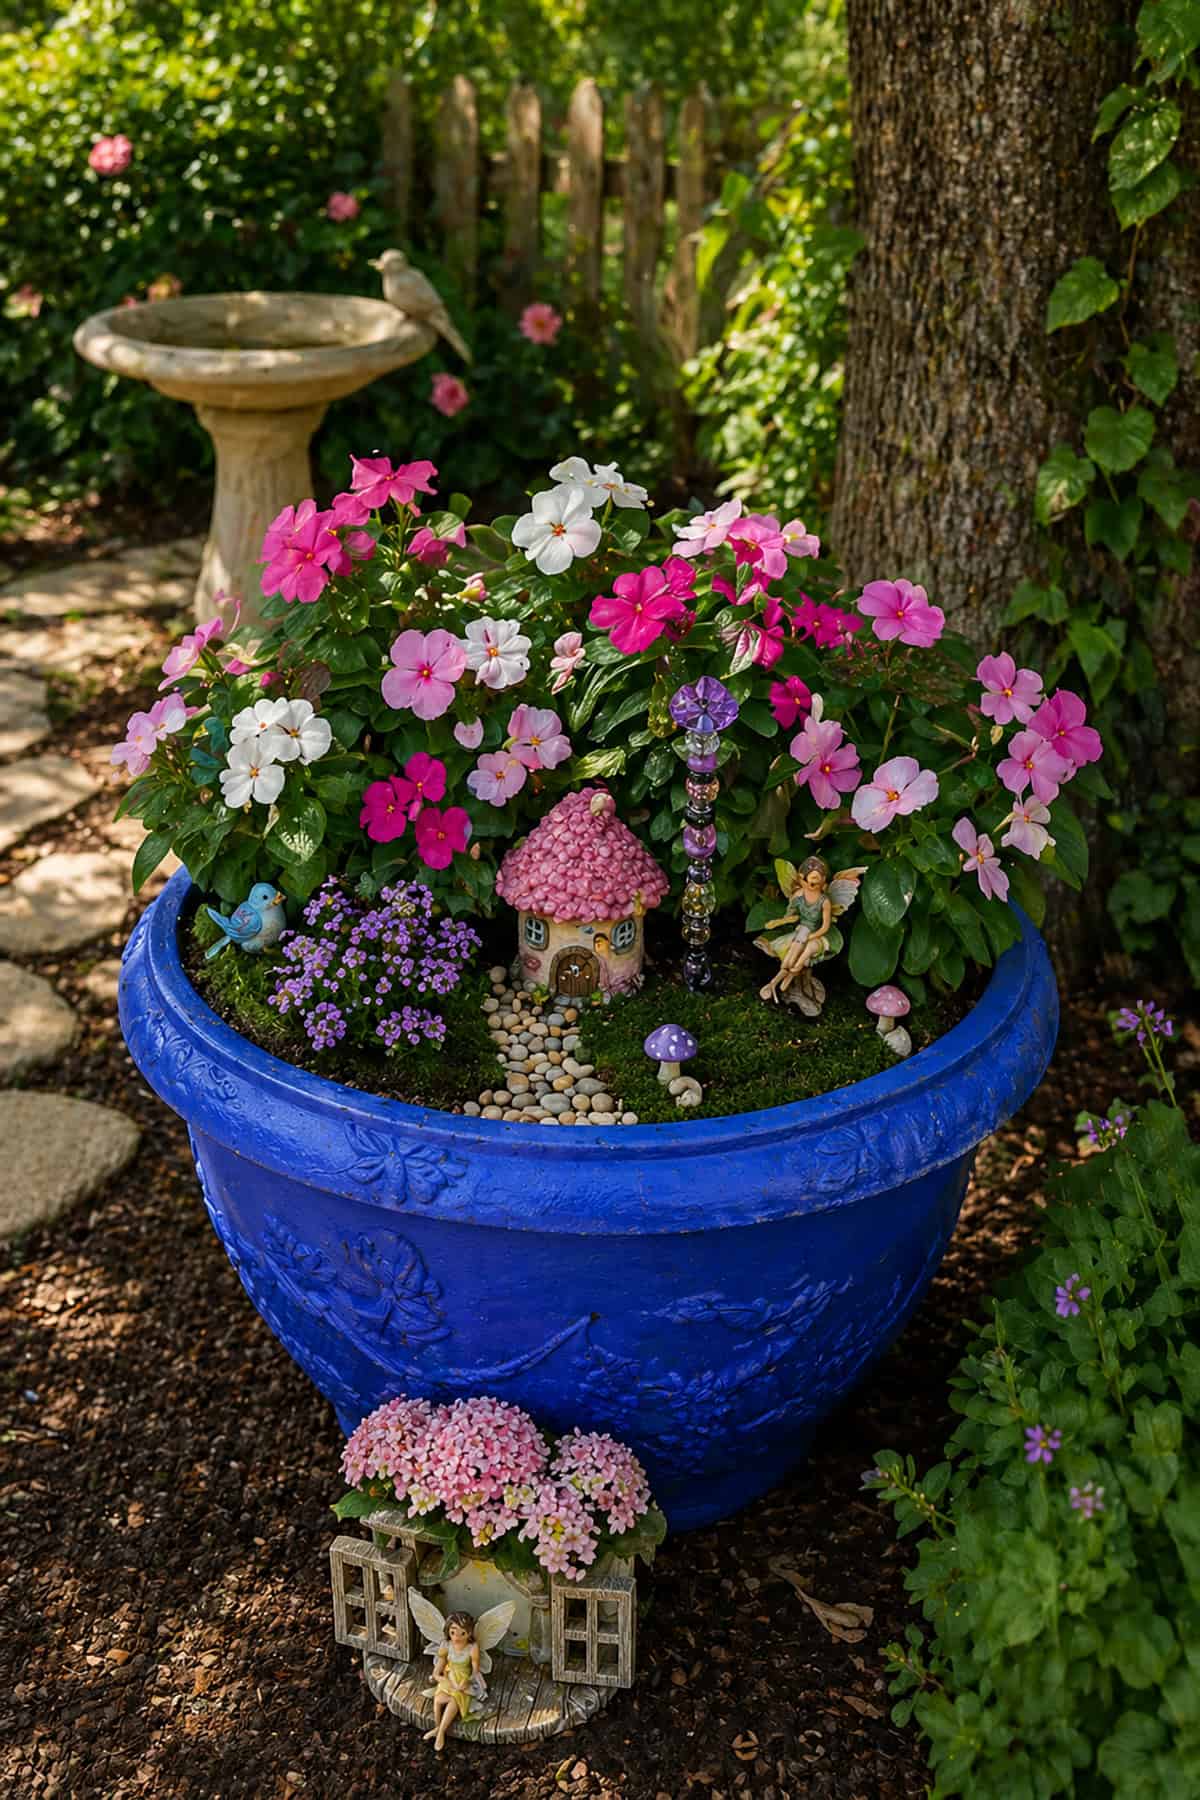
Wide ceramic pots let you mix flowers and greenery without cramping the style. It’s a chance to get a bit lush.
A cottage nestled toward the back, a curved stone path winding to its door—it’s cozy, not staged.
Lavender and creeping thyme bring scent and texture, but keep them trimmed so they don’t swallow up the details.
Steady light helps everything grow in proportion, keeping the scene from getting lopsided.
Stacked Flower Pot Fairy House Tower
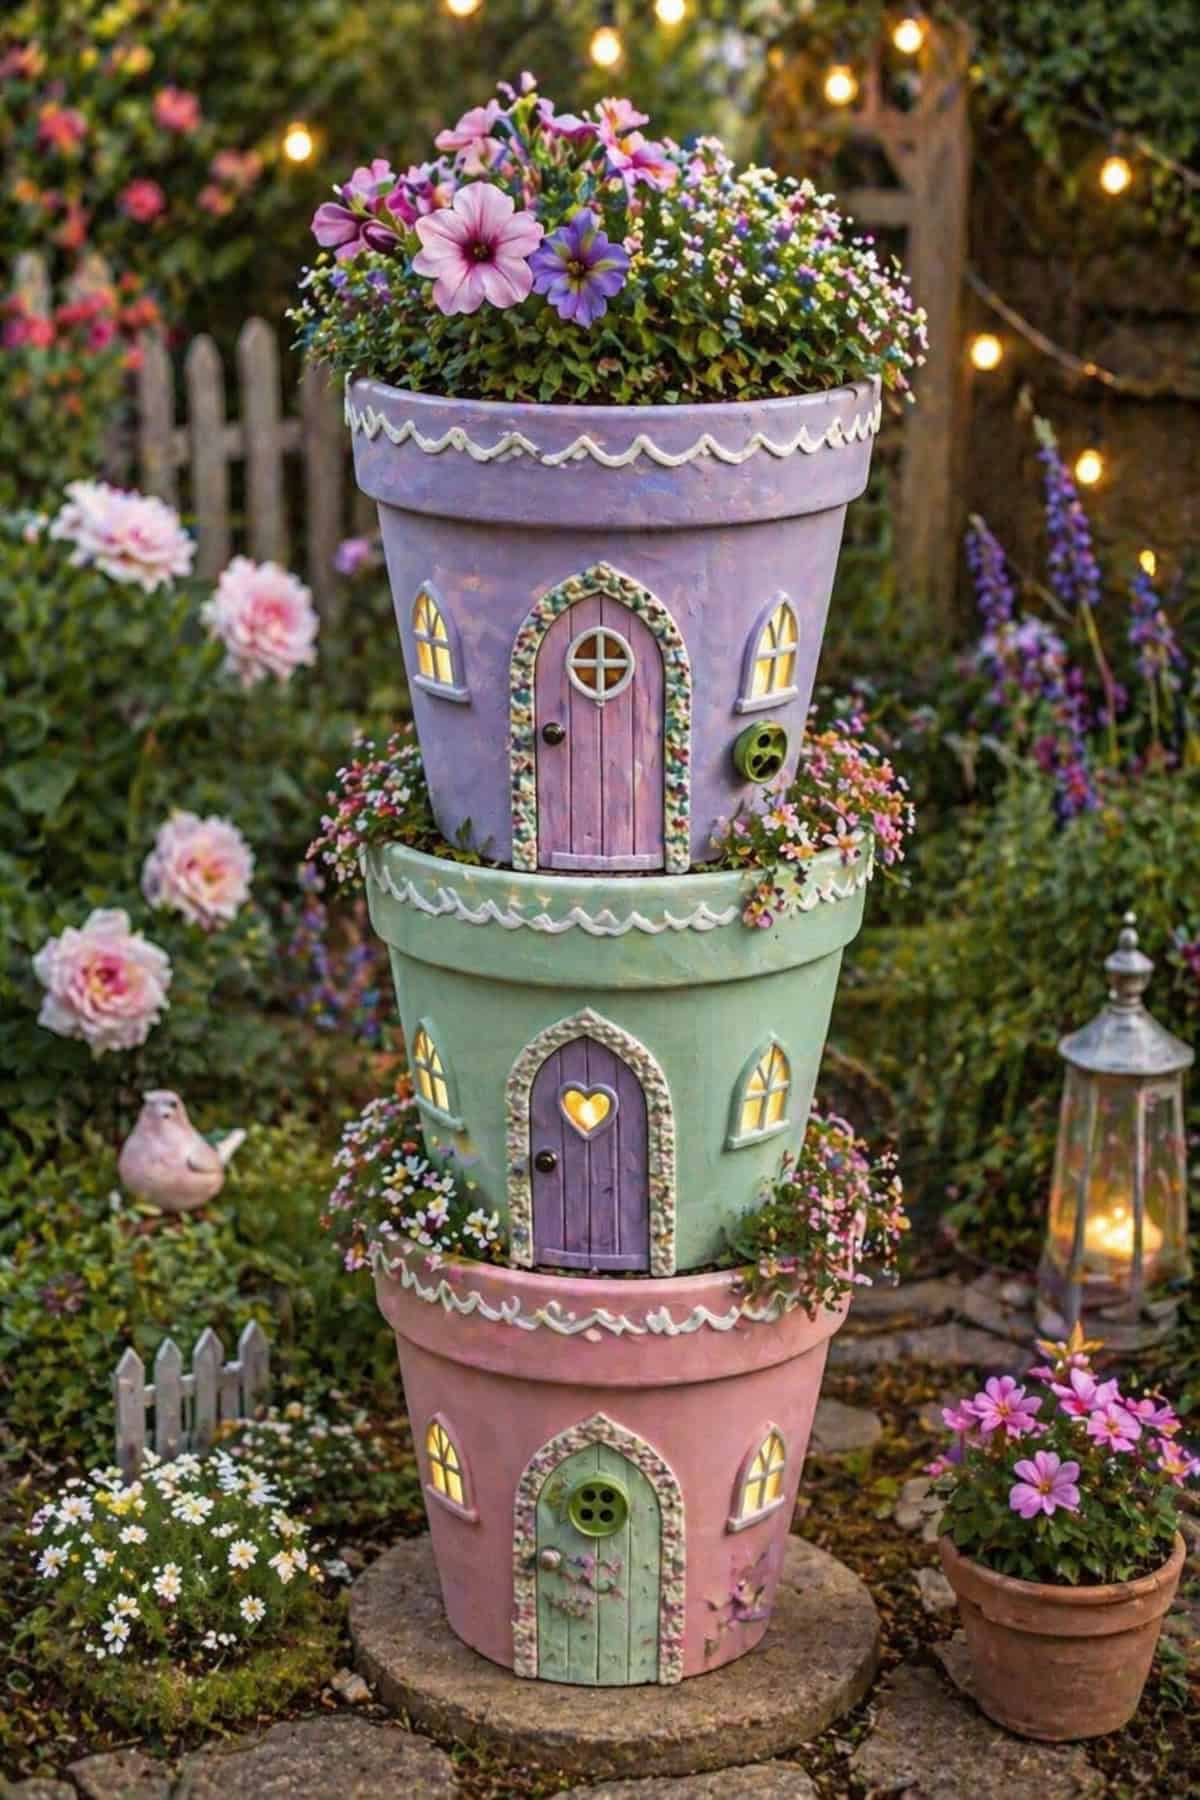
Stacking terracotta pots—each smaller than the last—builds a whimsical tower. A central rod keeps the whole thing from toppling.
Cut side doors in some pots, slipping in little shelves of soil for planting. It’s a bit fiddly, but worth it.
Trailing plants soften the lines, with compact succulents tucked into the upper pots. The mix keeps things lively.
Ladders or stepping stones between levels give the fairies a way up—at least in theory. Works especially well where space is tight.
Evening and Fantasy Themes
As dusk settles, the mood of a fairy garden shifts. Lighting—fairy lights, lanterns, subtle glows—can turn a simple setup into something atmospheric or even a little magical. Accessories and structures play into the vibe, whether you want calm, mystery, or a hint of storybook adventure.
Backyard Fairy Nook After Dark with String Lights
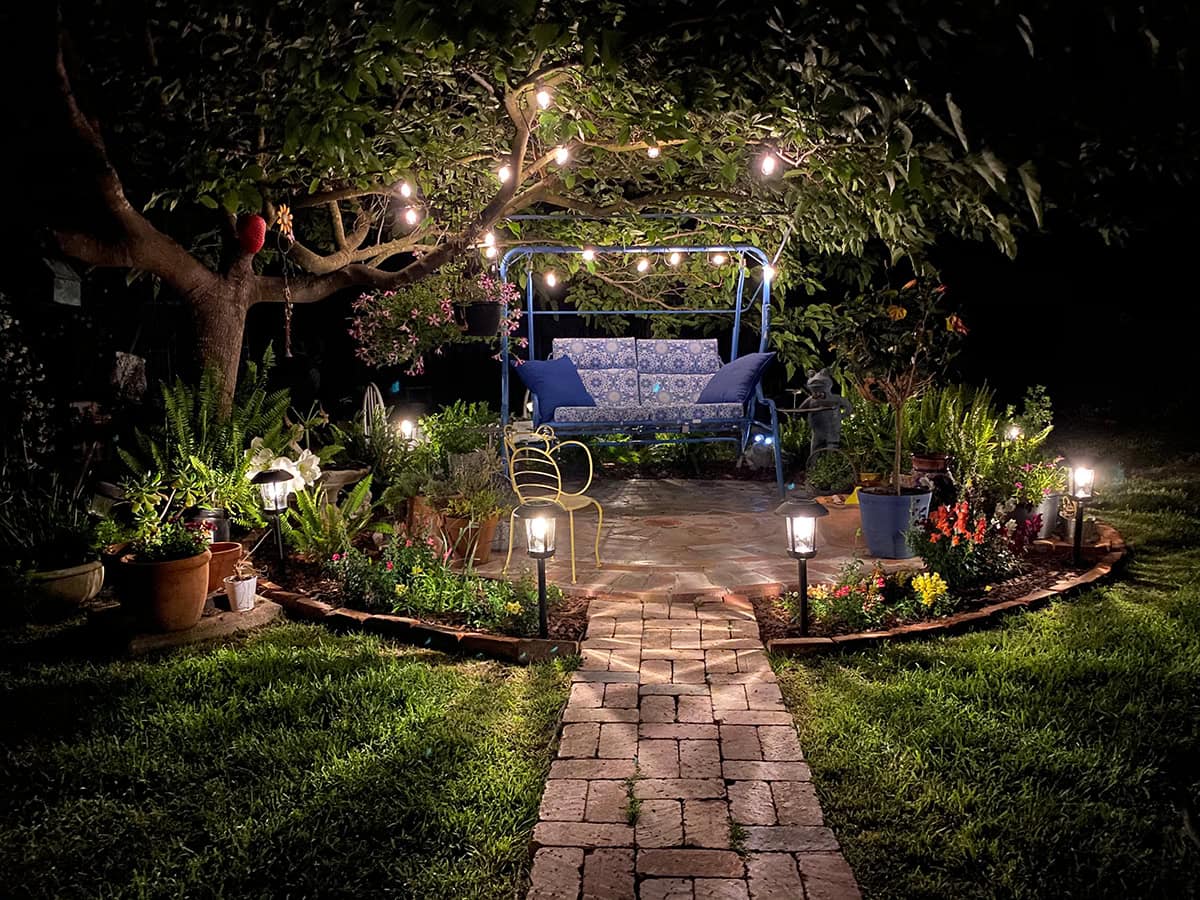
Soft, warm light shapes the mood here. Fairy lights loop around the rim or snake through moss and shrubs, their thin wires vanishing into the foliage. Battery-powered or solar, just pick what fits your setup.
Lanterns—solar ones are easy—draw the eye upward and help anchor the scene. Place one by a bench or at a path’s edge for a cozy focal point. Twinkle settings with gentle fades give a steady glow without turning the whole thing into a disco.
Dense, low plantings—moss, dwarf mondo grass, compact sedum—let the lights shine without hiding them. Change up the bulb colors for holidays or seasons if you’re into that.
Hide cords and batteries under stones. Keeps it tidy and dry, even if it rains.
Fantasy Treehouse with Rope Walkway
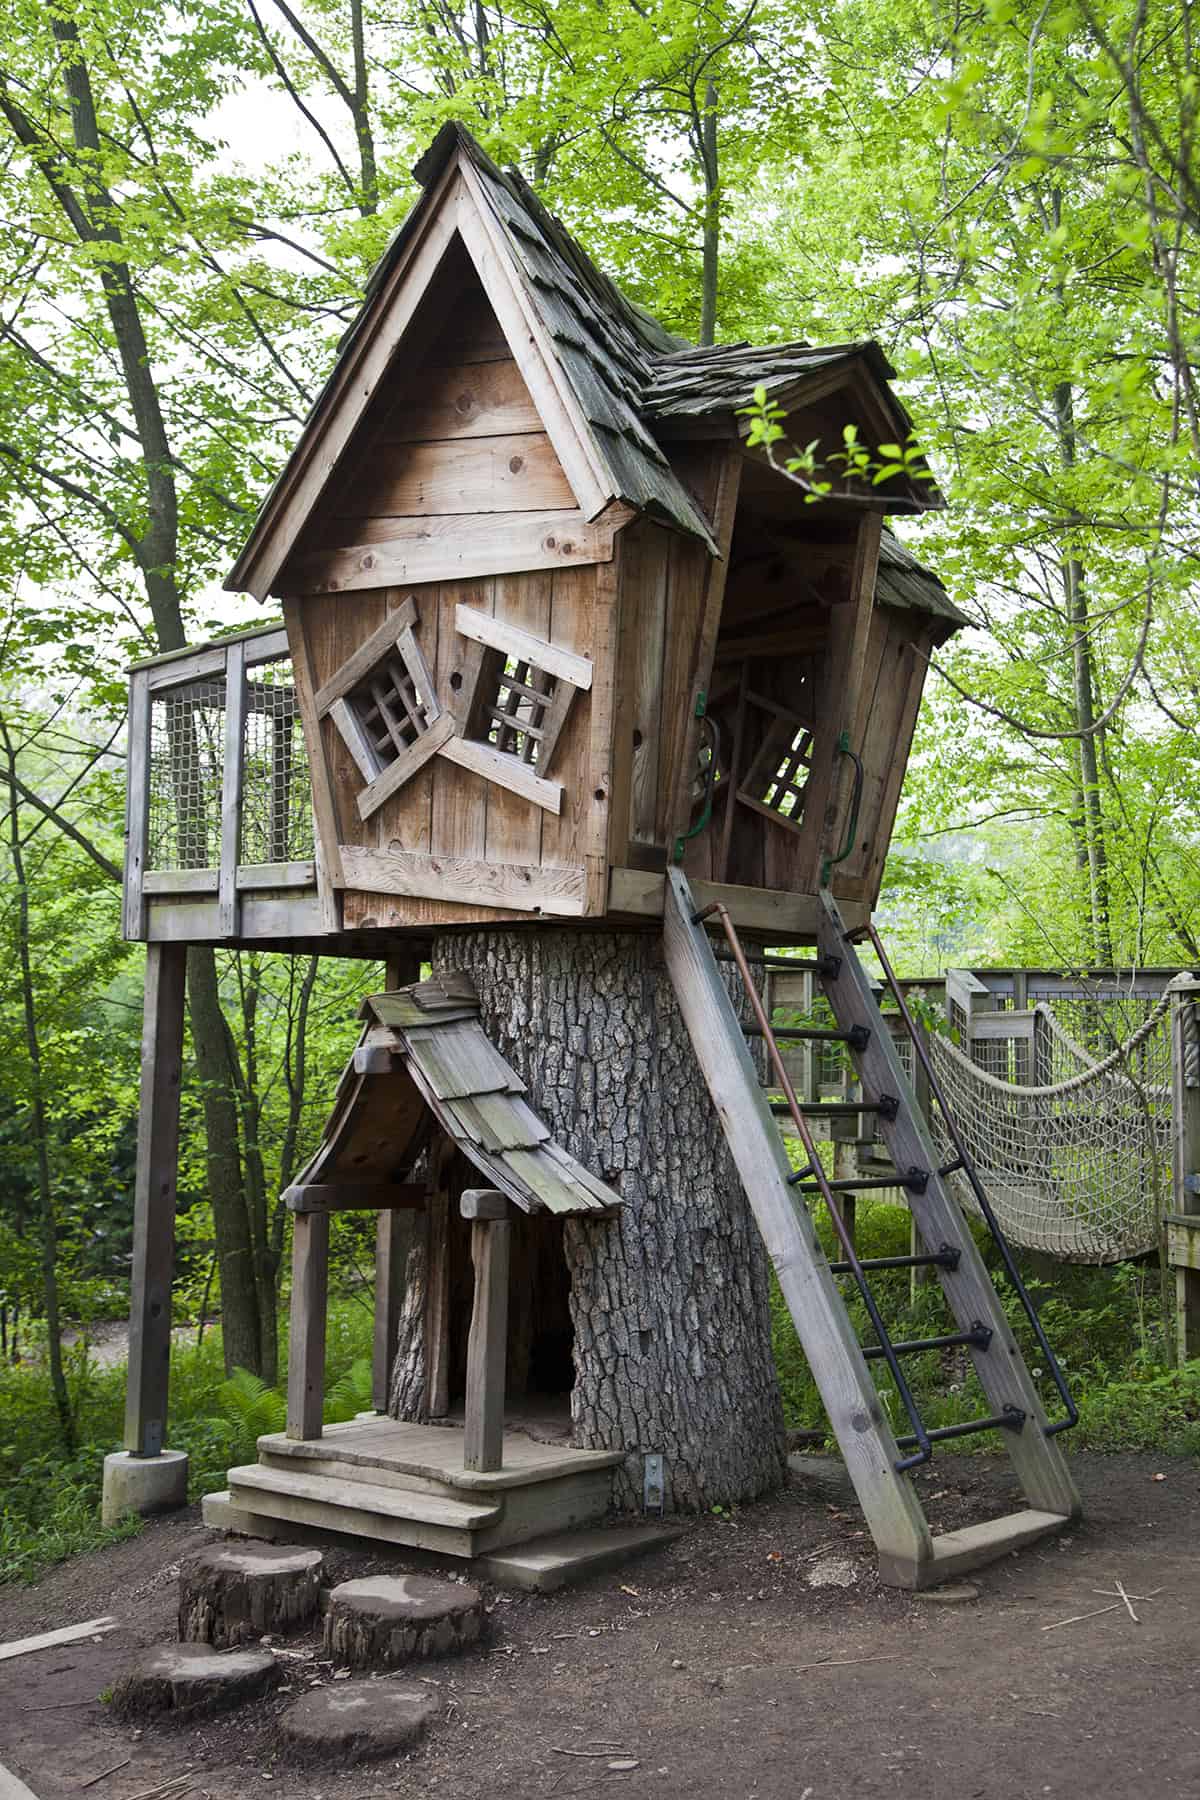
Elevated features—like a treehouse perched on a driftwood trunk or sturdy branch—pull focus upward. Sizing matters; match the house to the surrounding plants so it doesn’t look out of place.
Moss or dwarf ivy at the base hints at a wild forest floor. A rope walkway—twine and craft sticks—adds a bit of adventure, as long as it’s anchored tight.
Fairy lights tucked under the roof edge give a gentle outline after dark, not overpowering the plants below. A solar lantern or two at the base balances the scene.
Swap out roof details as the seasons change—tiny pumpkins in autumn, a dusting of white sand for winter. Keeps things fresh without a total overhaul.
Wizard-Themed Fairy Garden Using Green Glass Bottles
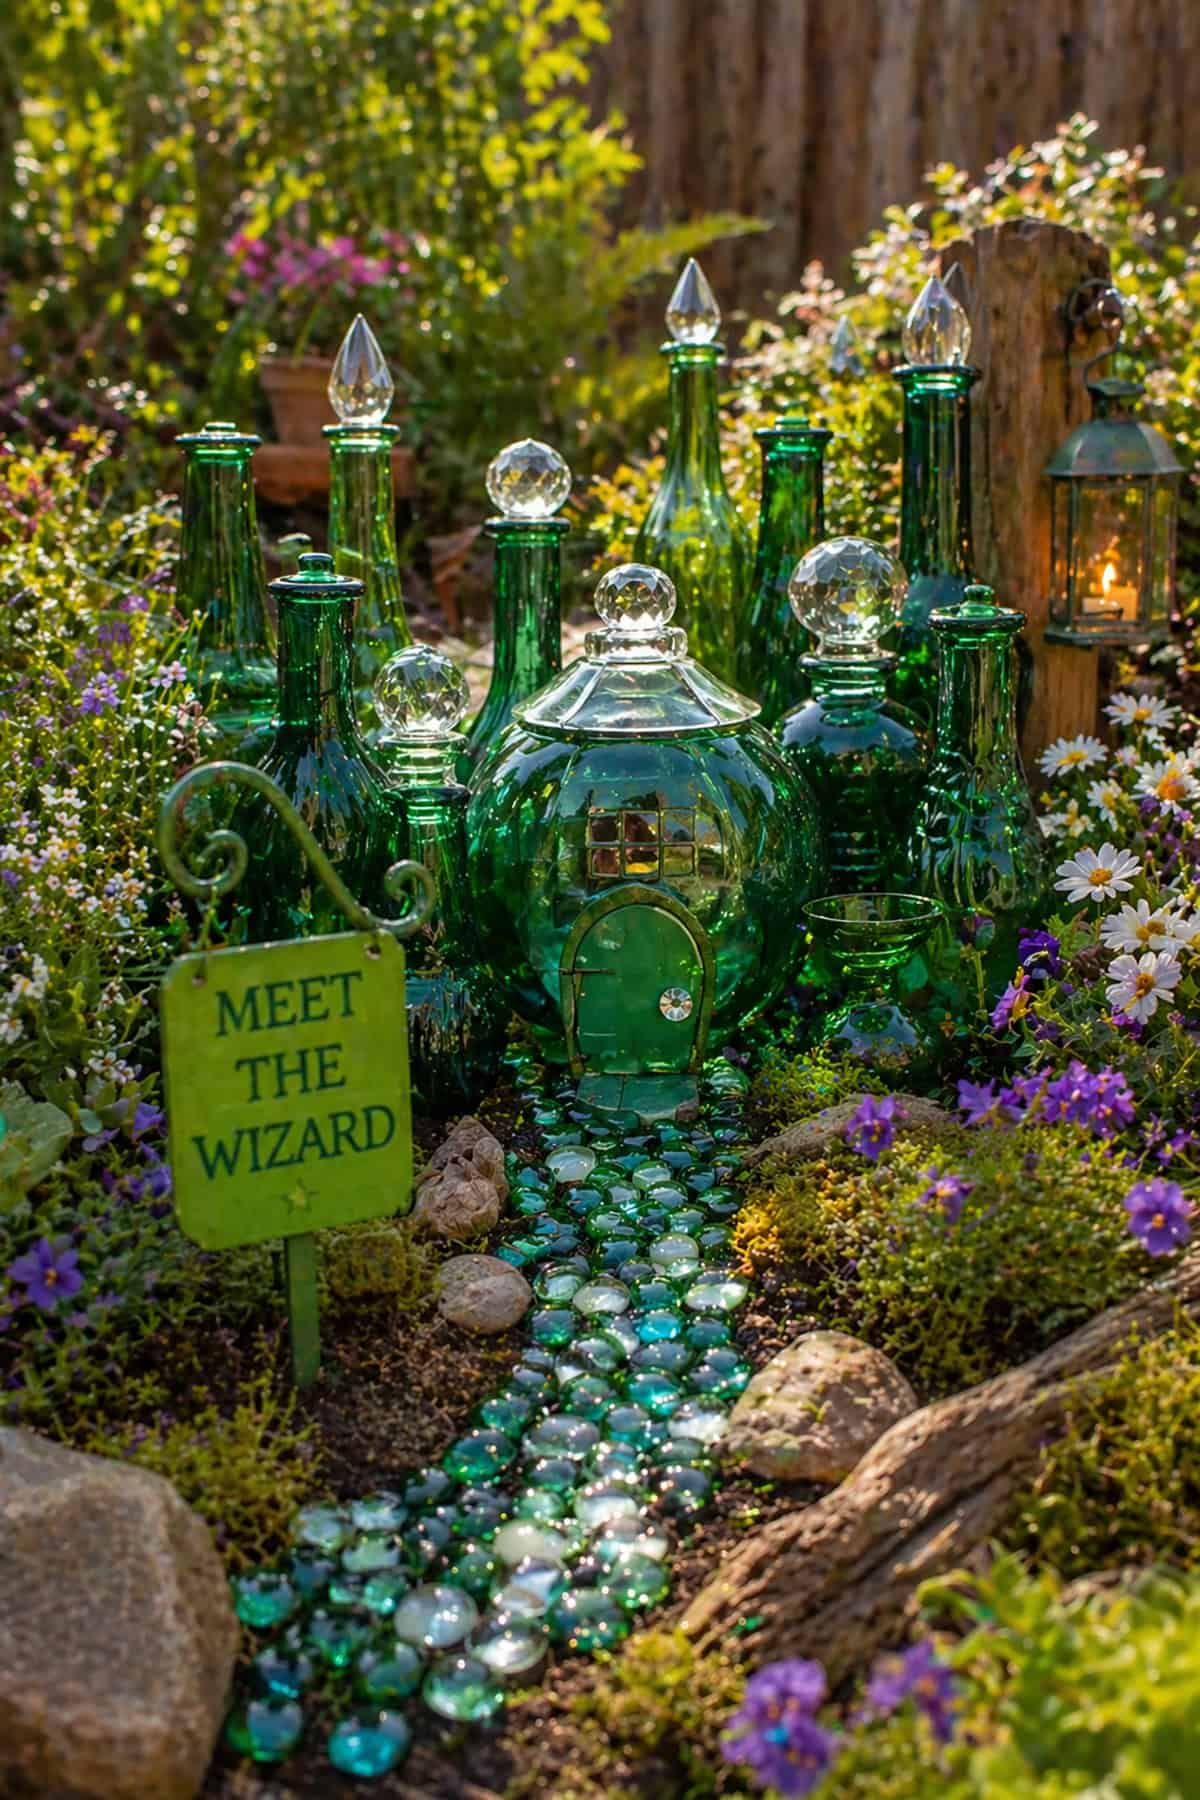
That deep green glass? It sets a moody, almost secretive vibe right off the bat. Try slicing the base off smaller bottles for quick, jagged towers, or just tuck whole bottles among the greenery where they’ll catch and scatter sunlight in unexpected ways. Don’t line them up—play with height so nothing feels too staged.
Beneath it all, dark gravel or bark chips pull the eye to those glassy greens. Mini ferns and pint-sized hostas squeeze in, their leaves overlapping until you get a pocket of shade that feels hidden away. It’s a little wild, a little cramped, but that’s the point.
Cool blue or white fairy lights tucked behind the glass throw out ghostly glows, bending and pooling color across stones. A battered solar lantern—bronze, maybe a little tarnished—lurks in the corner, hinting at old magic without spelling it out.
Don’t go overboard on props. One wizard figure or a crooked staff is plenty. Too many trinkets and you’ll lose the spell.