
Pressed flowers have a quiet way of holding onto a moment. A few petals can turn everyday objects into keepsakes that feel personal and lasting. This list of 50 DIY pressed flower craft ideas gives you plenty of ways to turn simple blooms into something worth keeping or gifting.
Table of Contents
- DIY Pressed Flower Craft Ideas
- Pressed Flower Bookmarks
- Pressed Flower Phone Cases
- Framed Pressed Flower Art
- Pressed Flower Greeting Cards
- Resin Pressed Flower Coasters
- Pressed Flower Candle Holders
- Pressed Flower Glass Ornaments
- Pressed Flower Jewelry Pendants
- Pressed Flower Earrings
- Pressed Flower Keychains
- Pressed Flower Tray Decor
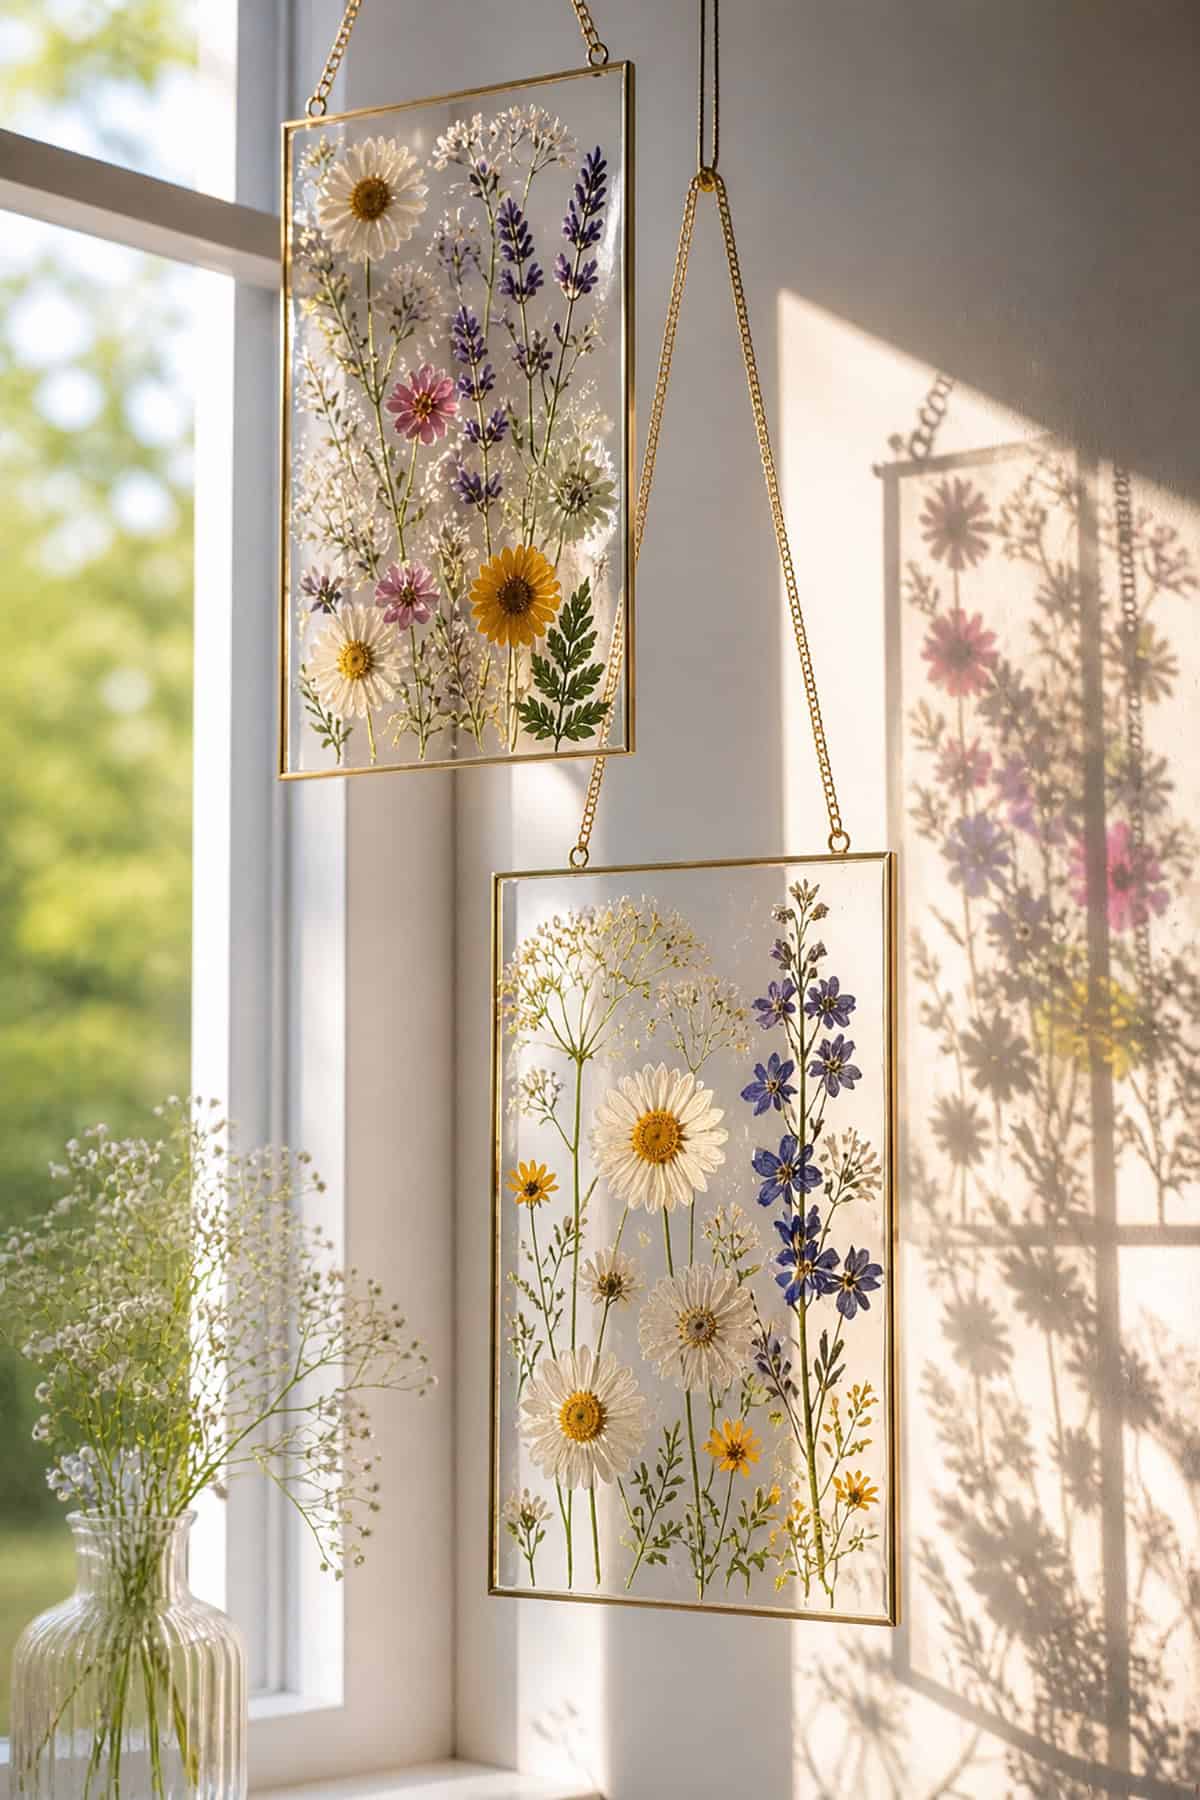
- Pressed Flower Wall Hanging
- Pressed Flower Gift Tags
- Pressed Flower Stationery Sets
- Pressed Flower Photo Frames
- Pressed Flower Resin Bookmarks
- Pressed Flower Envelopes
- Pressed Flower Scrapbook Pages
- Pressed Flower Terrarium Insert
- Pressed Flower Stickers (With Laminate Film)
- Pressed Flower Floating Frame
- Pressed Flower Wax Seals
- Pressed Flower Lampshade
- Pressed Flower Tea Light Jars
- Pressed Flower Coated Candles
- Pressed Flower Shadow Box
- Pressed Flower Serving Board (Resin Top)
- Pressed Flower Window Decals
- Pressed Flower Suncatchers
- Pressed Flower Notebook Covers
- Pressed Flower Decorative Plates
- Pressed Flower Magnets
- Pressed Flower Resin Hair Clips
- Pressed Flower Phone PopSockets
- Pressed Flower Jewelry Dish
- Pressed Flower Resin Letters
- Pressed Flower Name Signs
- Pressed Flower Cabinet Knobs
- Pressed Flower Candle Rings
- Pressed Flower Gift Boxes
- Pressed Flower Bath Salt Jars
- Pressed Flower Table Runner Inserts
- Pressed Flower Pillar Candle Wraps
- Pressed Flower Boutonnières
- Pressed Flower Resin Coaster Sets
- Pressed Flower Resin Paperweights
- Pressed Flower Resin Light Catcher Panels
- Pressed Flower Mason Jar Lids
- Pressed Flower Garden Markers
- Pressed Flower Wall Clock Face
- Pressed Flower Pendant Tray Charms
- Pressed Flower “Specimen Style” Labels
- Pressed Flower Fabric Transfer Art
- Pressed Flower Resin Rings
- Pressed Flower Wax Melts (Embedded Petals)
DIY Pressed Flower Craft Ideas
Preserved petals can add a bit of life to all sorts of objects—some purely decorative, some you’ll actually use. Combining flowers with see-through materials like resin, glass, or wax really shows off their shape and color, making for lasting gifts or home accents.
Pressed Flower Bookmarks
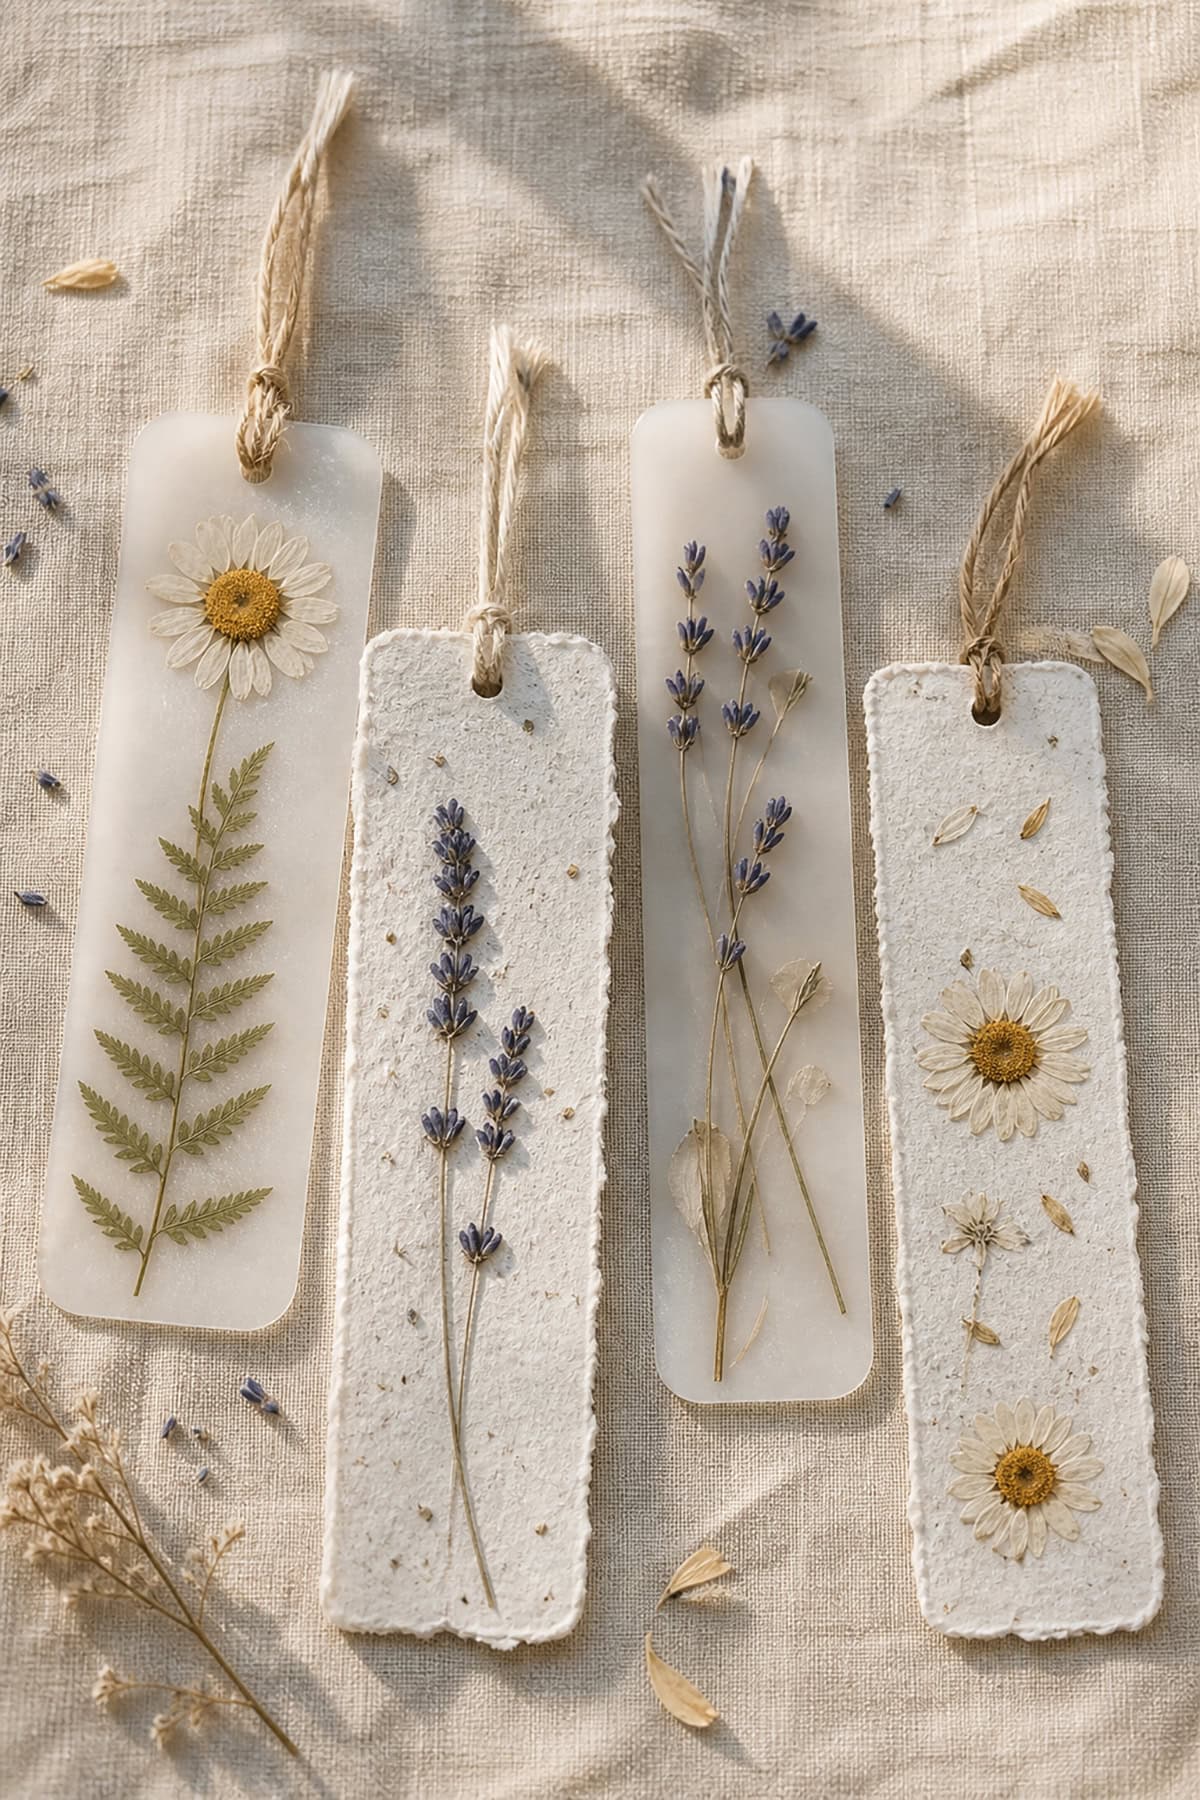
Pressed flower bookmarks are a simple, everyday way to keep a bit of nature close by. All you really need is absorbent paper, some clear contact film, and flowers that press flat. Thinner petals just work better—thick ones wrinkle up and look odd.
Sandwich your design between two pieces of laminate or thin plastic, then trim it up. This keeps the flowers safe and makes the bookmark tough enough for regular use. Punch a hole at the top and add a ribbon if you’re feeling extra.
Pressed Flower Phone Cases
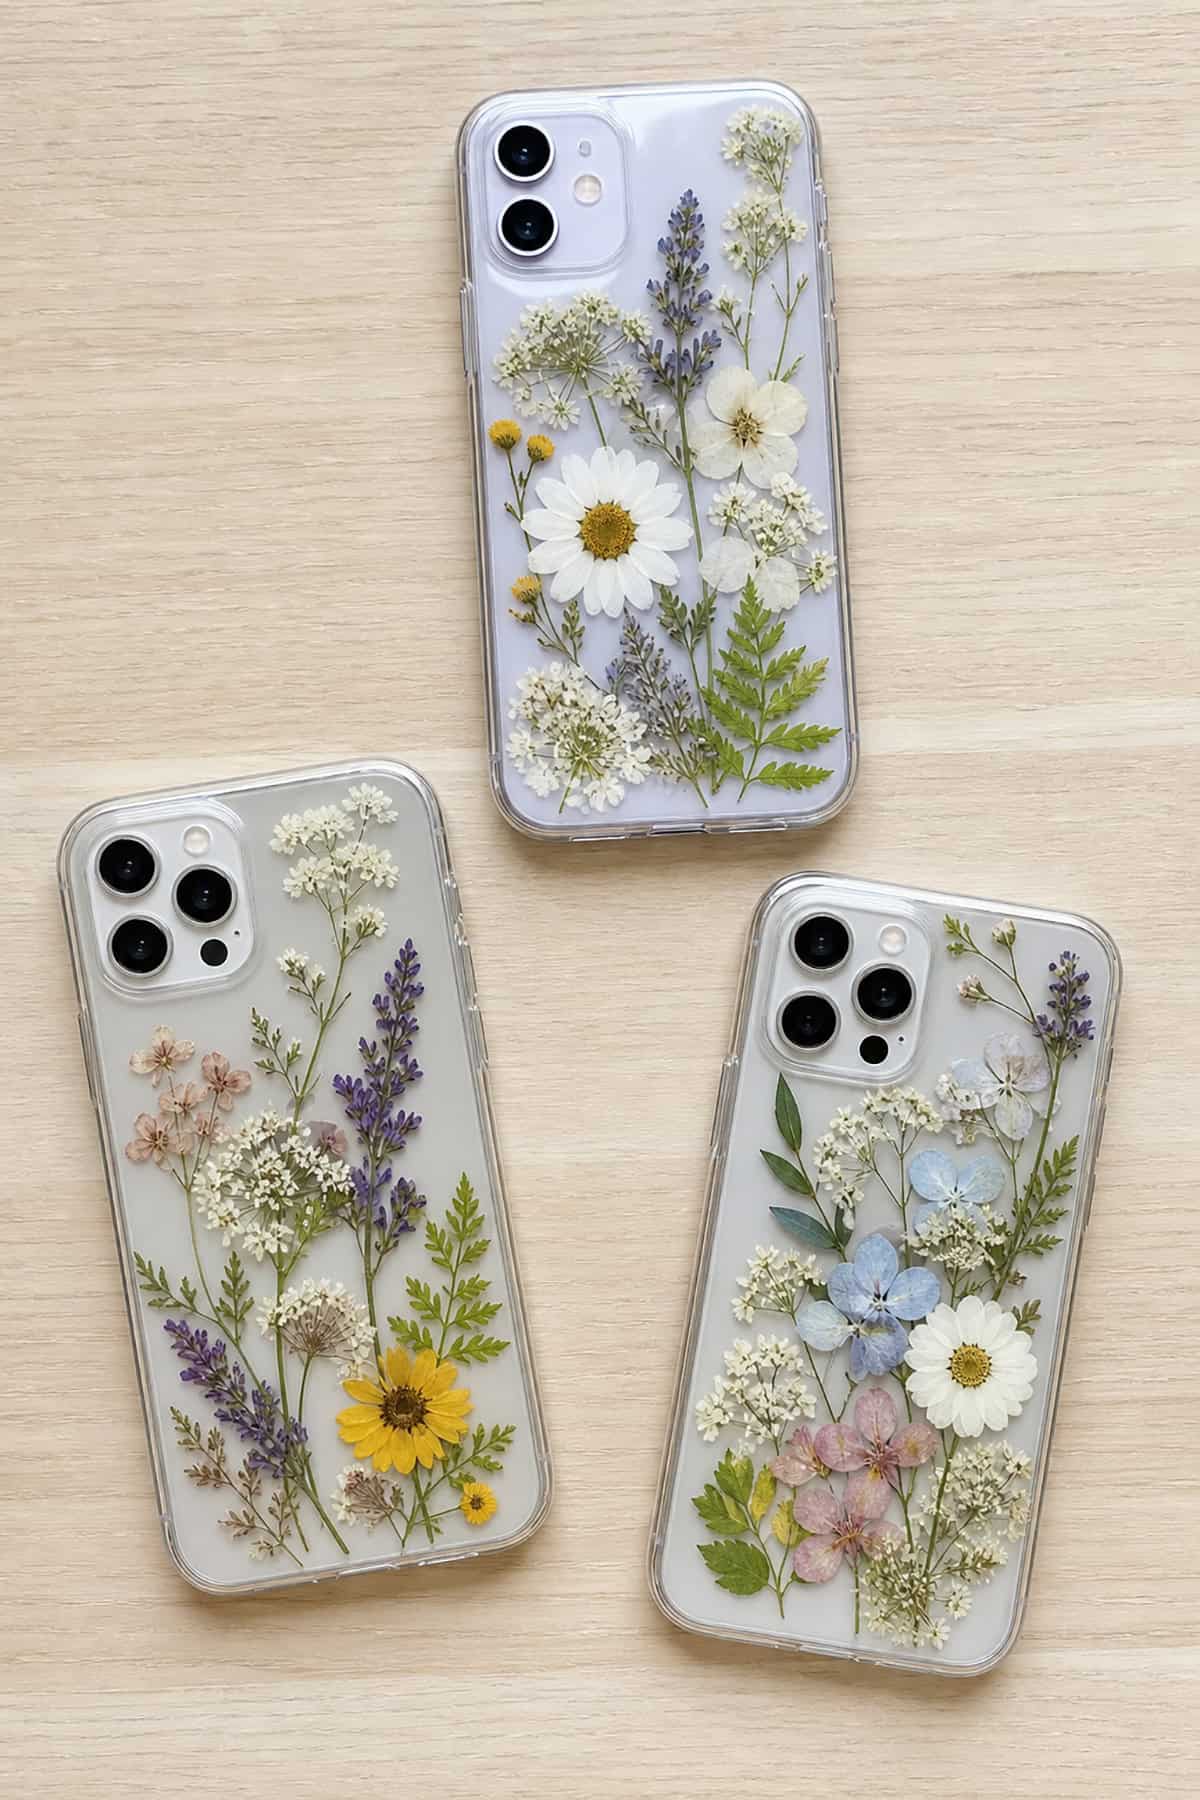
Customizing a phone case with pressed flowers is a fun way to make your device stand out. Go for a clear silicone case that hugs your phone tight. Arrange the flowers how you like, then seal them with a thin coat of resin or UV-protective sealant—just don’t rush, or you’ll get cloudy spots.
Stick with flatter blooms so nothing peels up. Press everything down evenly so the resin doesn’t pool weirdly. Once it’s dry, you’ll have a scratch-resistant case that shows off your flower arrangement under a glassy surface.
Framed Pressed Flower Art
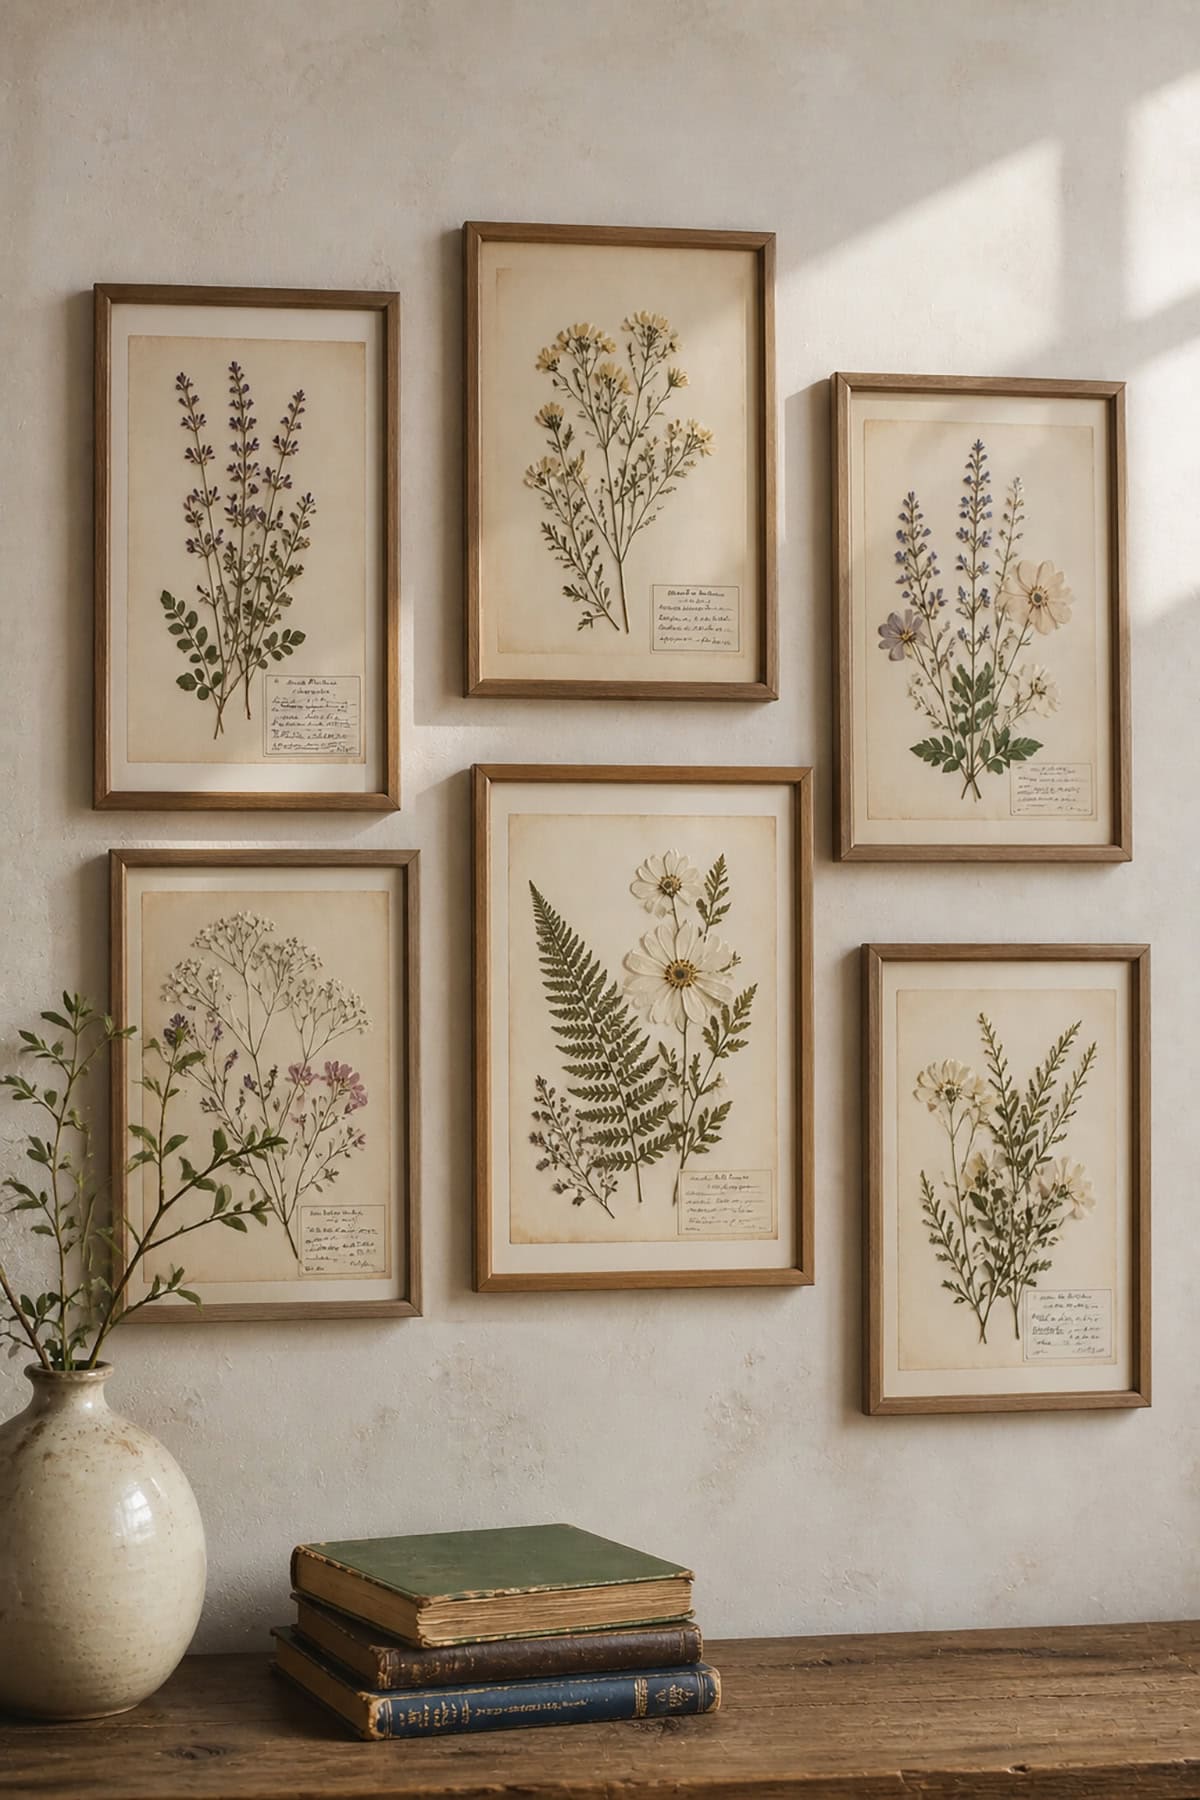
Turning pressed petals into framed art gives you a botanical display that’s easy to match with modern or natural-themed rooms. Use acid-free paper to avoid yellowing, and tweezers to place the petals just right. A balanced layout keeps things from looking messy.
Mount your design under a mat and glass frame. Make sure the frame closes tight to keep out moisture. If you keep it out of direct sun, it’ll last a good long time.
Pressed Flower Greeting Cards
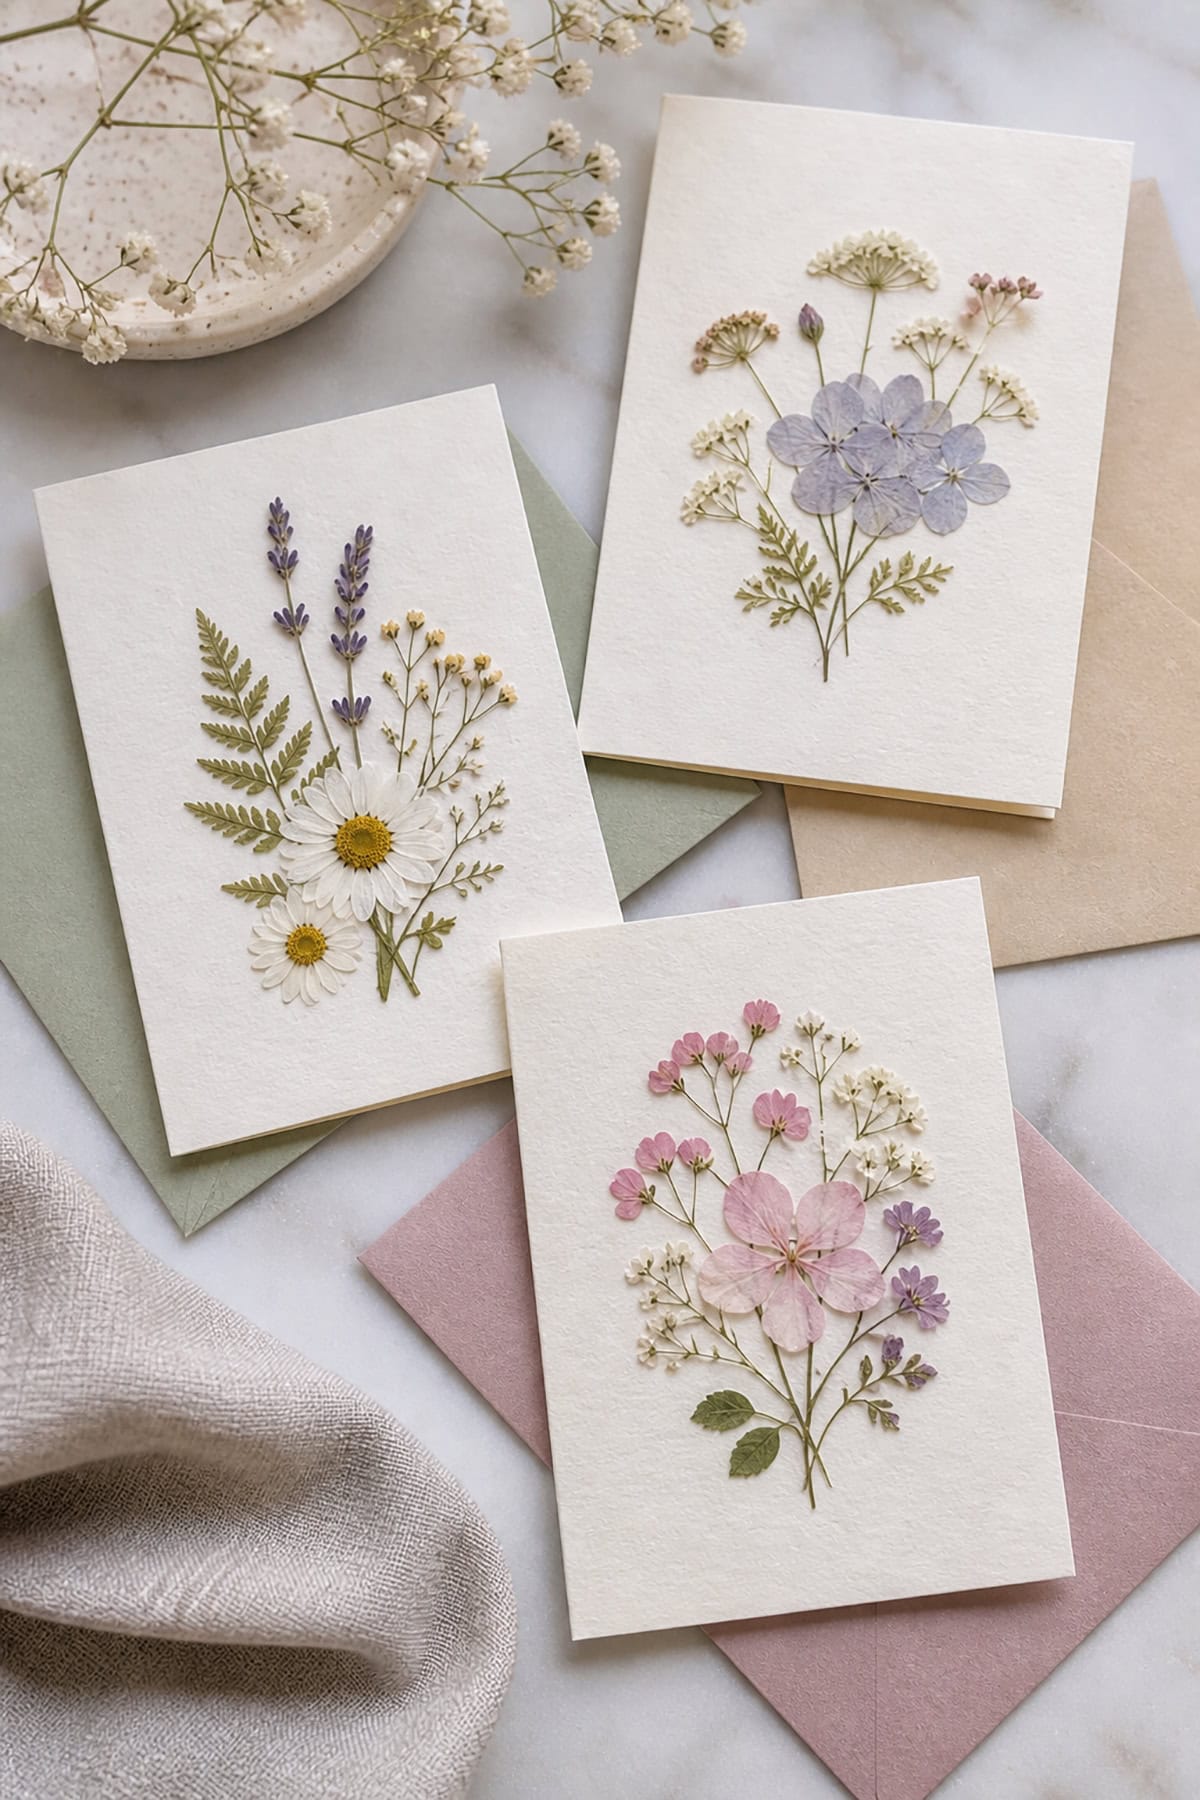
Handmade cards with pressed flowers just feel more personal. The petals add a little texture but won’t make the card bulky. A light touch of craft glue with a fine brush does the trick—too much and you’ll get glue stains.
Plain cardstock really lets the colors pop. One or two flowers per card usually looks best. Let the cards dry flat so nothing curls up. Sometimes, simple is just better, especially for special occasions.
Resin Pressed Flower Coasters
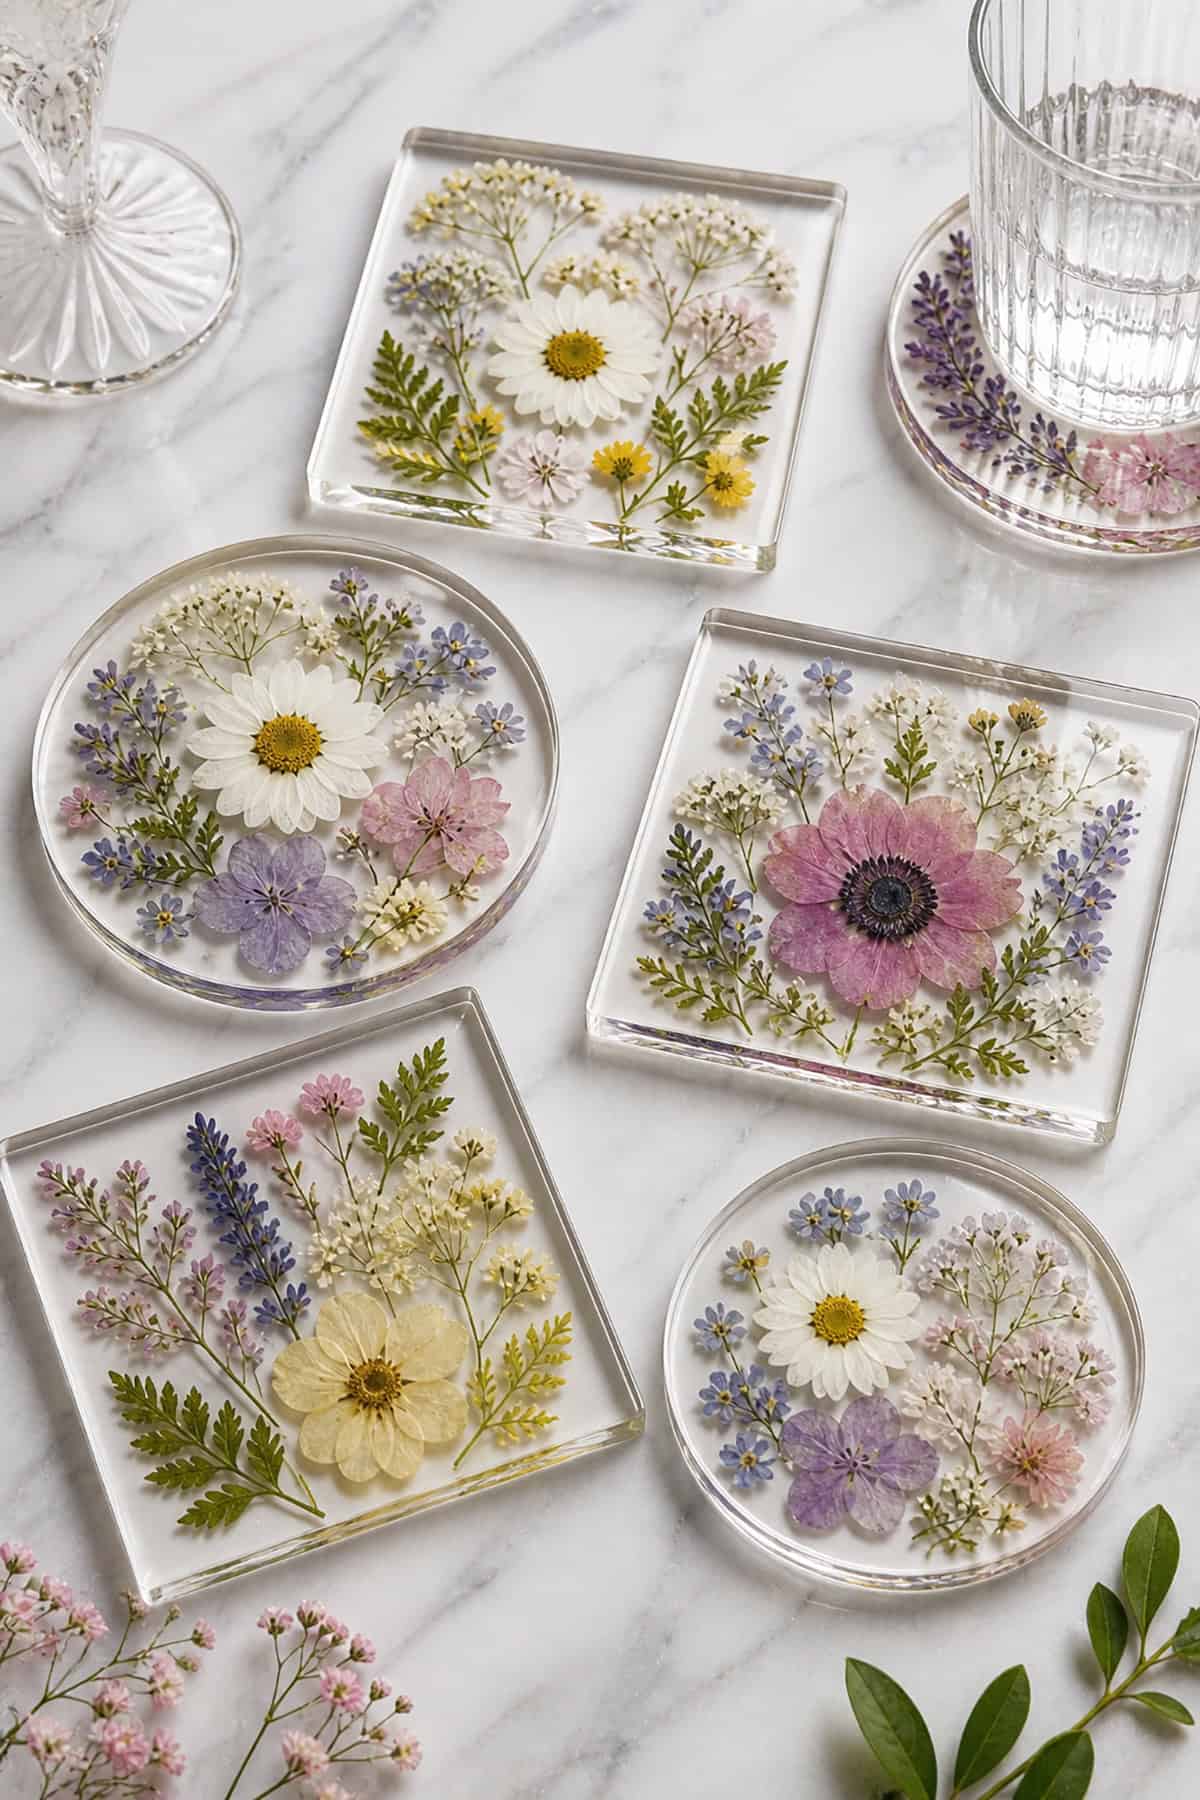
Pressed flower coasters in resin are both pretty and practical. Use a silicone mold for shape, pour half the resin, carefully arrange your flowers, then top it off with the rest.
Pop any air bubbles with a pin or a little heat. Once cured, sand the edges smooth. The result: water-resistant coasters that show off real flowers under a glass-clear finish.
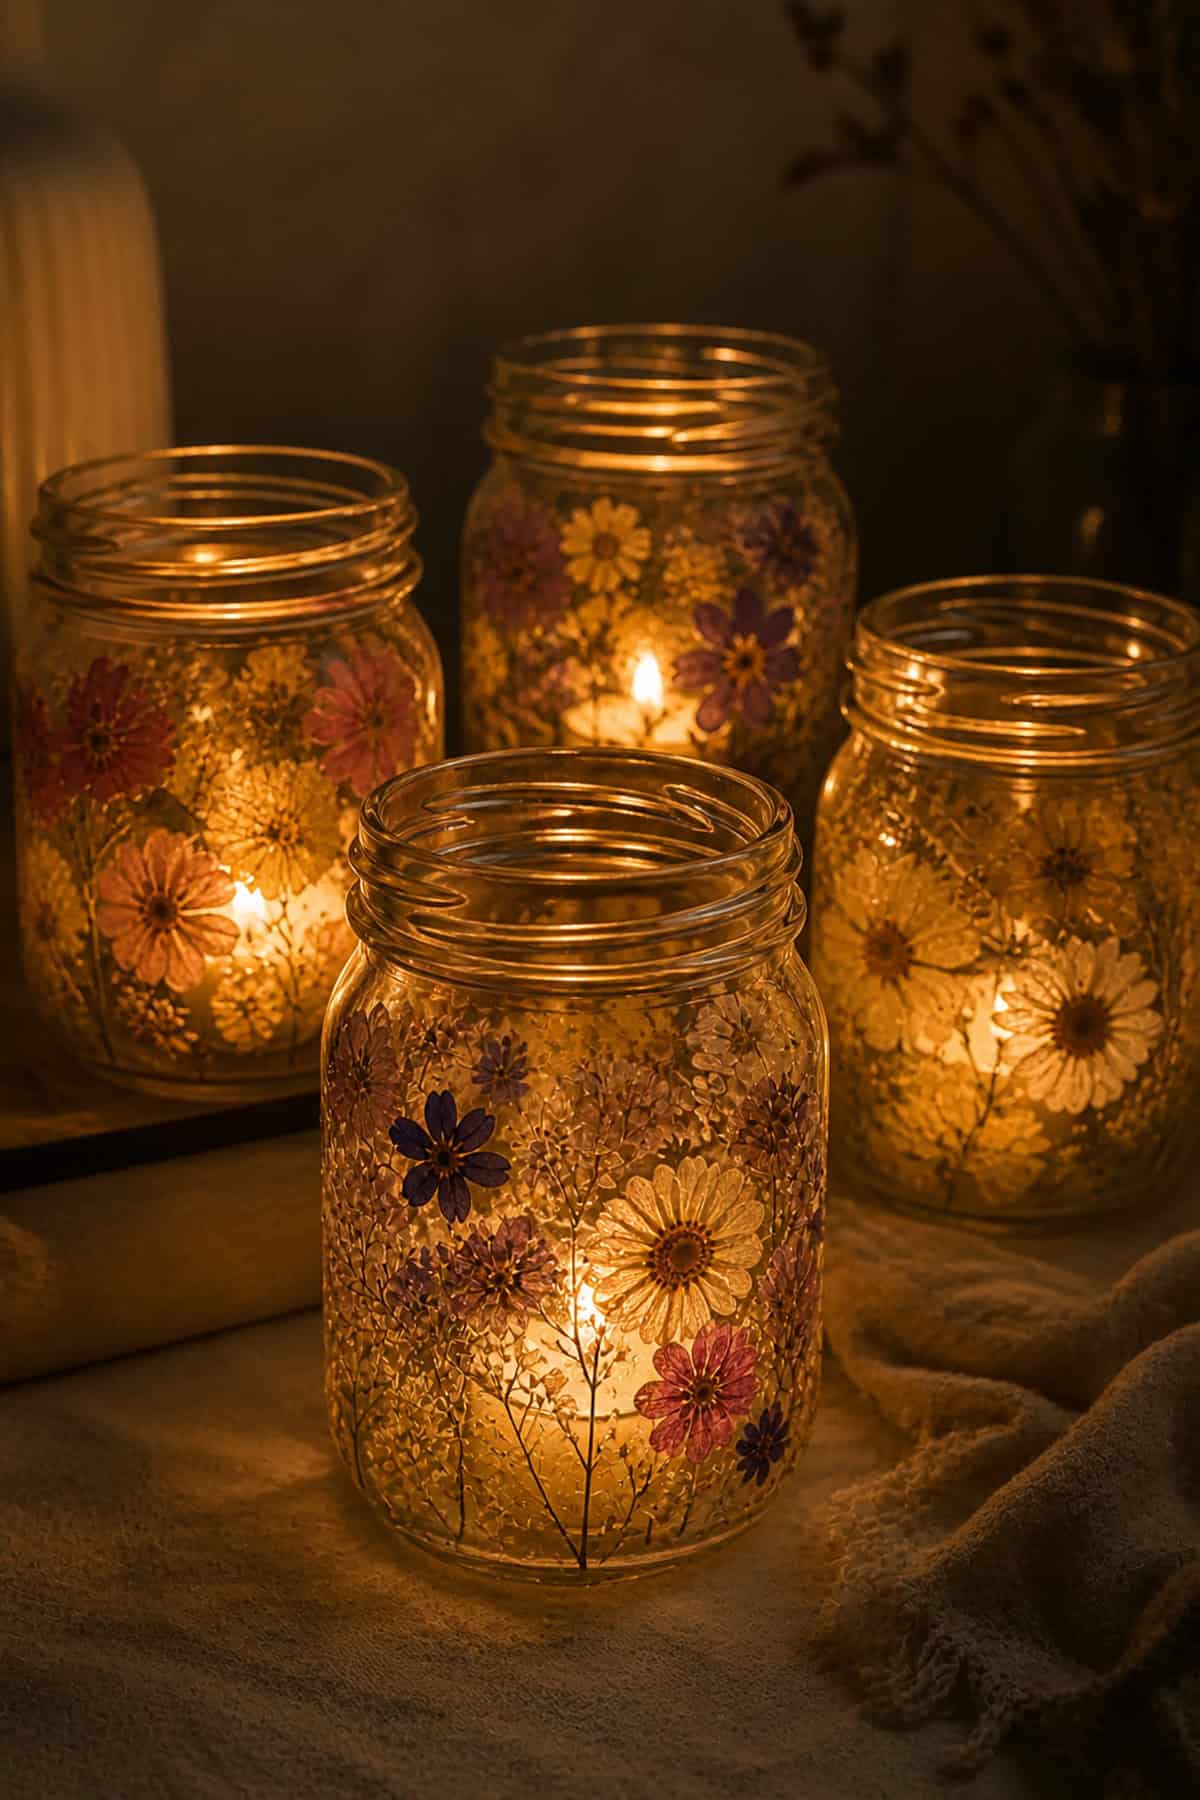
Pressed Flower Candle Holders
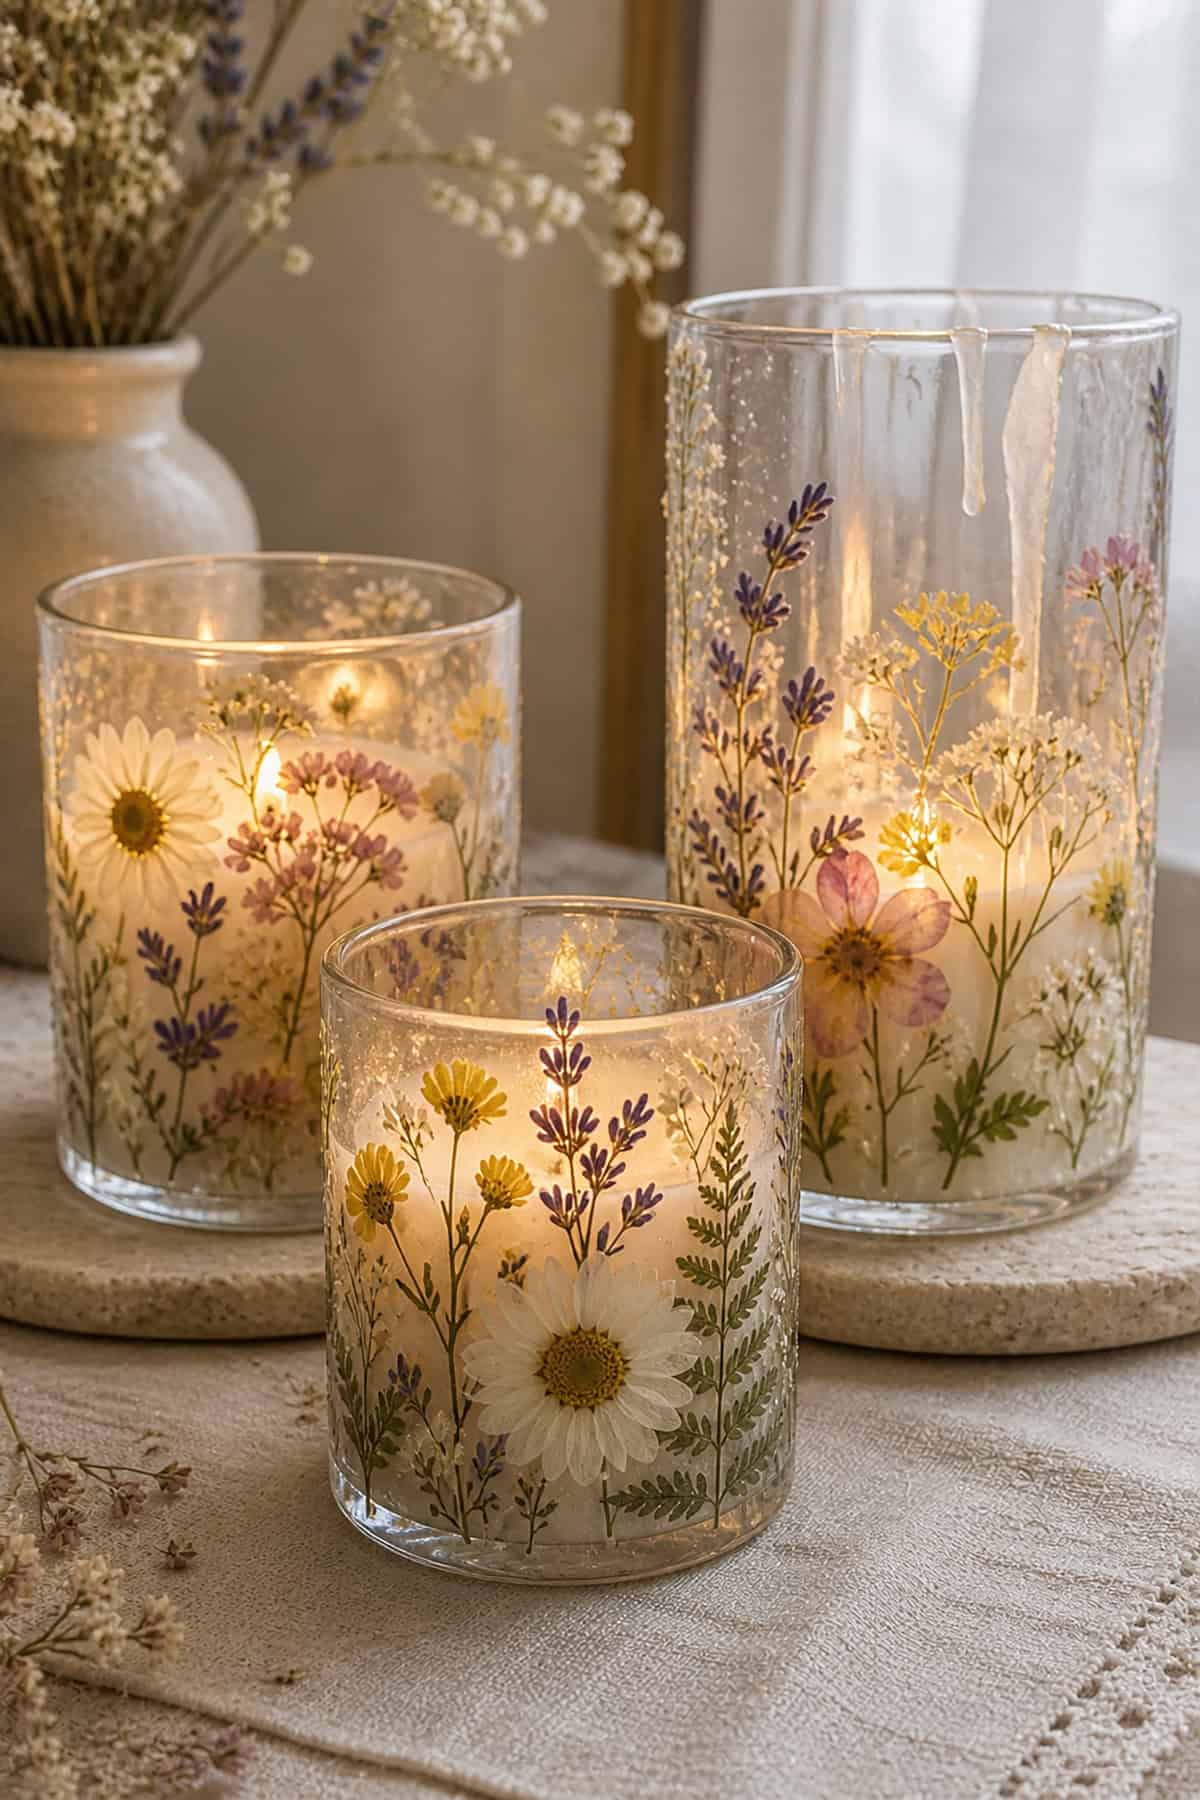
Clear glass candle holders with pressed flowers glow softly when lit. Brush on thin layers of decoupage medium to stick the petals to the outside, smoothing out any bubbles.
Let each coat dry before adding another. The petals catch the candlelight in a subtle way. Hand-wash only—don’t dunk them or toss them in the dishwasher.
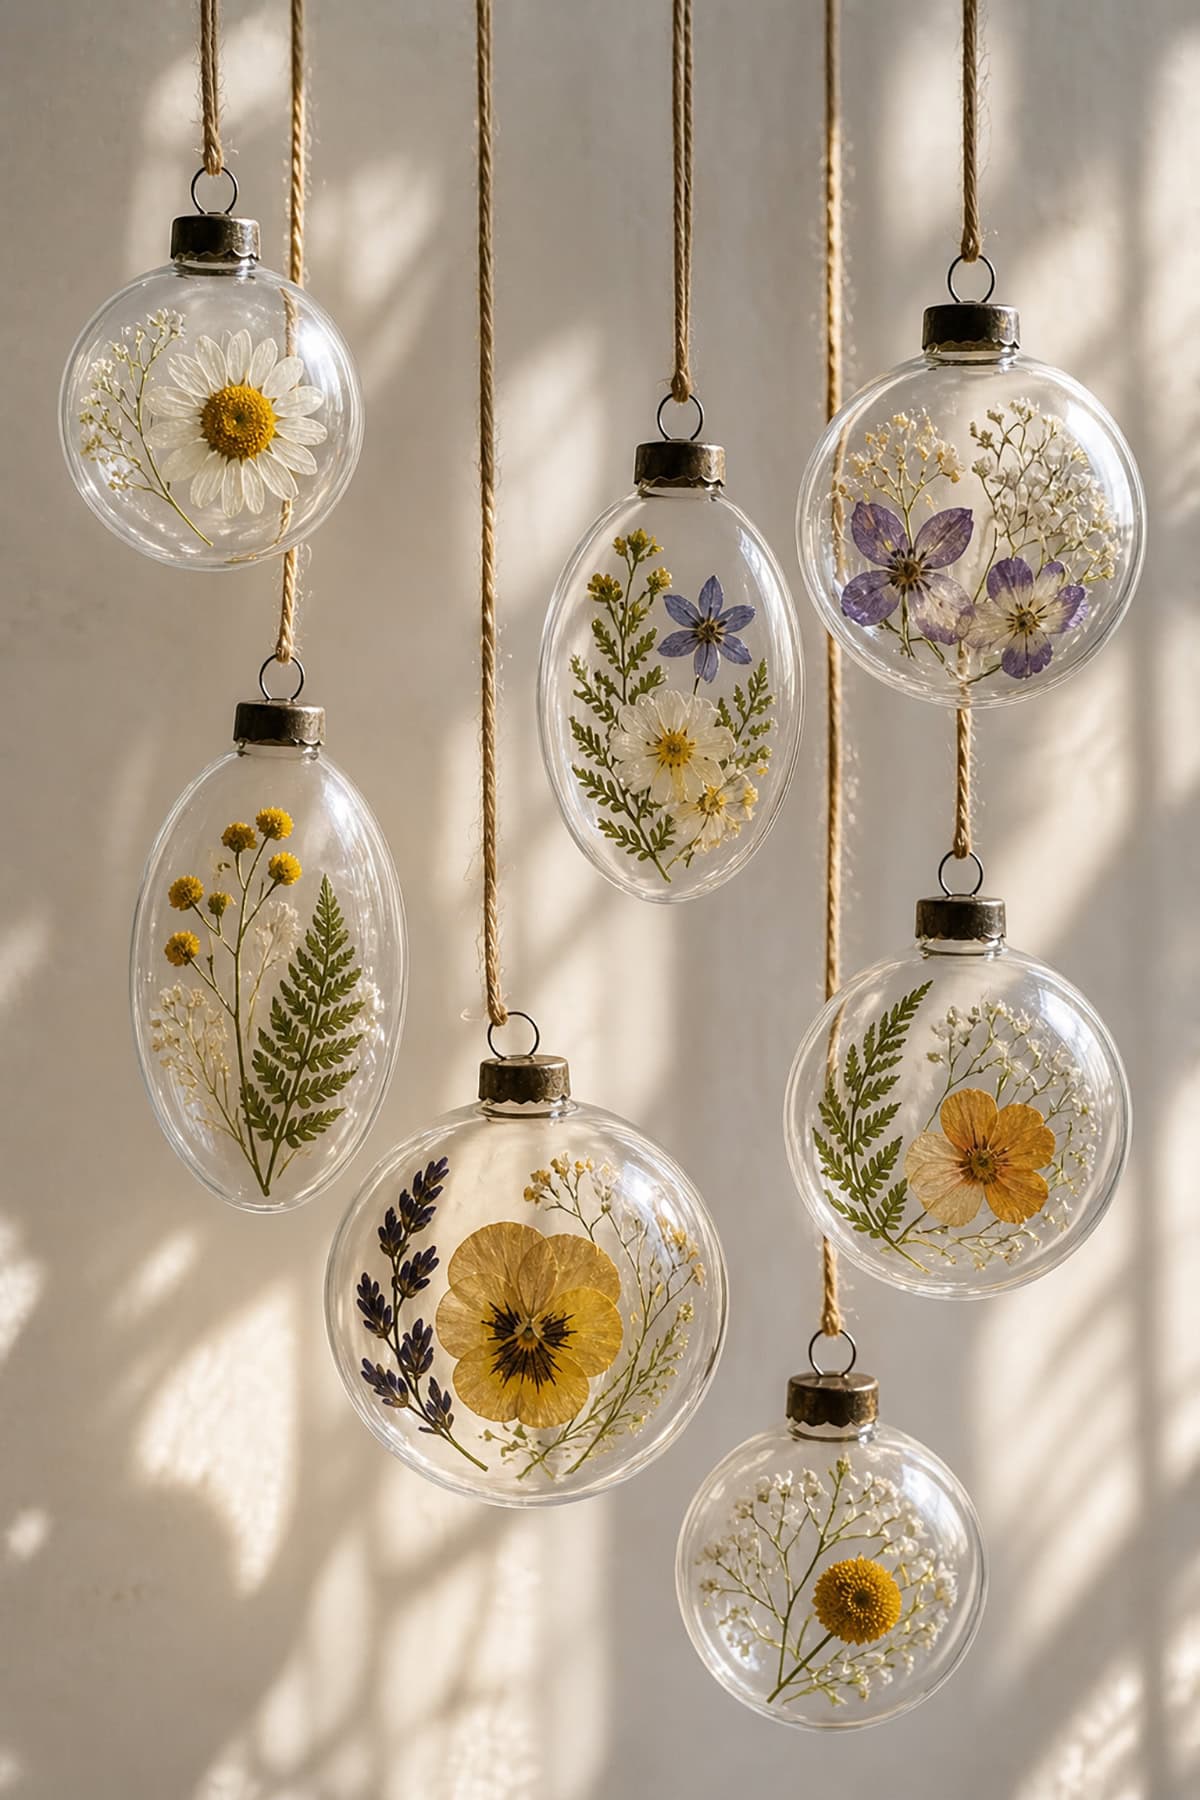
Pressed Flower Glass Ornaments
Glass ornaments let you show off tiny pressed flower arrangements in a floating display. Use tweezers to gently fill clear glass spheres, securing the flowers with a bit of glue or resin.
Seal the ornament once you’re happy with the look. Hang these in a window or on a tree—light shines right through, showing off the colors and shapes.
Pressed Flower Jewelry Pendants
Pressed flowers in resin pendants make for delicate, one-of-a-kind jewelry. Pick small, flat petals that fit inside pendant trays so nothing sticks out. Pour a thin base of resin, set the flower, then slowly fill to the top.
UV resin cures quickly in sunlight. Sand any rough bits, then add a chain or cord. It’s a subtle way to keep a little nature close at hand.
Pressed Flower Earrings

Light, resin-coated earrings with pressed flowers are perfect for botanical jewelry fans. Match up small, symmetrical blooms for a balanced look. Pour resin, set the flowers, and finish with another layer.
Let them cure overnight. Drill tiny holes for hooks if needed. Each pair shows off the unique patterns of the flowers in a glossy finish.
Pressed Flower Keychains
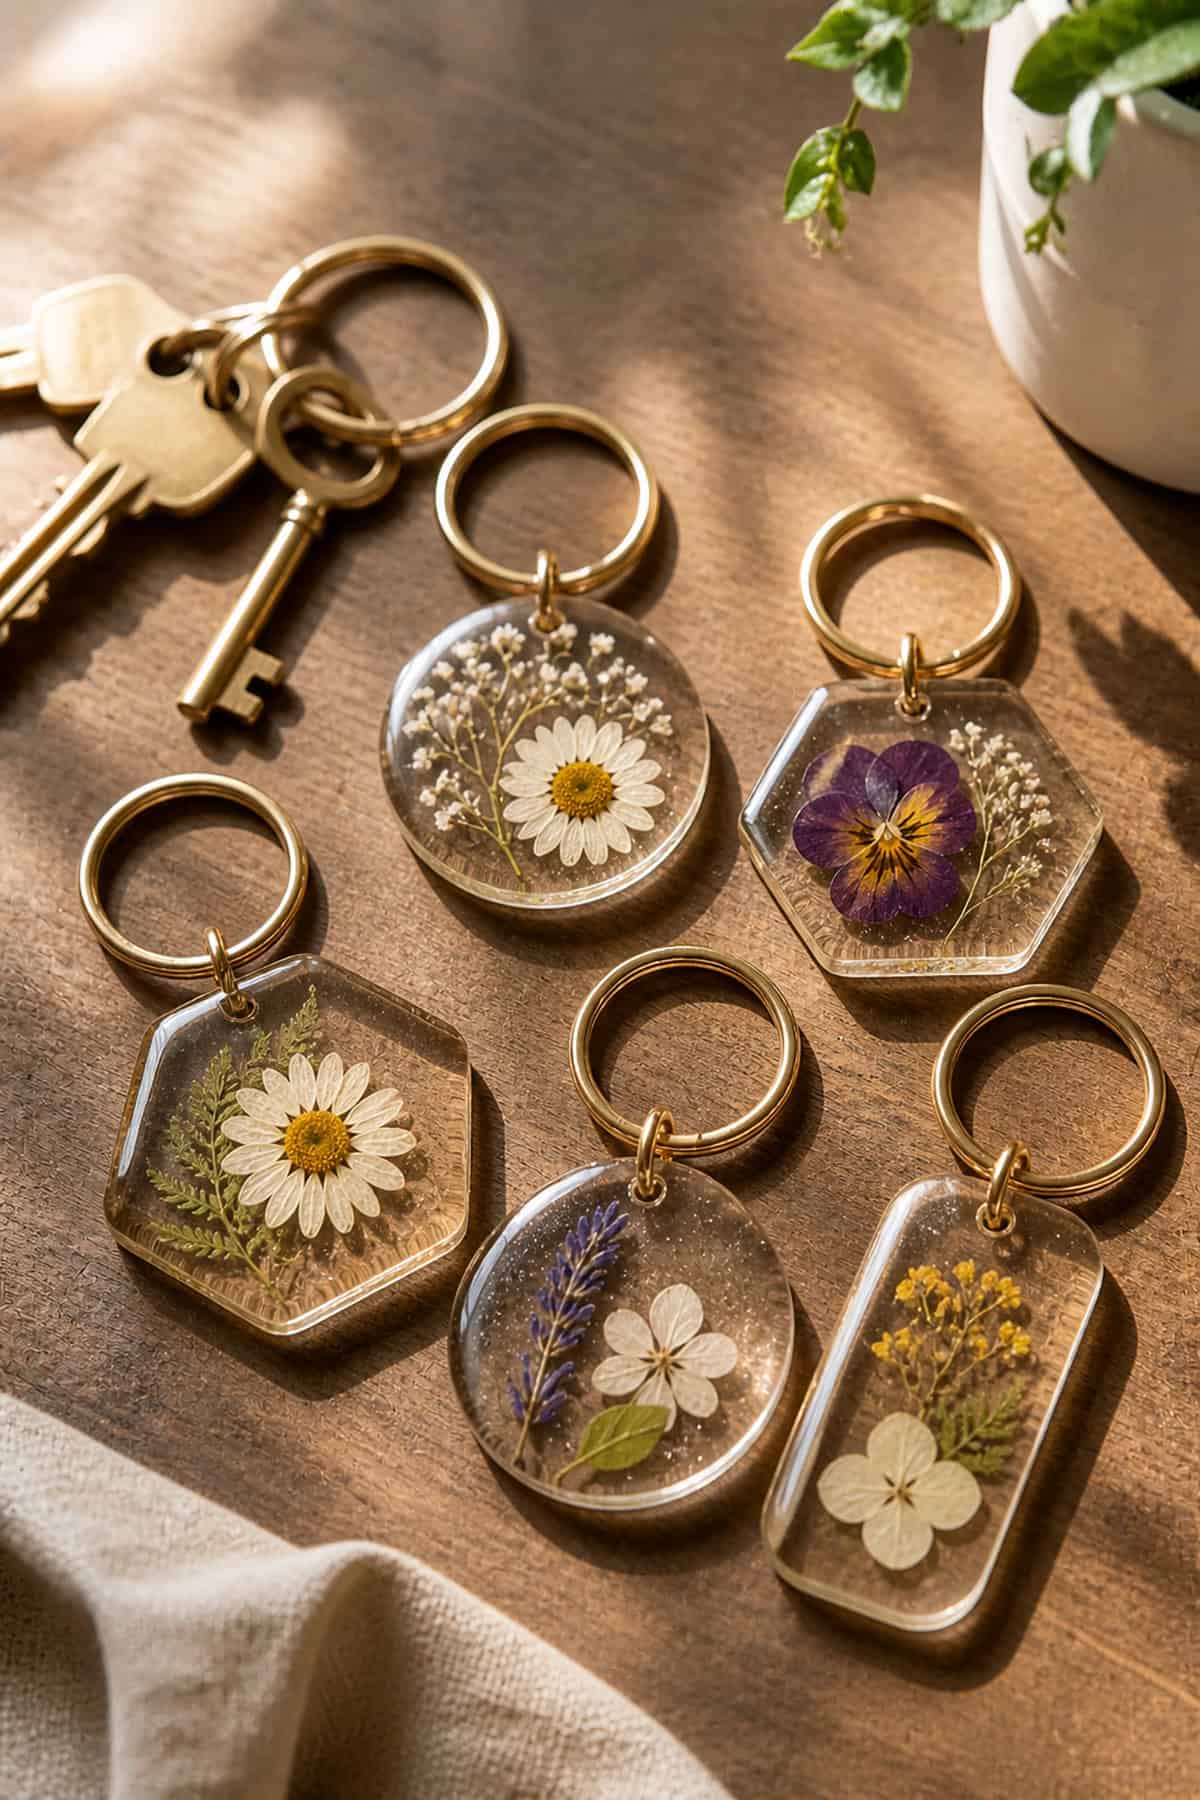
Pressed flowers sealed in acrylic or resin make surprisingly tough keychains. Use a small mold and arrange the blooms with care. After curing, add your keyring hardware.
If the surface looks cloudy, polish it with fine sandpaper. These keychains are both pretty and practical, and the flowers stay protected inside.
Pressed Flower Tray Decor
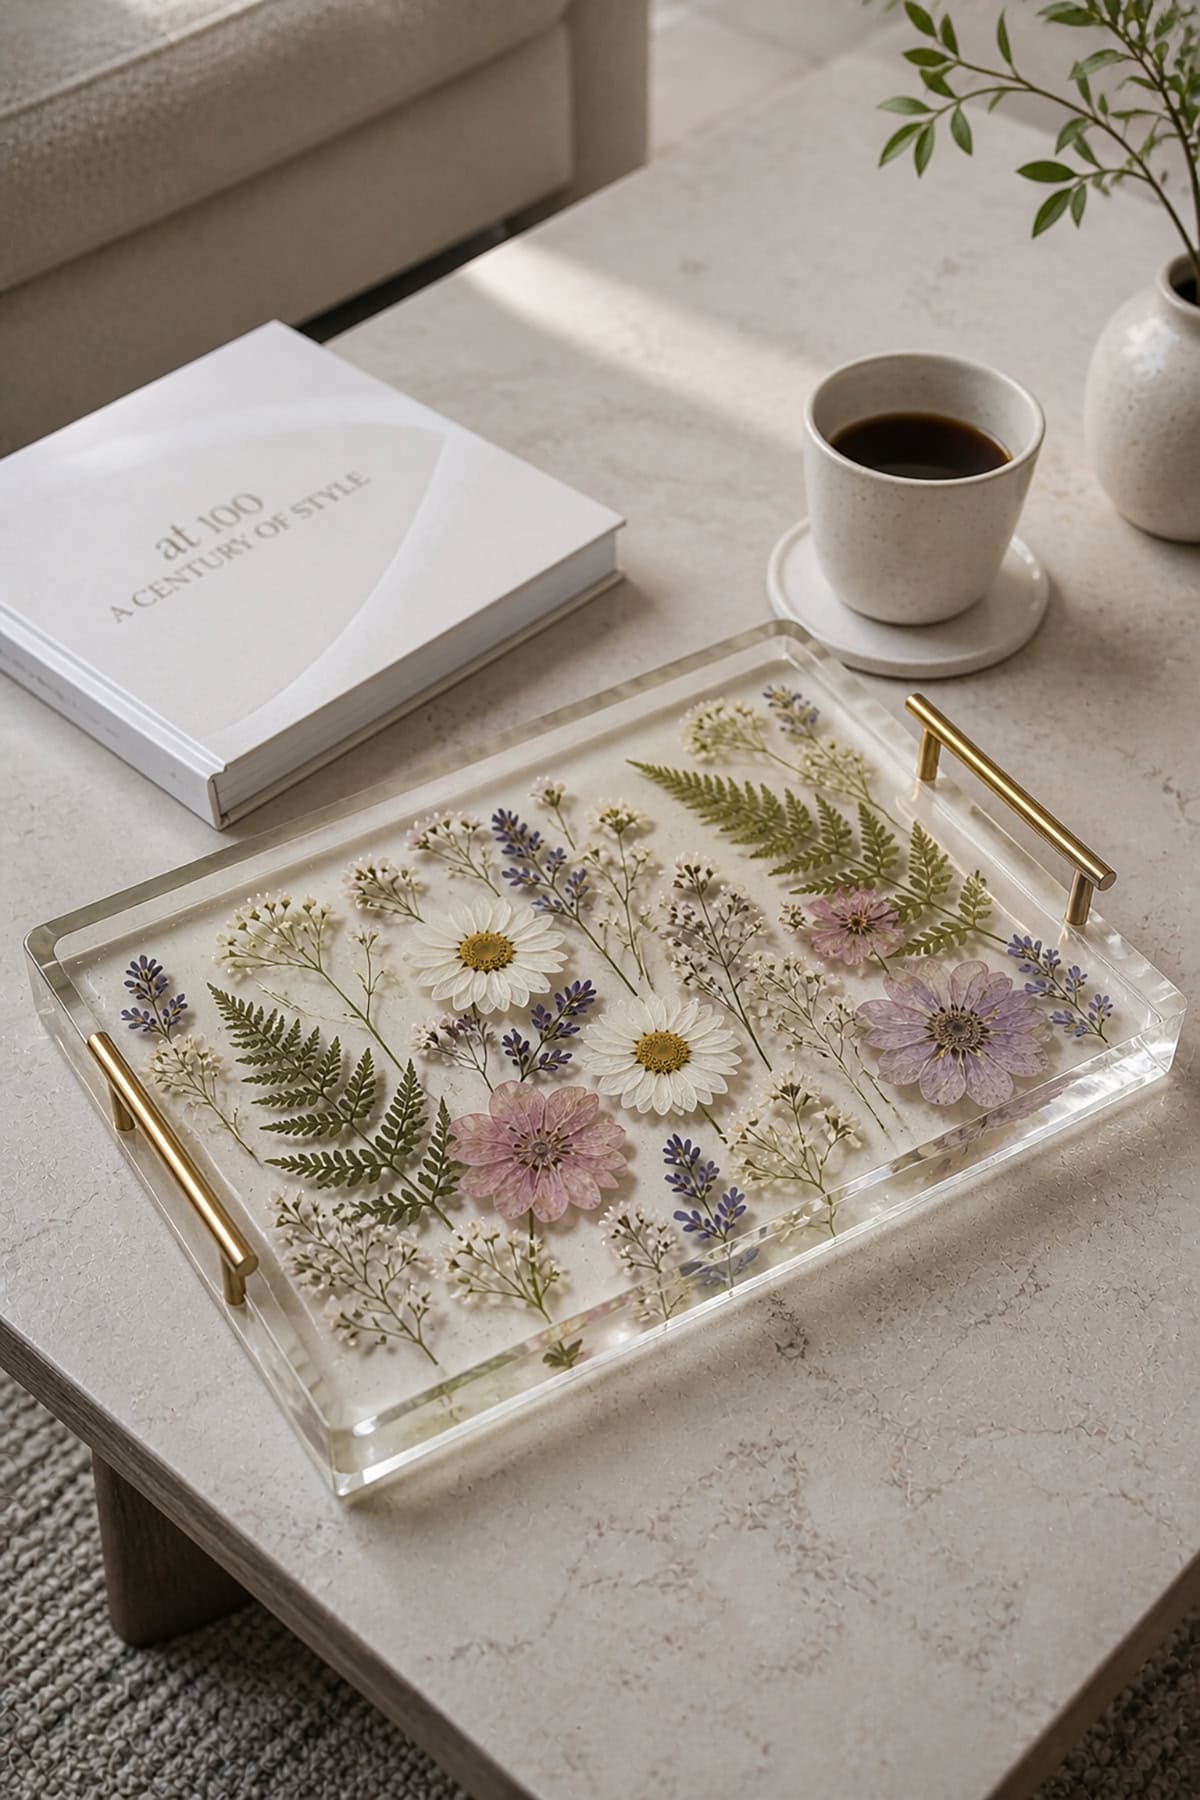
Decorative trays with pressed flowers under resin combine art and function. Arrange the petals on a wooden or acrylic tray, then pour a thin layer of resin over everything.
Keep an eye on curing for a smooth finish. The tray resists spills and keeps the flowers bright—great for serving snacks or just as table decor.
Pressed Flower Wall Hanging
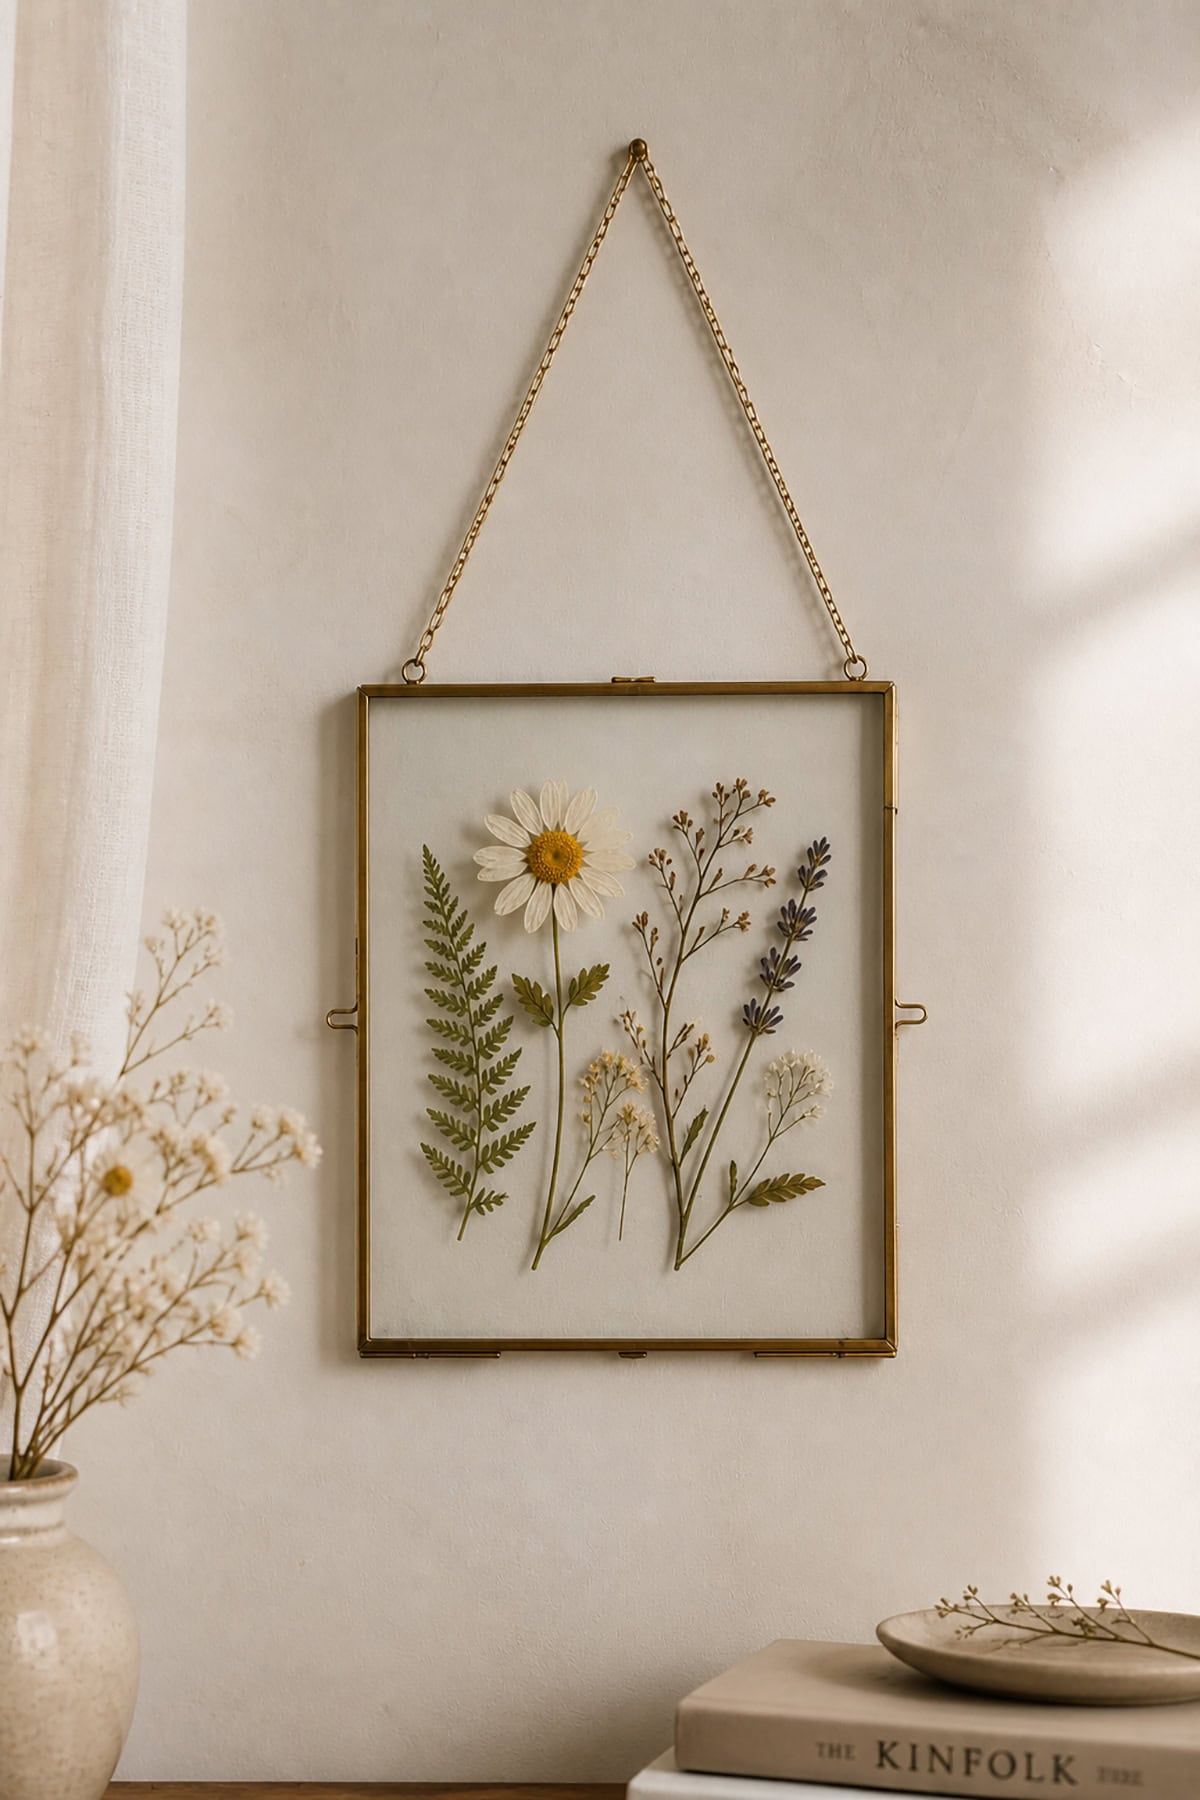
Suspending pressed flowers between two clear acrylic sheets makes for modern wall art that lets light stream through. Arrange your blooms, bolt the panels together, and add hanging hardware.
Clear acrylic really shows off the colors. Just avoid humid spots to keep condensation away. It’s a subtle way to add natural color to a room.
Pressed Flower Gift Tags
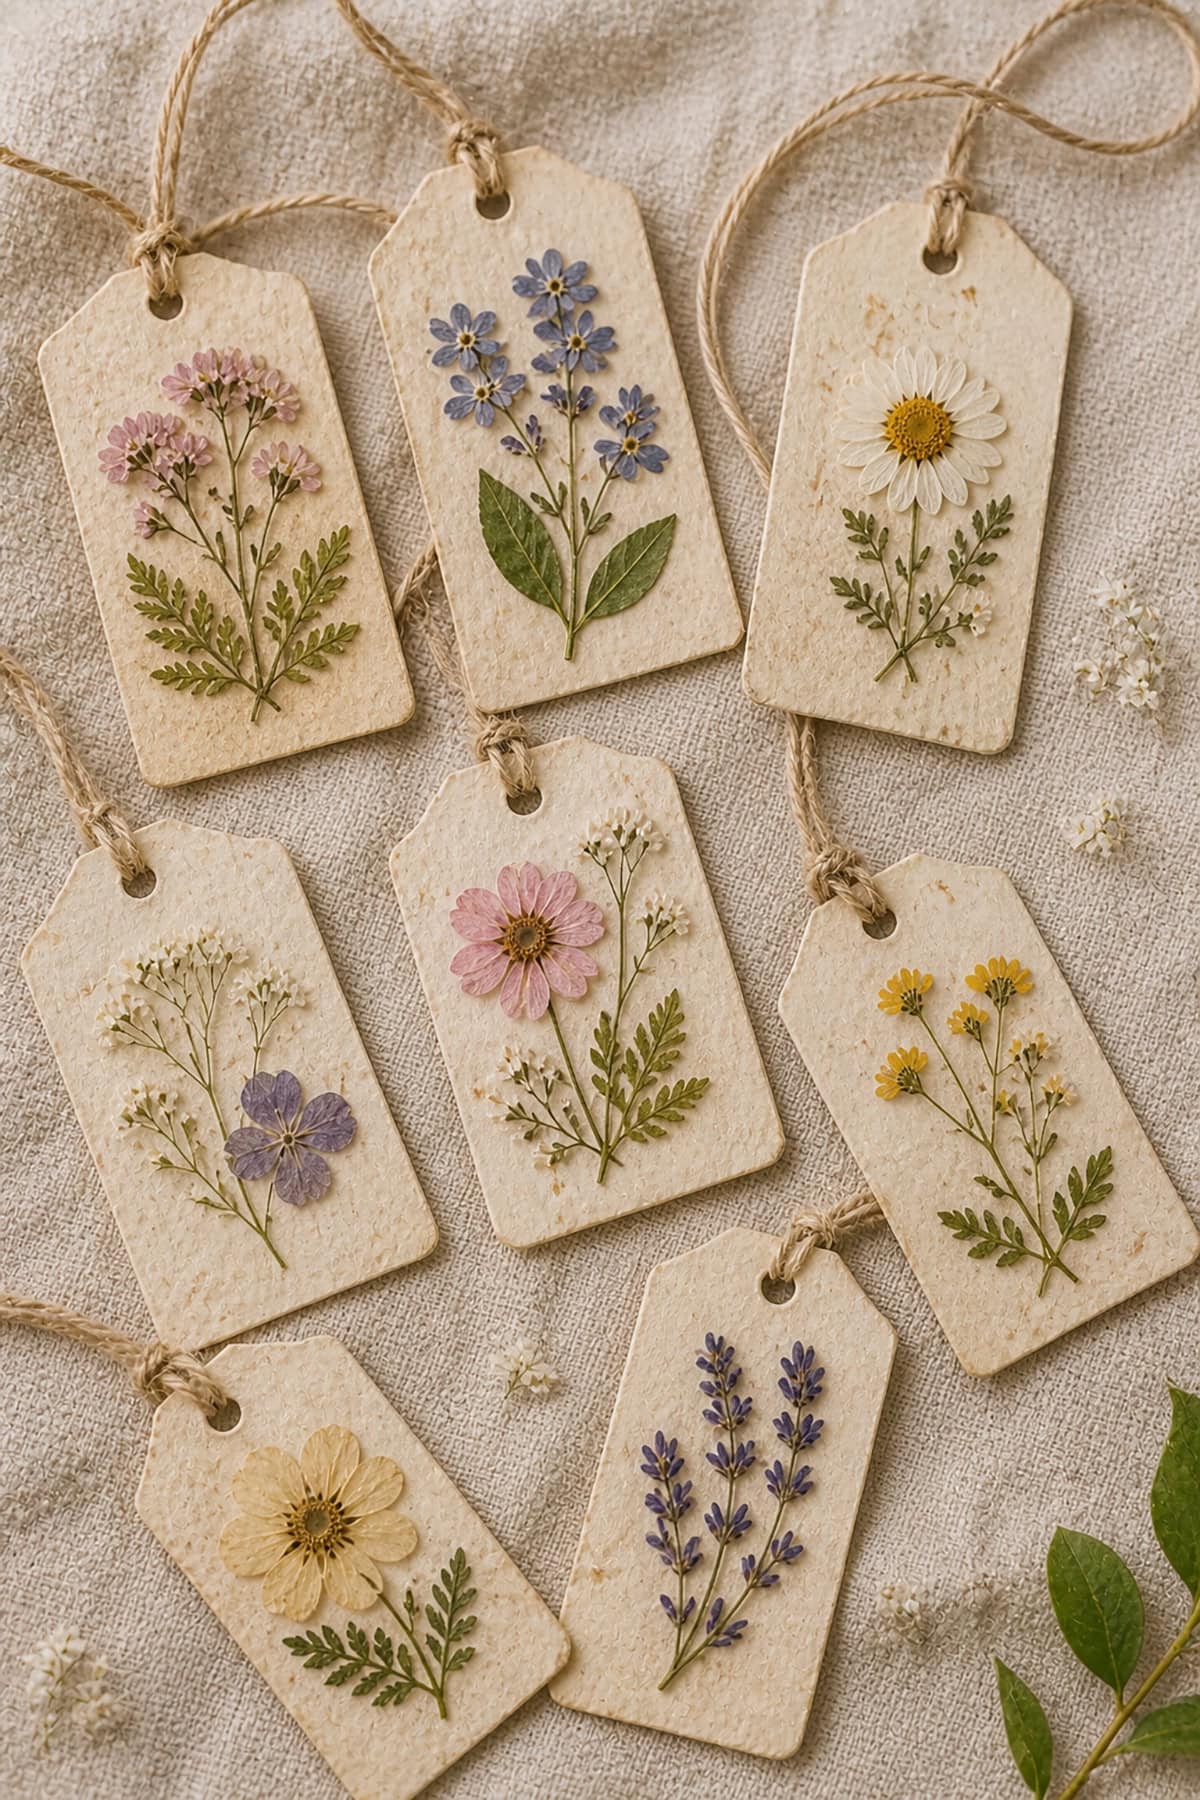
Pressed flower gift tags are a sweet touch for any present. Use thin blooms so they stick flat, and don’t overdo the glue. Press them under a weight while drying for best results.
Punch a hole and add ribbon or twine. Match the flower colors to your wrapping paper for a coordinated look without much fuss.
Pressed Flower Stationery Sets
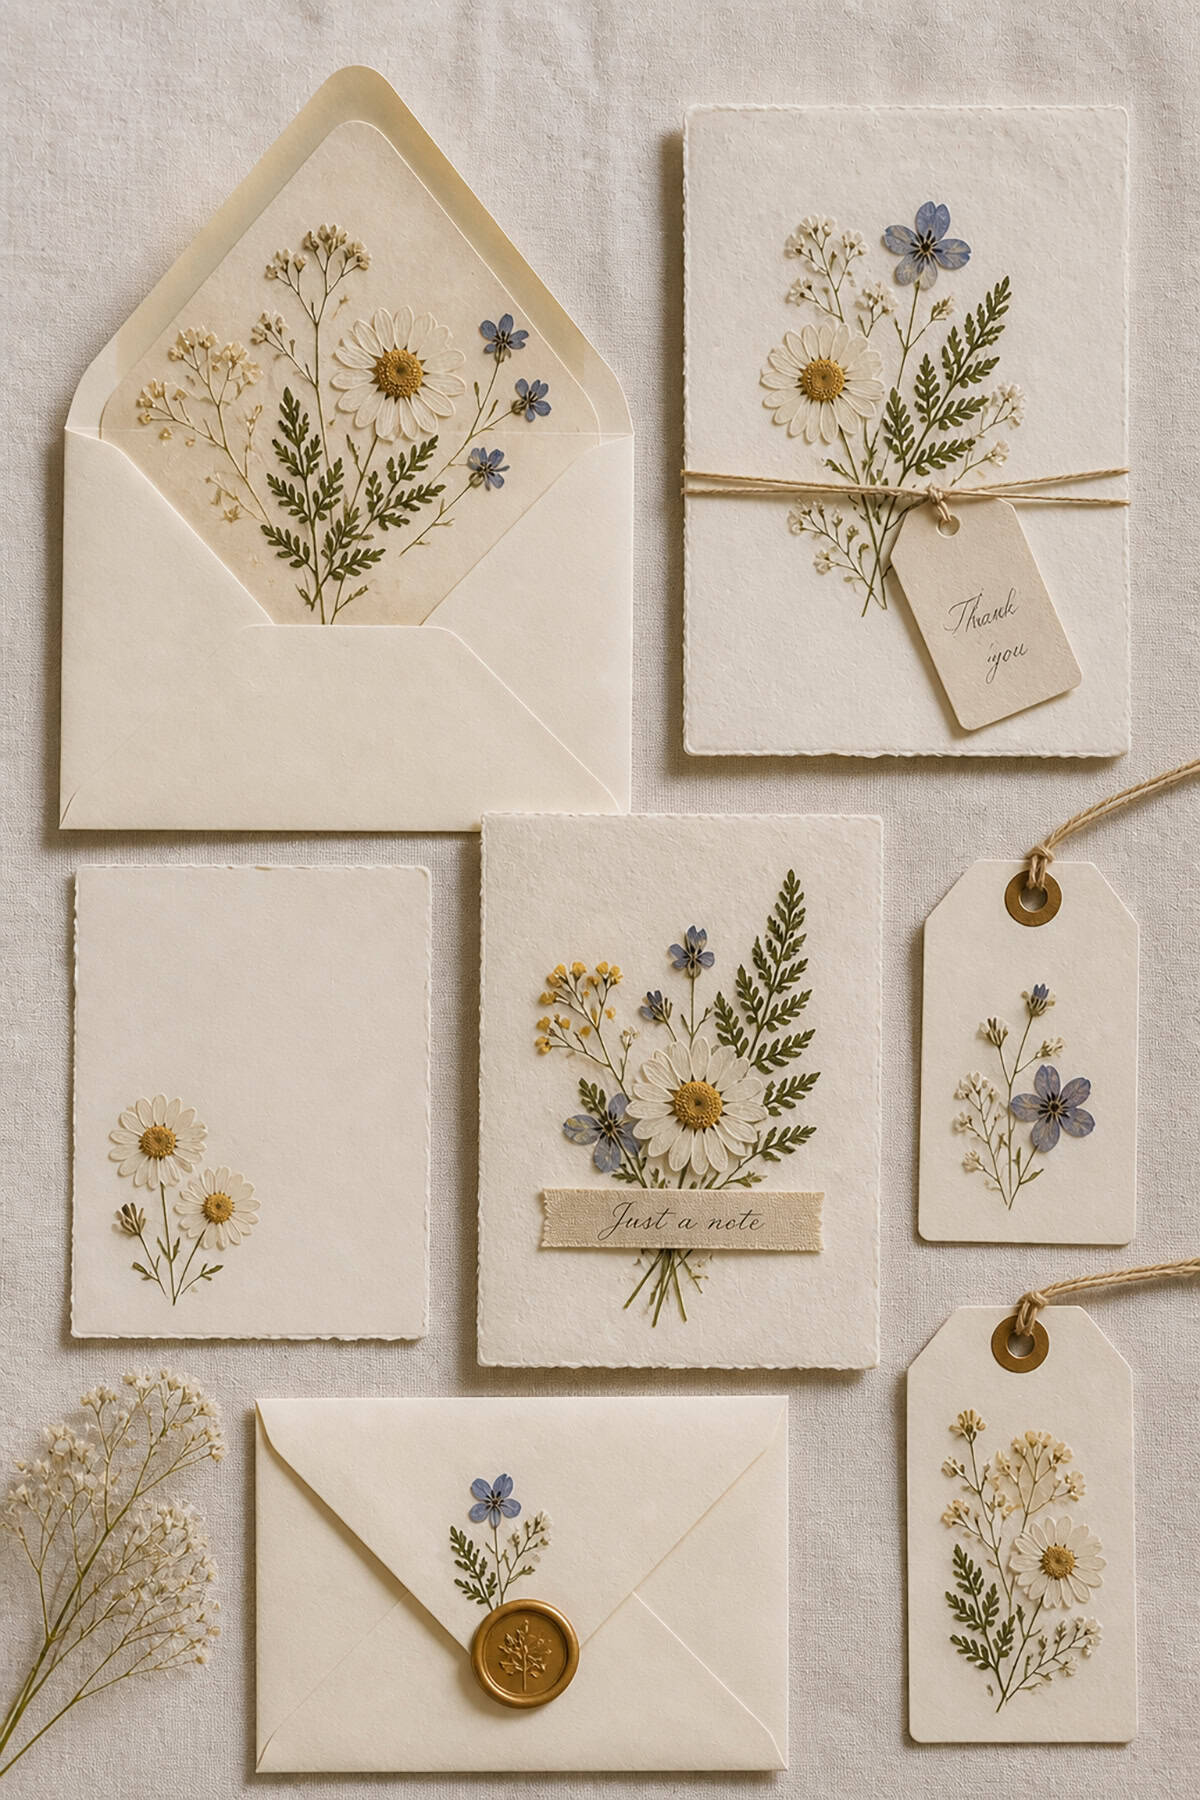
Pressed flowers on notecards and envelopes make writing sets feel special. Use archival glue to keep petals from yellowing. Apply to one side only so the writing surface stays smooth.
Keep finished sets in a dry, dark spot. The colors stay fresh, and even a simple card becomes something worth keeping.
Pressed Flower Photo Frames
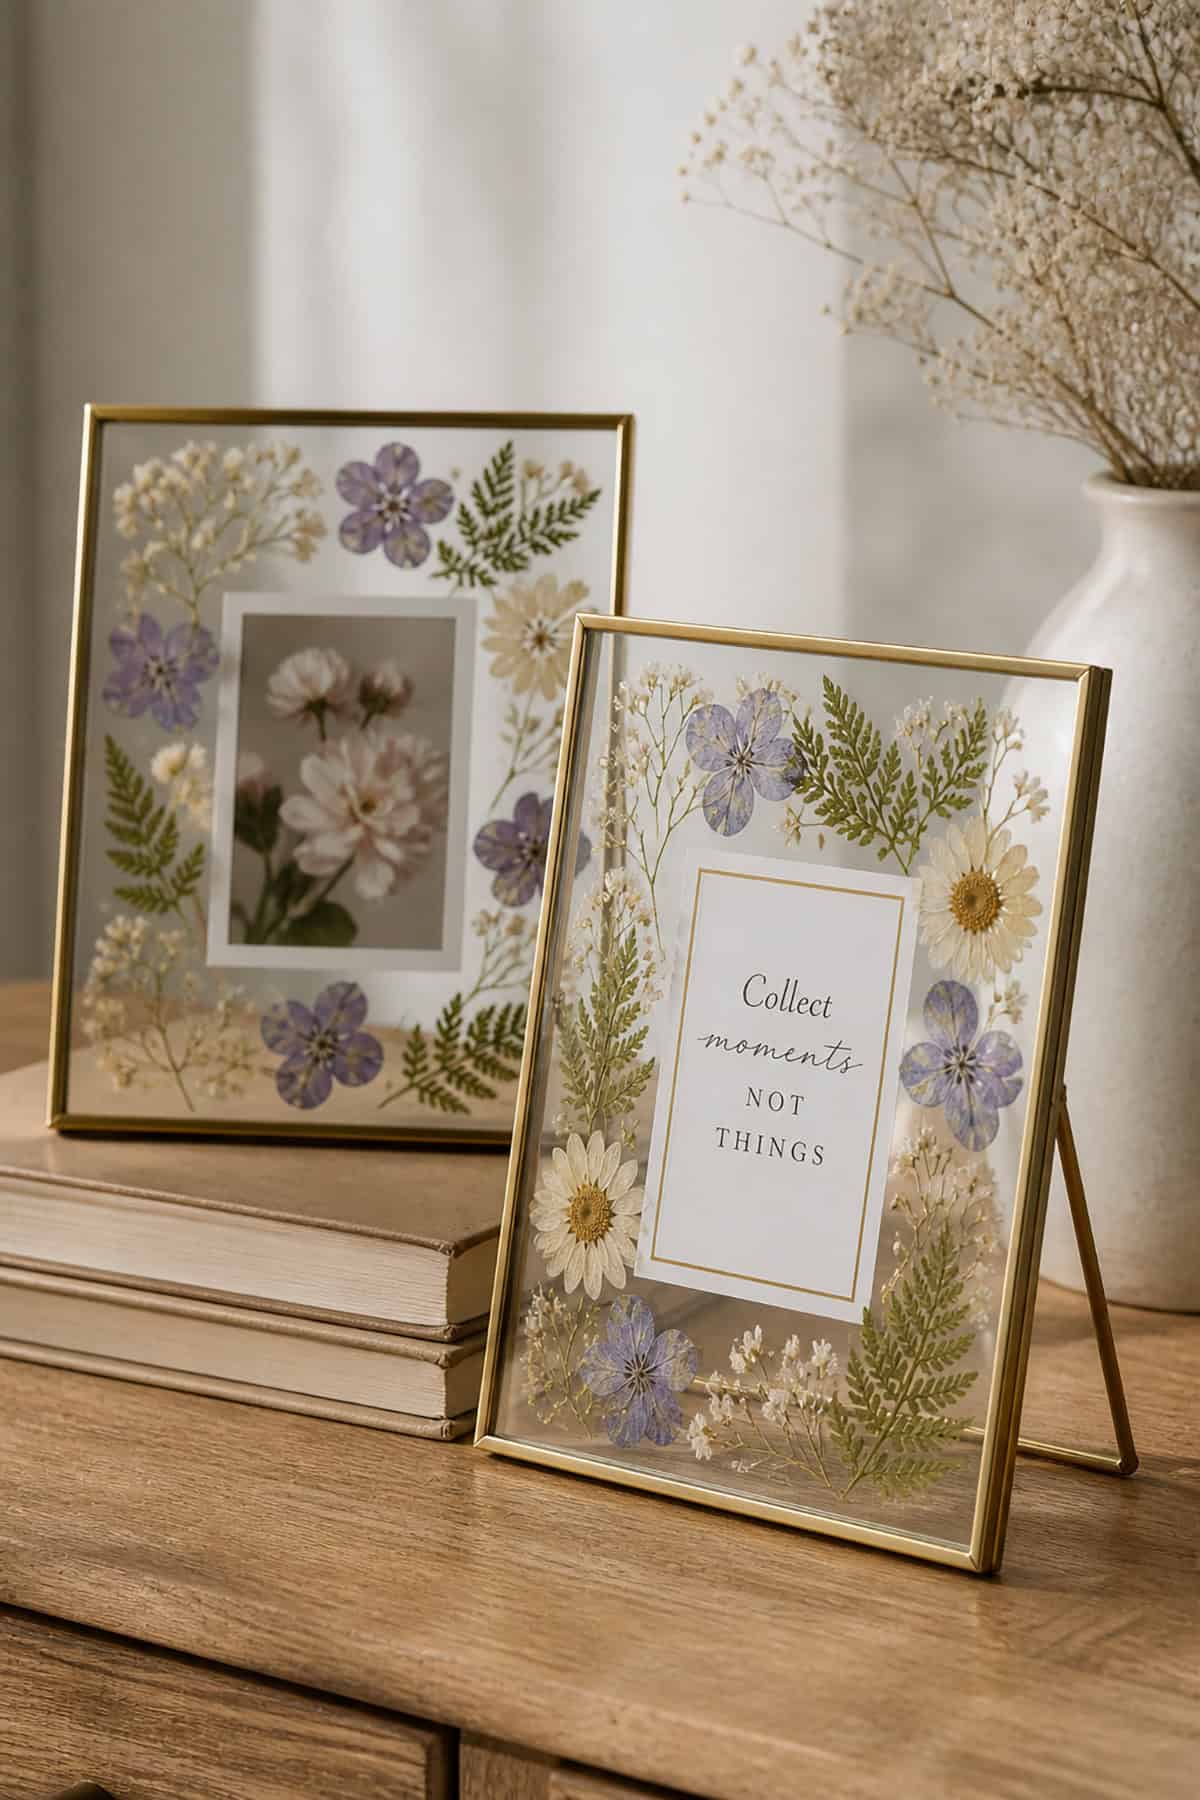
Adding pressed flowers to a photo frame border brings a bit of nature to your pictures. Use decoupage glue on wood or acrylic, letting each layer dry before sealing.
Stick to the corners to avoid crowding. Pick flower colors that work with your photos. A sealed finish keeps everything in place and easy to dust.
Pressed Flower Resin Bookmarks
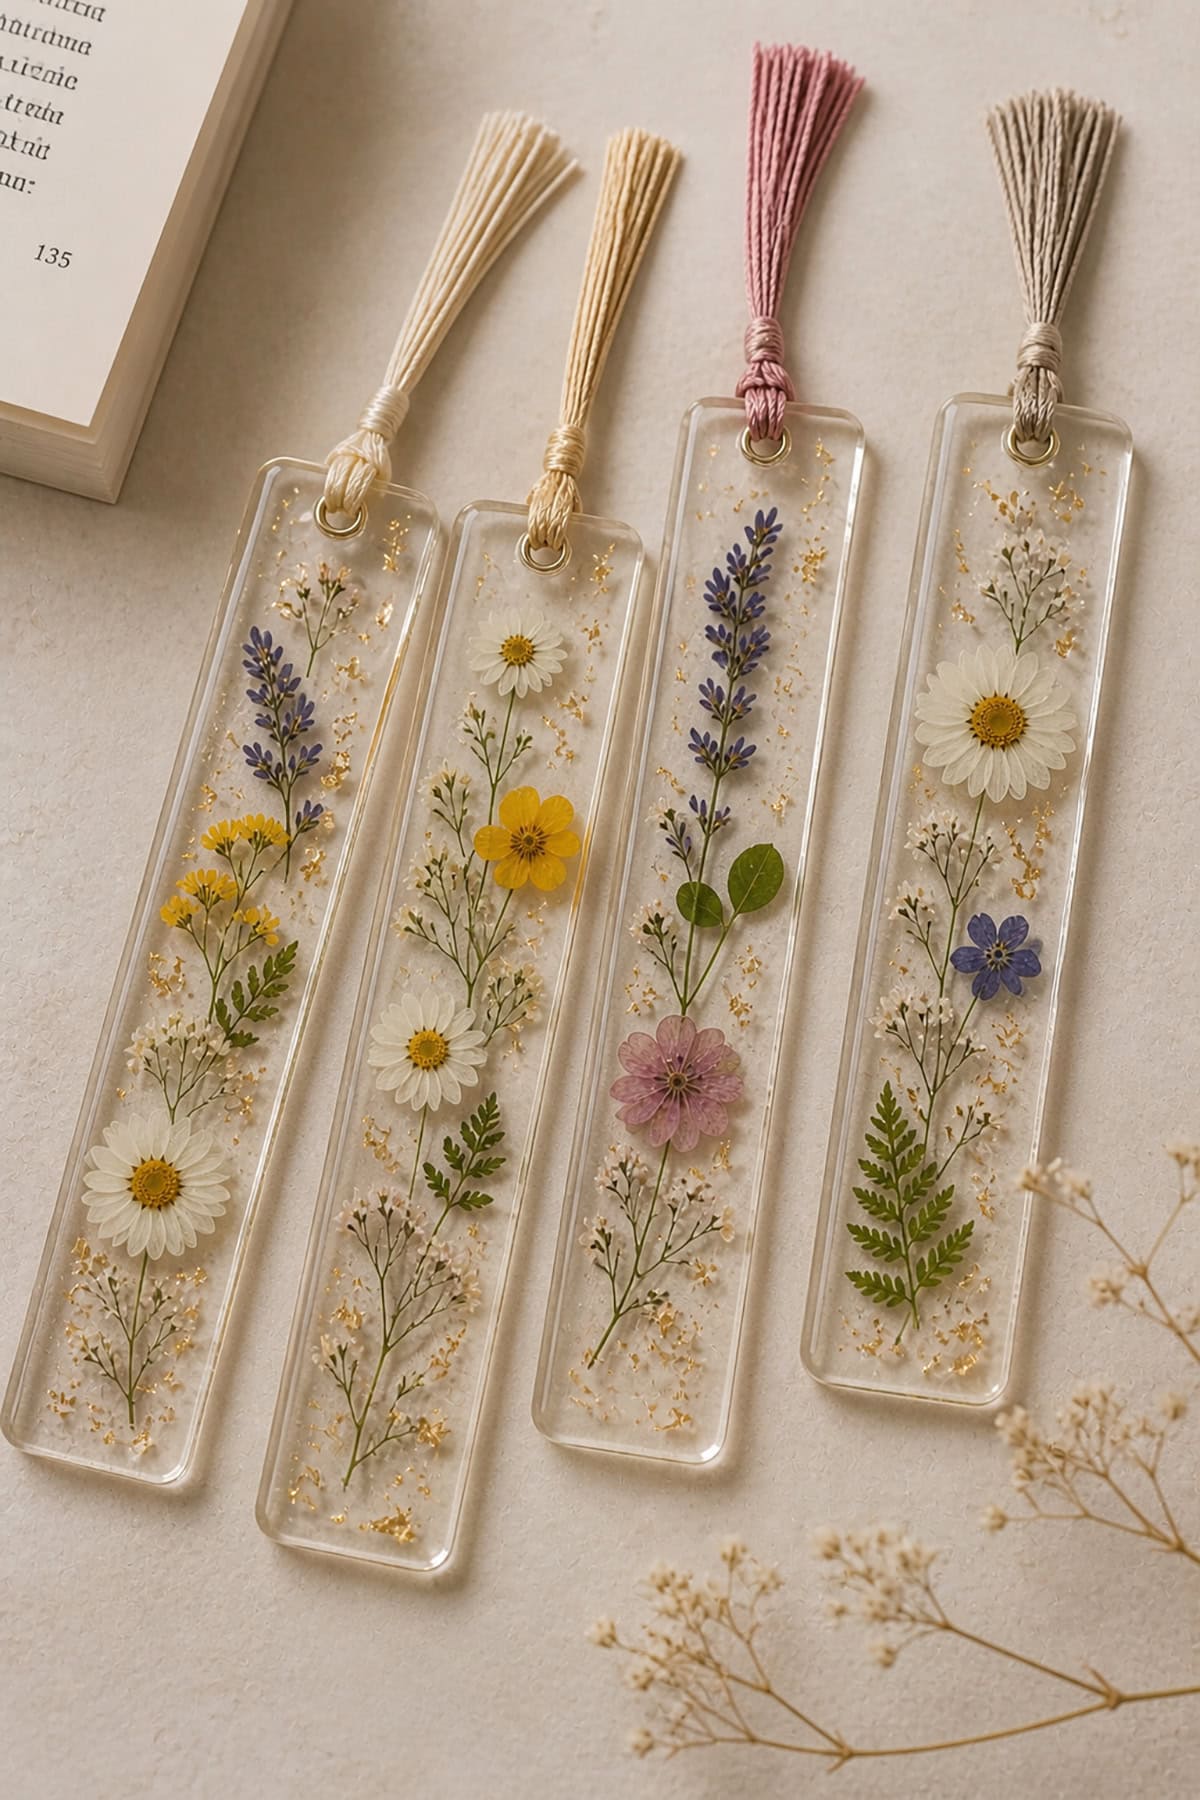
Resin bookmarks with pressed flowers are sturdy and eye-catching. Pour a thin first layer, add your flowers, then top it off and let it cure.
Trim any rough edges with a craft knife. Tie a tassel through a hole for a little flair. The resin keeps the petals bright and safe from the air.
Pressed Flower Envelopes
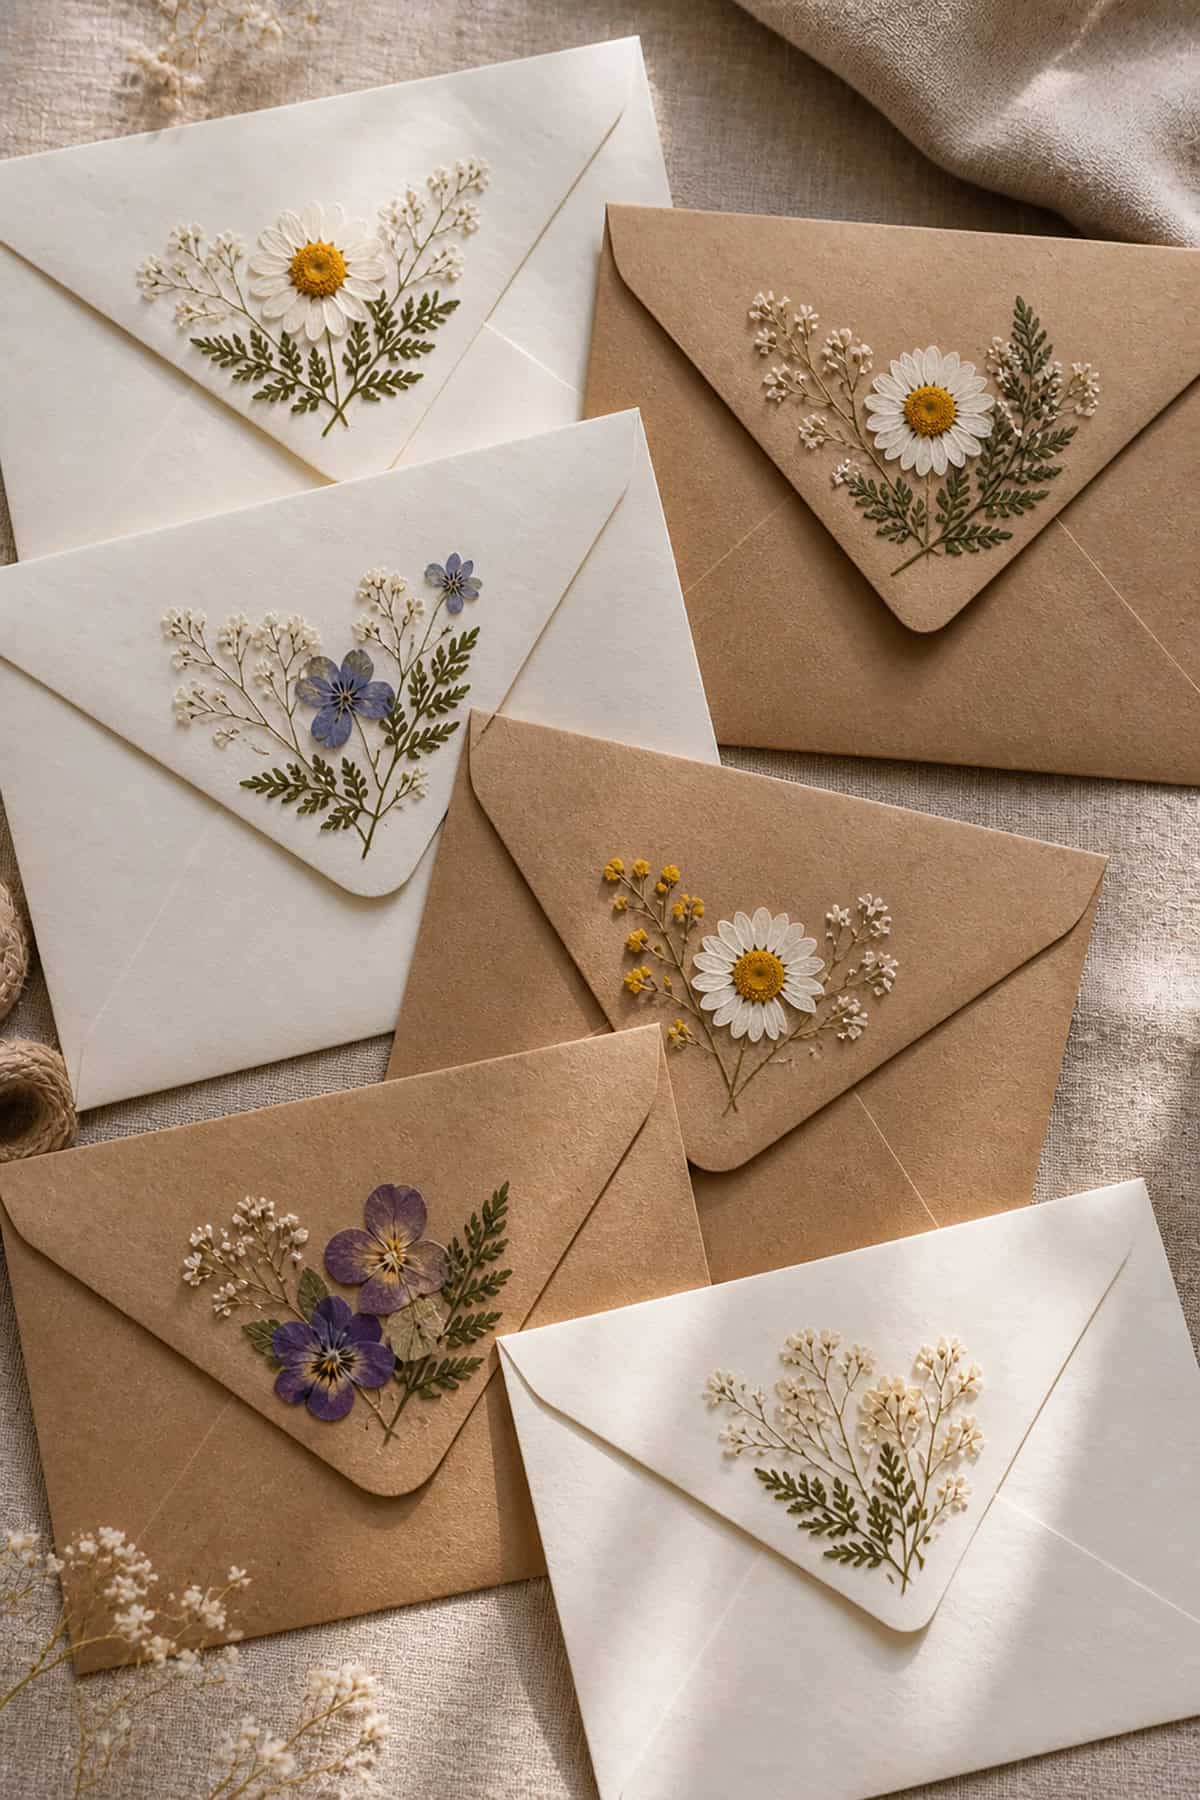
Decorating envelope flaps with pressed flowers makes any letter feel a bit more special. Glue lightweight petals along the edge, then seal with clear drying glue.
Don’t add too much near the fold so the envelope closes well. Press again after gluing for a snug fit. Pair with matching stationery for a coordinated look.
Pressed Flower Scrapbook Pages
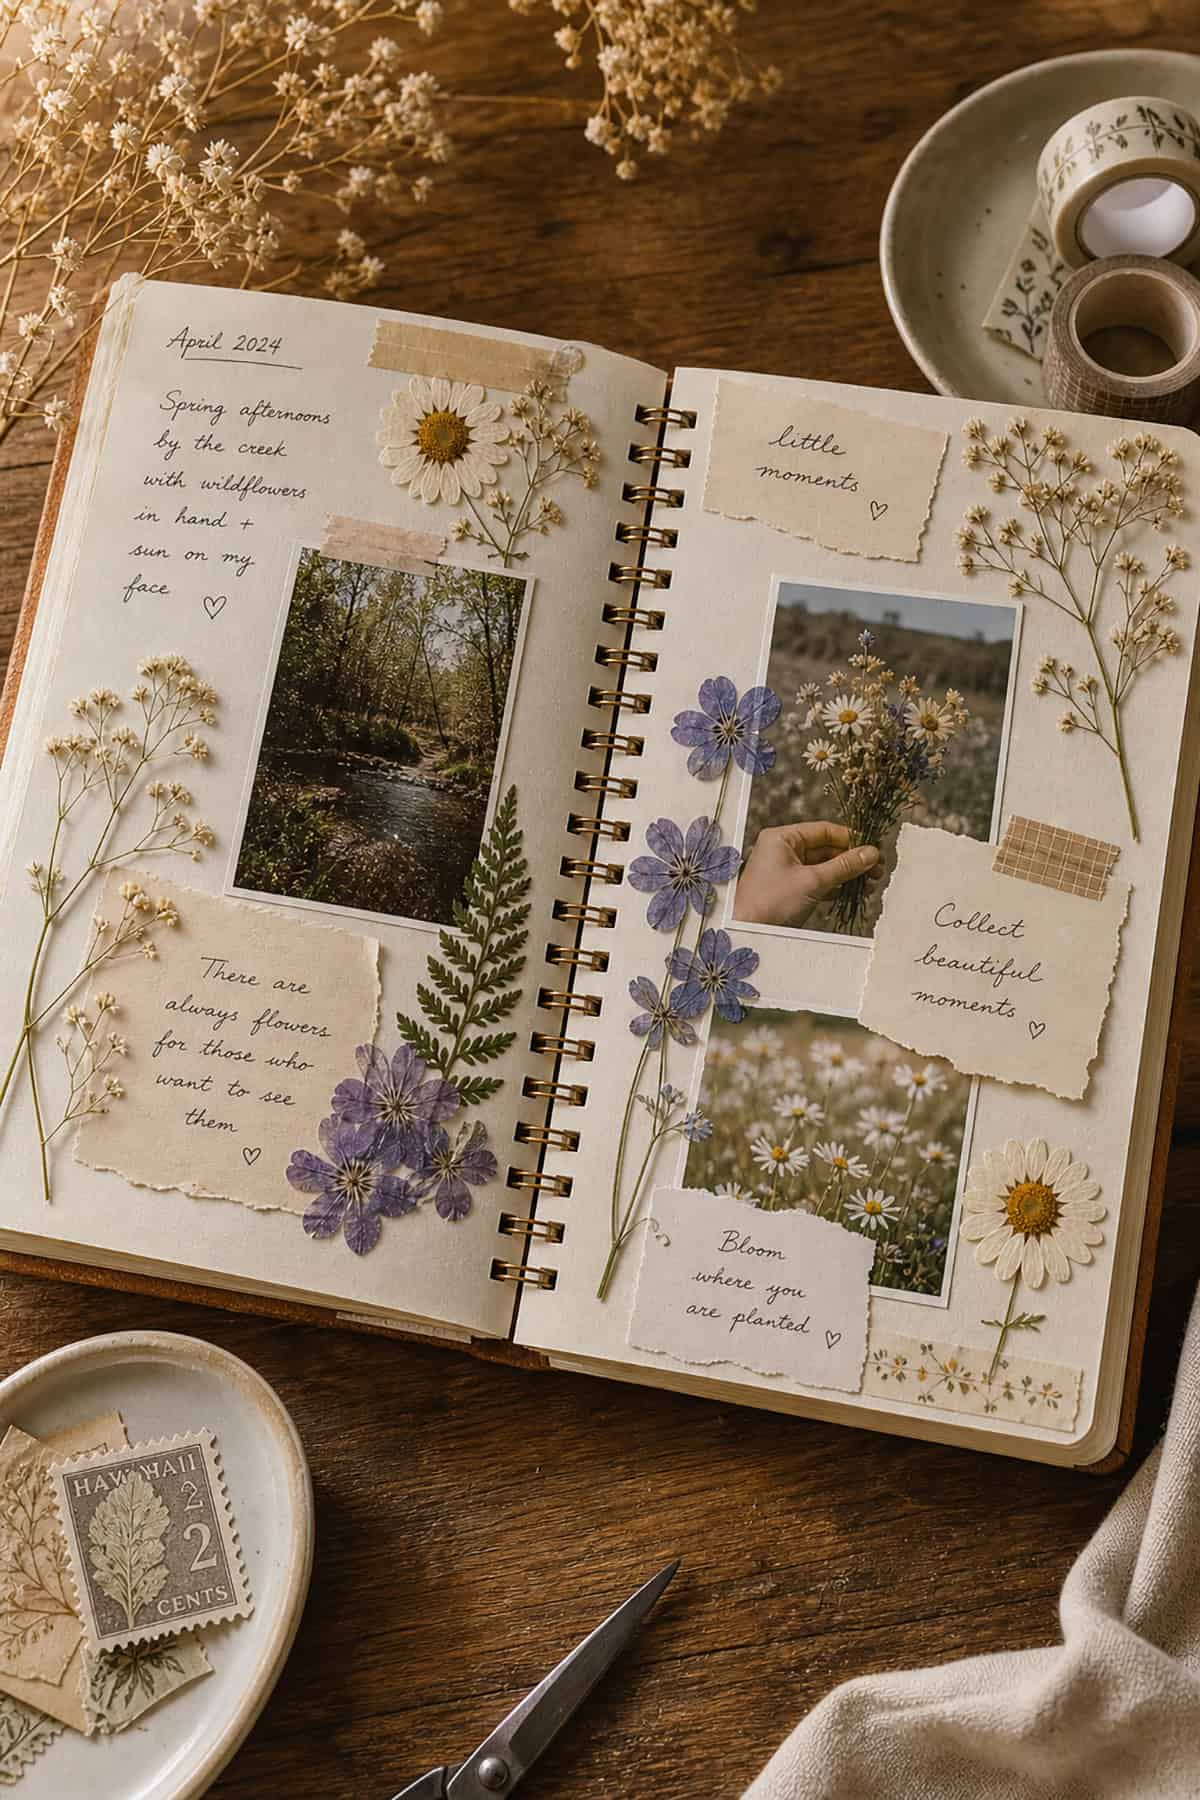
Scrapbooks get a tactile upgrade with pressed flowers between page protectors. Arrange them around photos or notes using acid-free adhesive.
Keep thicker petals away from the binding to avoid bumps. Store the scrapbook upright to keep everything in place.
Pressed Flower Terrarium Insert
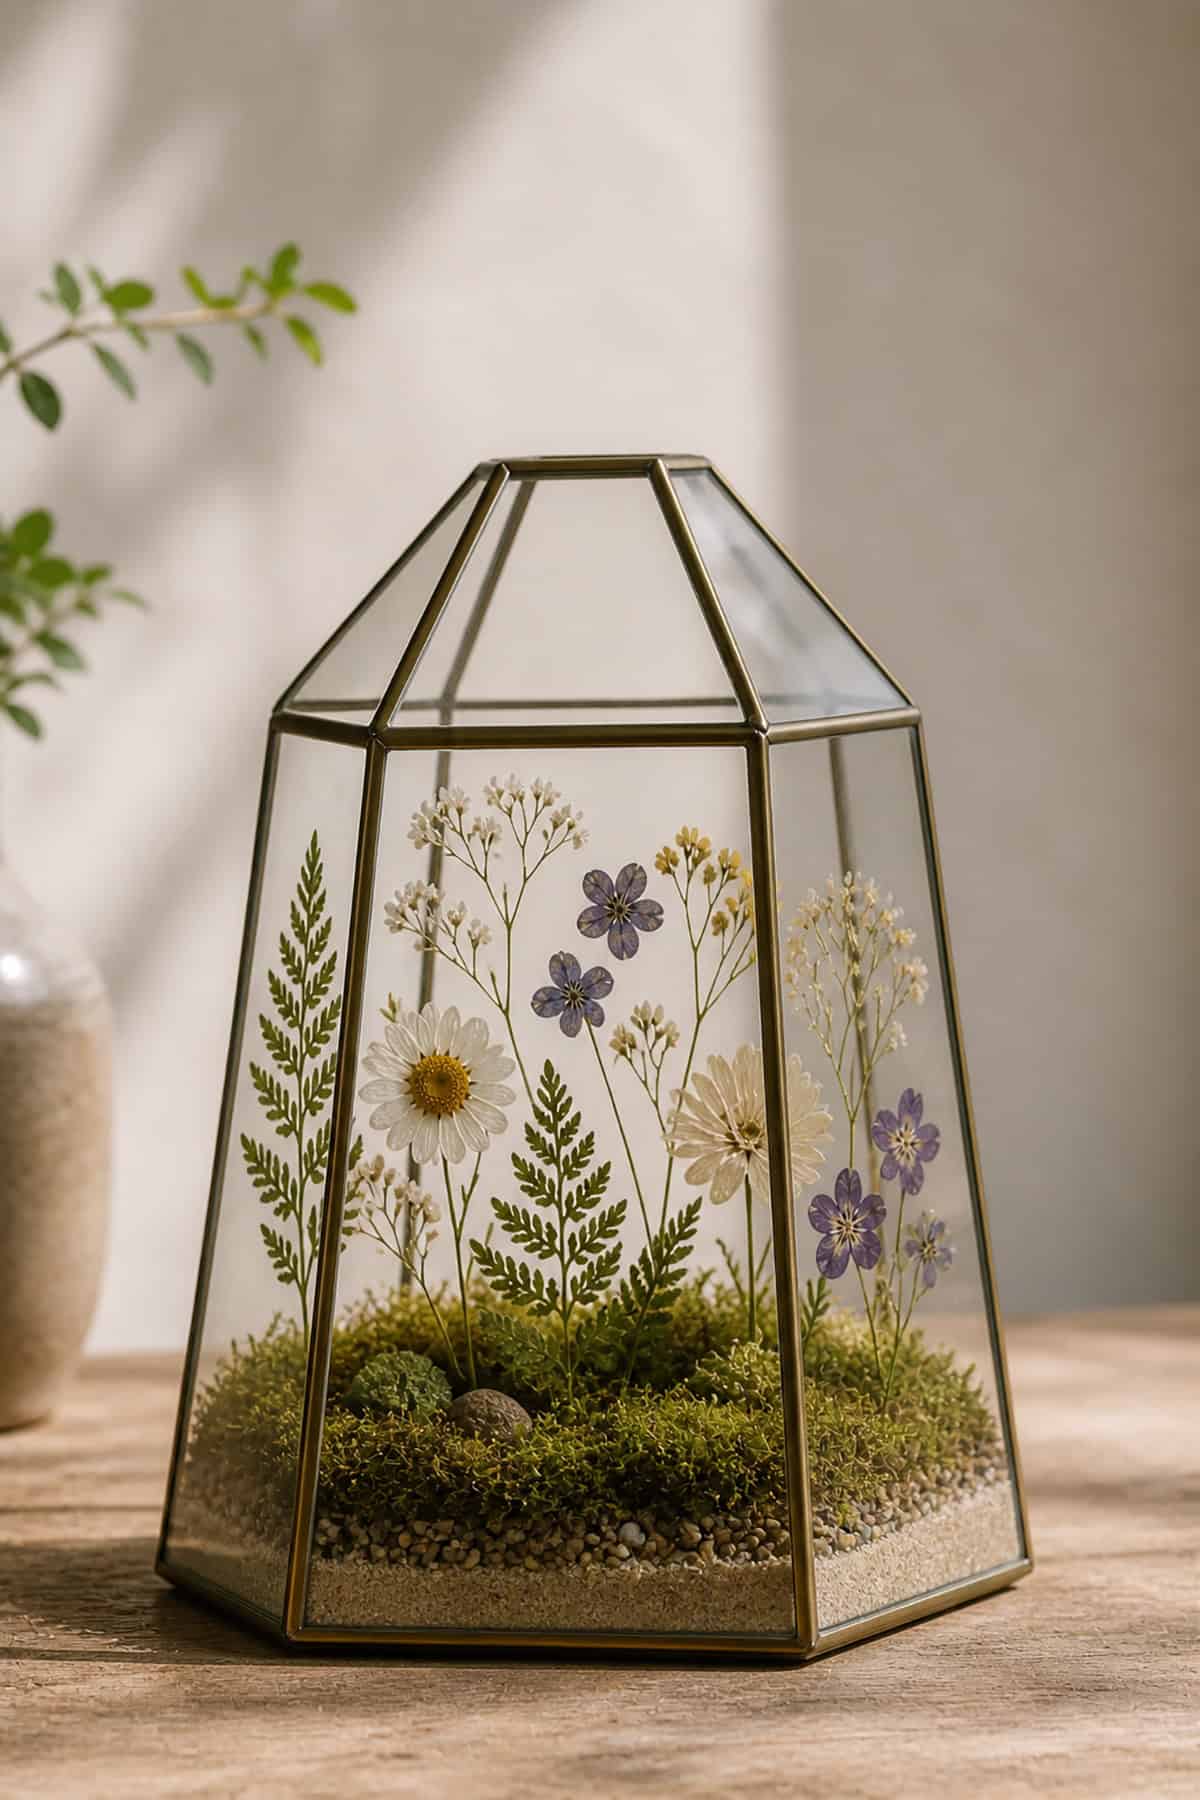
Pressed flowers between glass panels can mimic a living terrarium, but without the upkeep. Cut the panels to fit your container, sandwich the blooms, and secure the frame gently.
Add a subtle paper background for contrast. Keep the finished terrarium out of direct sun to prevent fading.
Pressed Flower Stickers (With Laminate Film)
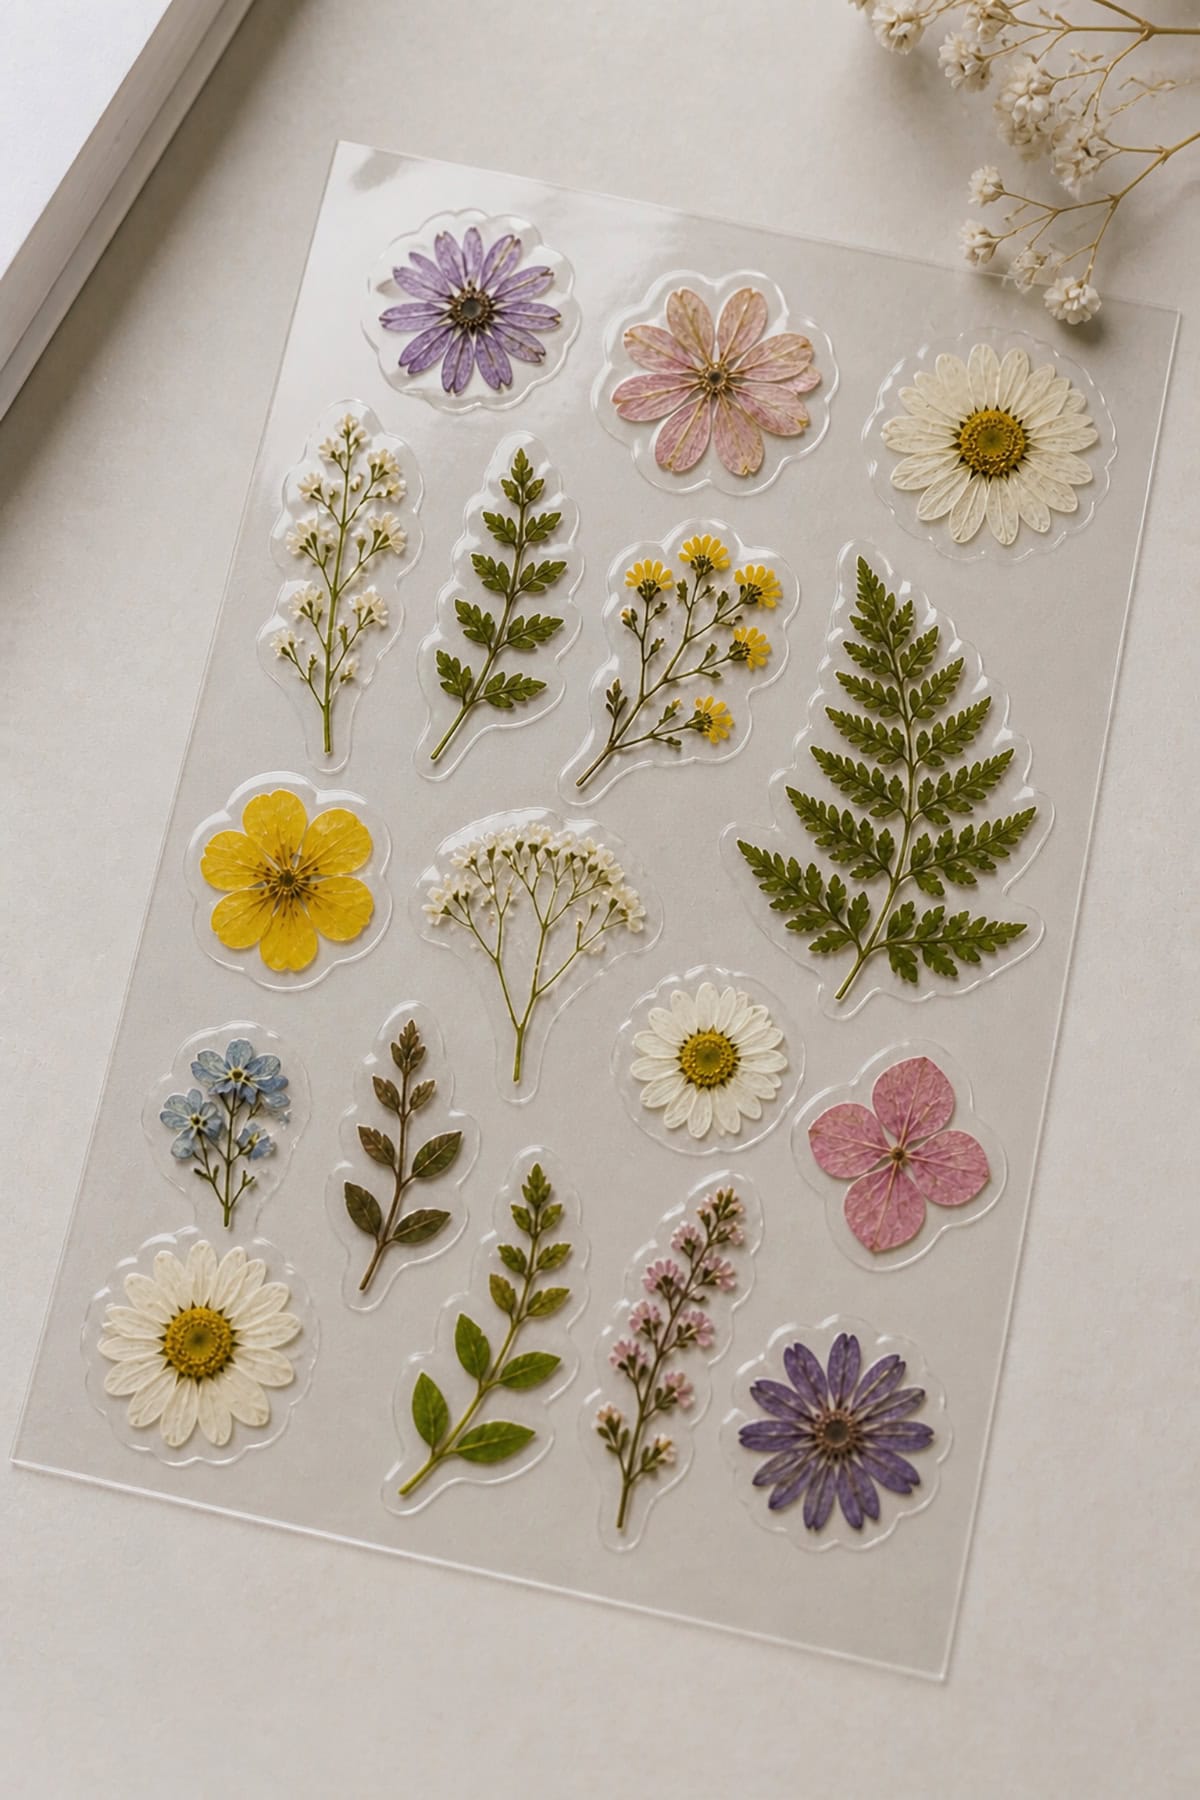
Pressed flower stickers made with laminate film are handy for decorating notebooks and bottles. Flatten your arrangement between adhesive sheets and cut out shapes.
The laminate keeps moisture out. Don’t store them somewhere hot, or the layers might separate and the colors could fade.
Pressed Flower Floating Frame
Floating frames with pressed flowers offer a clean, airy display. Line up your blossoms, clamp the glass panes, and seal tight to slow down discoloration.
The flowers seem to hover in the frame. Place near indirect light for best results.
Pressed Flower Wax Seals
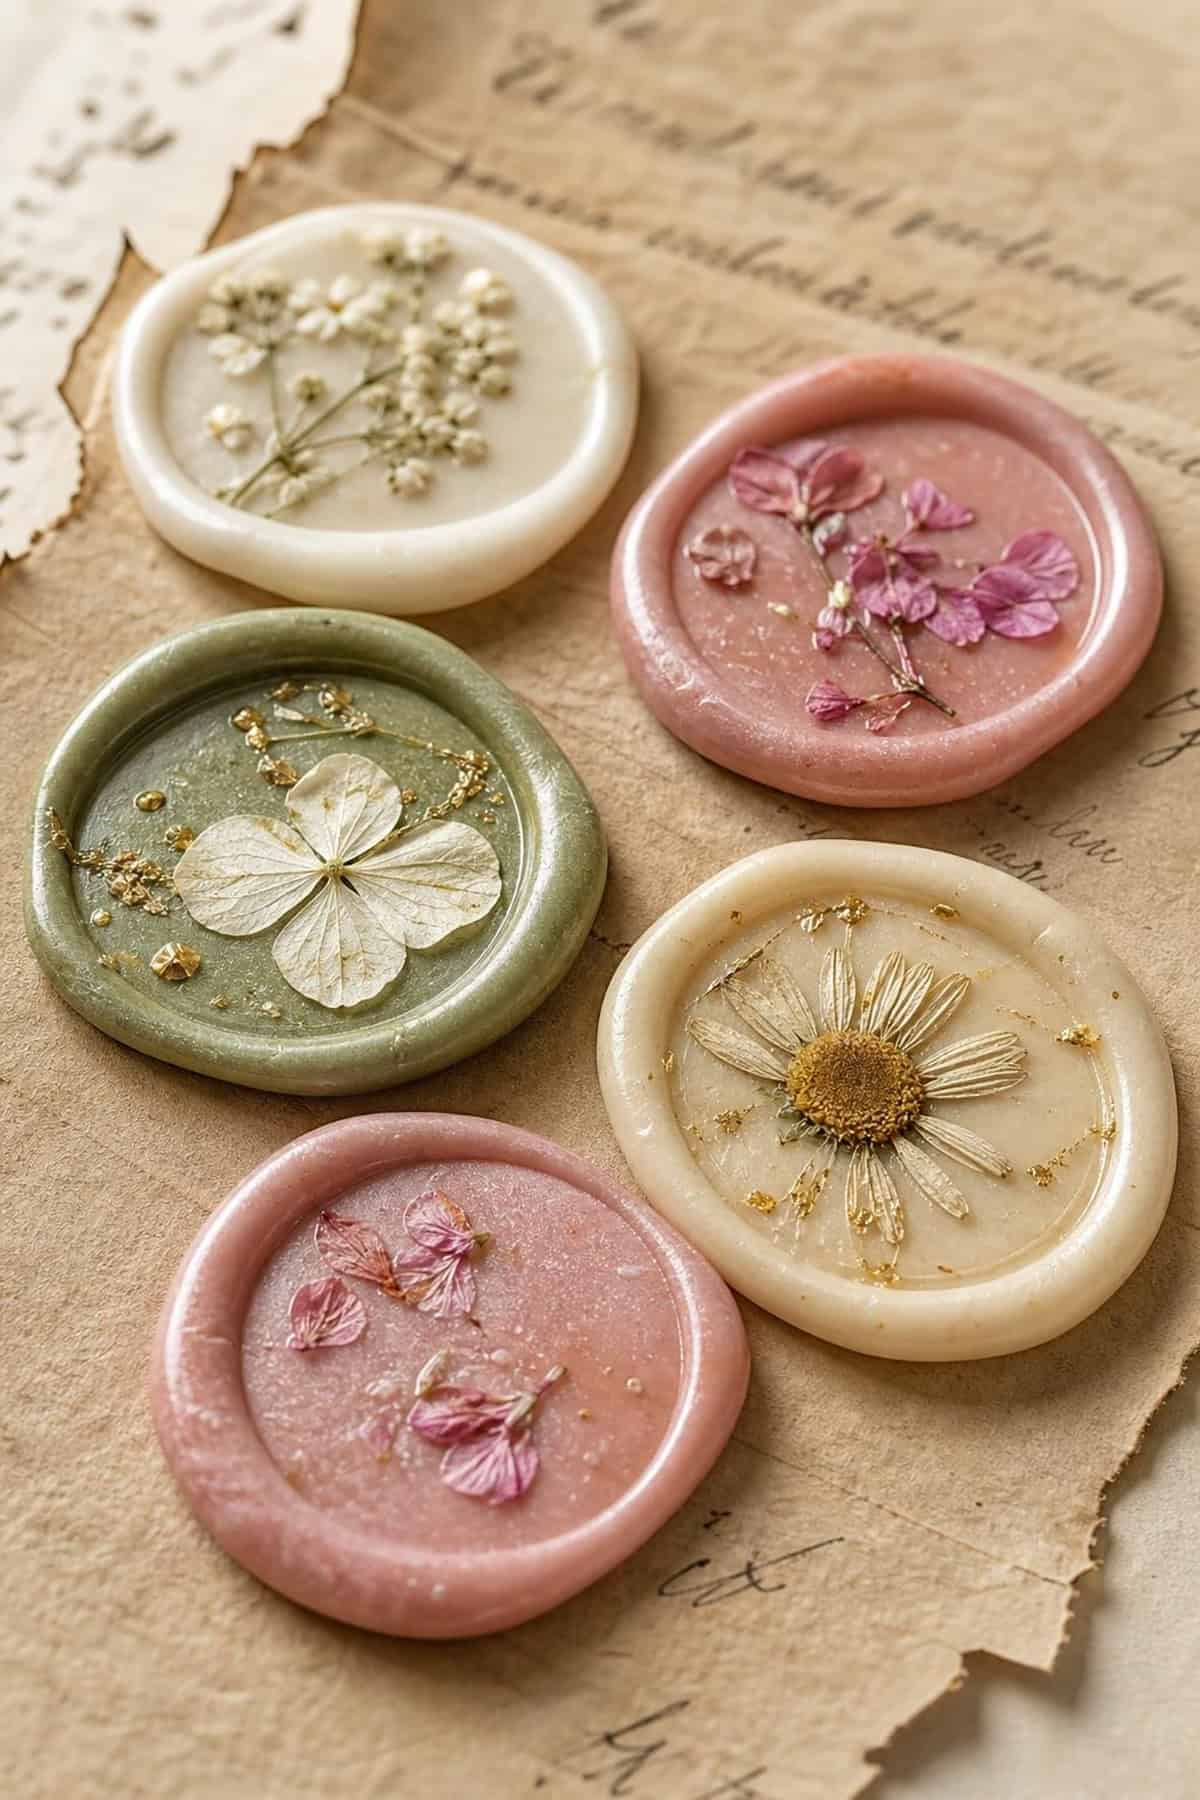
Wax seals with pressed petals add a little drama to letters. Melt the wax, set a few dry petals on top, then stamp—timing matters, or you’ll scorch them.
The result has bits of color and texture inside the wax. They stick well and look fancy, but handle with care so the edges don’t chip.
Pressed Flower Lampshade
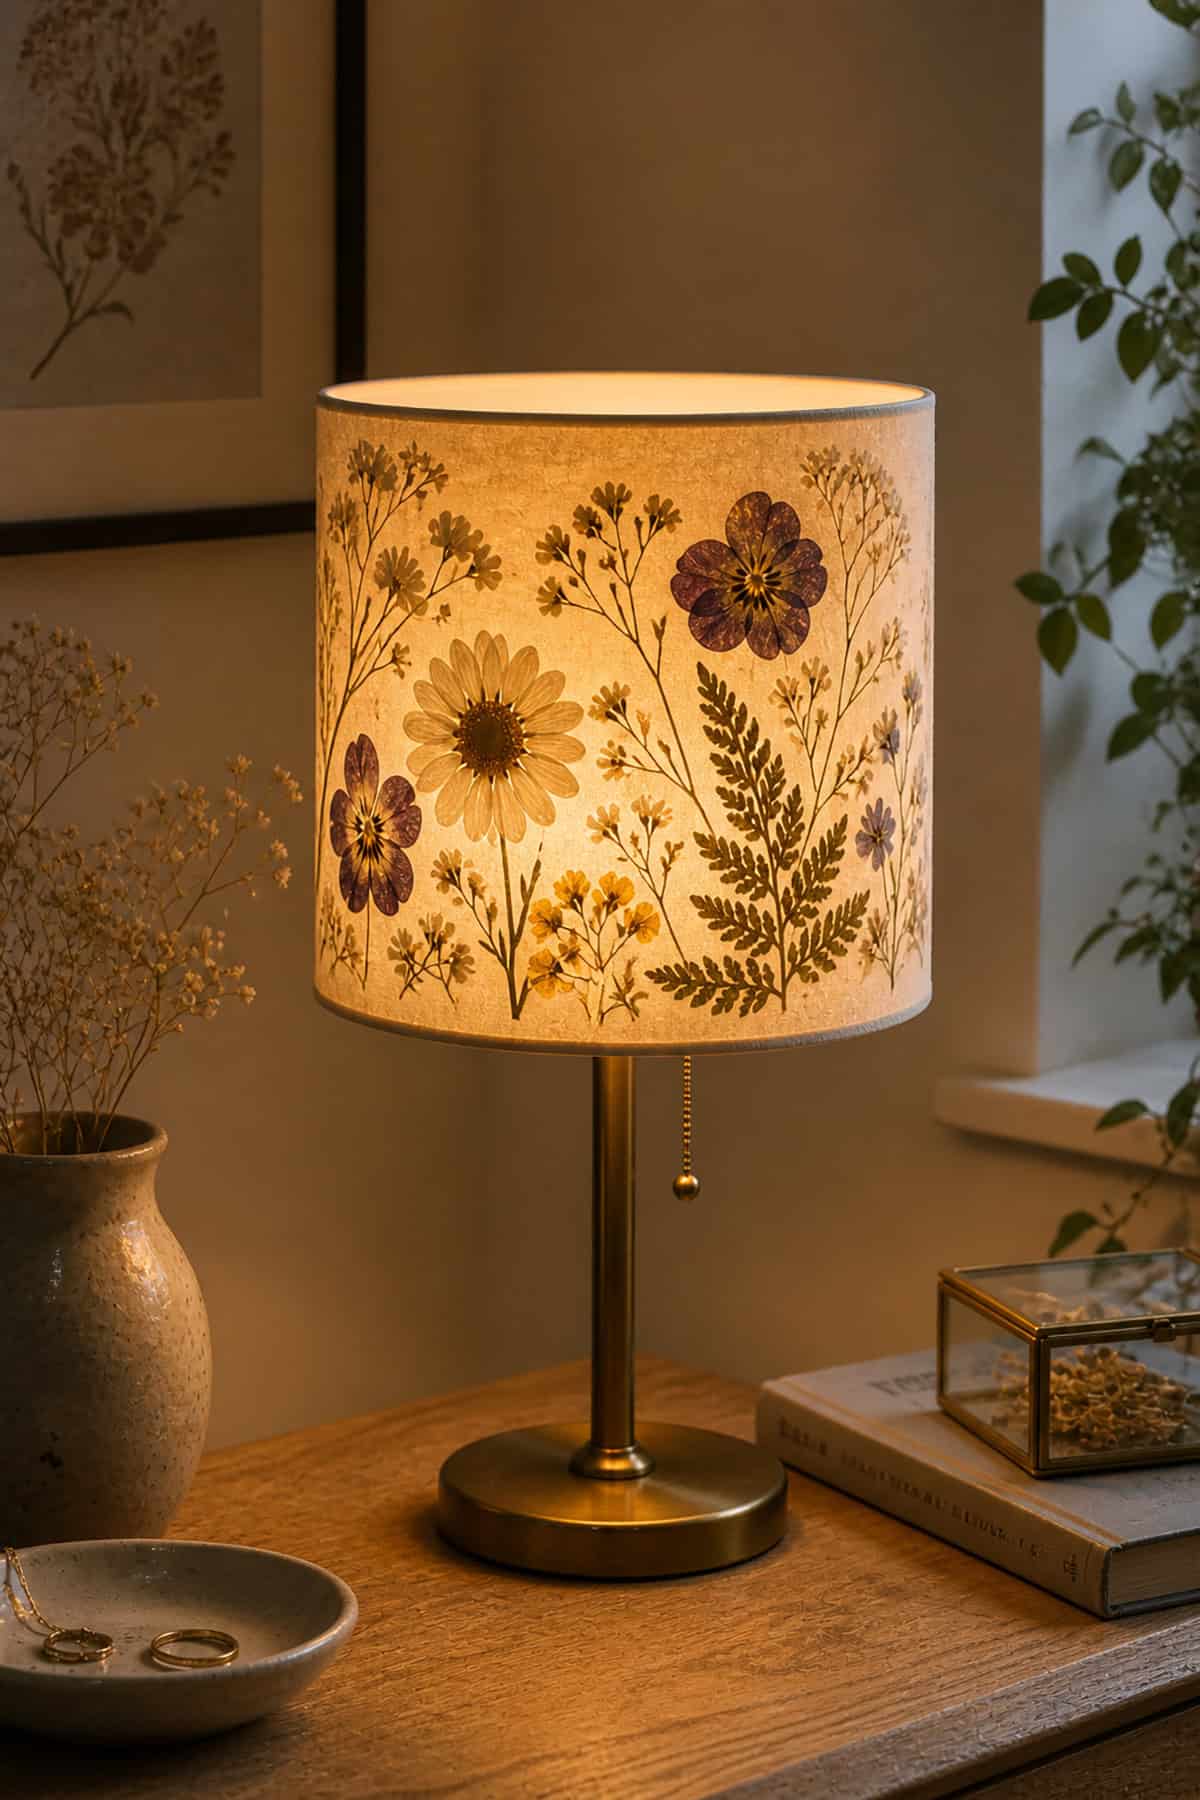
Pressed flowers inside a translucent lampshade create a gentle, diffused glow. Use thin rice paper to line the inside, sandwiching the blooms between layers. Try to keep it smooth—air pockets are tricky.
The petals cast soft shadows when the lamp’s on. Stick to low-heat bulbs so the flowers don’t brown. It’s a cozy touch for neutral rooms.
Pressed Flower Tea Light Jars
Jars wrapped with pressed flowers make charming tea light holders. Brush on decoupage glue, press the petals flat, and add another coat.
Let each layer dry fully. The effect is a soft, glowing jar that shows off the petal details. LED tea lights are safer if you’re worried about heat.
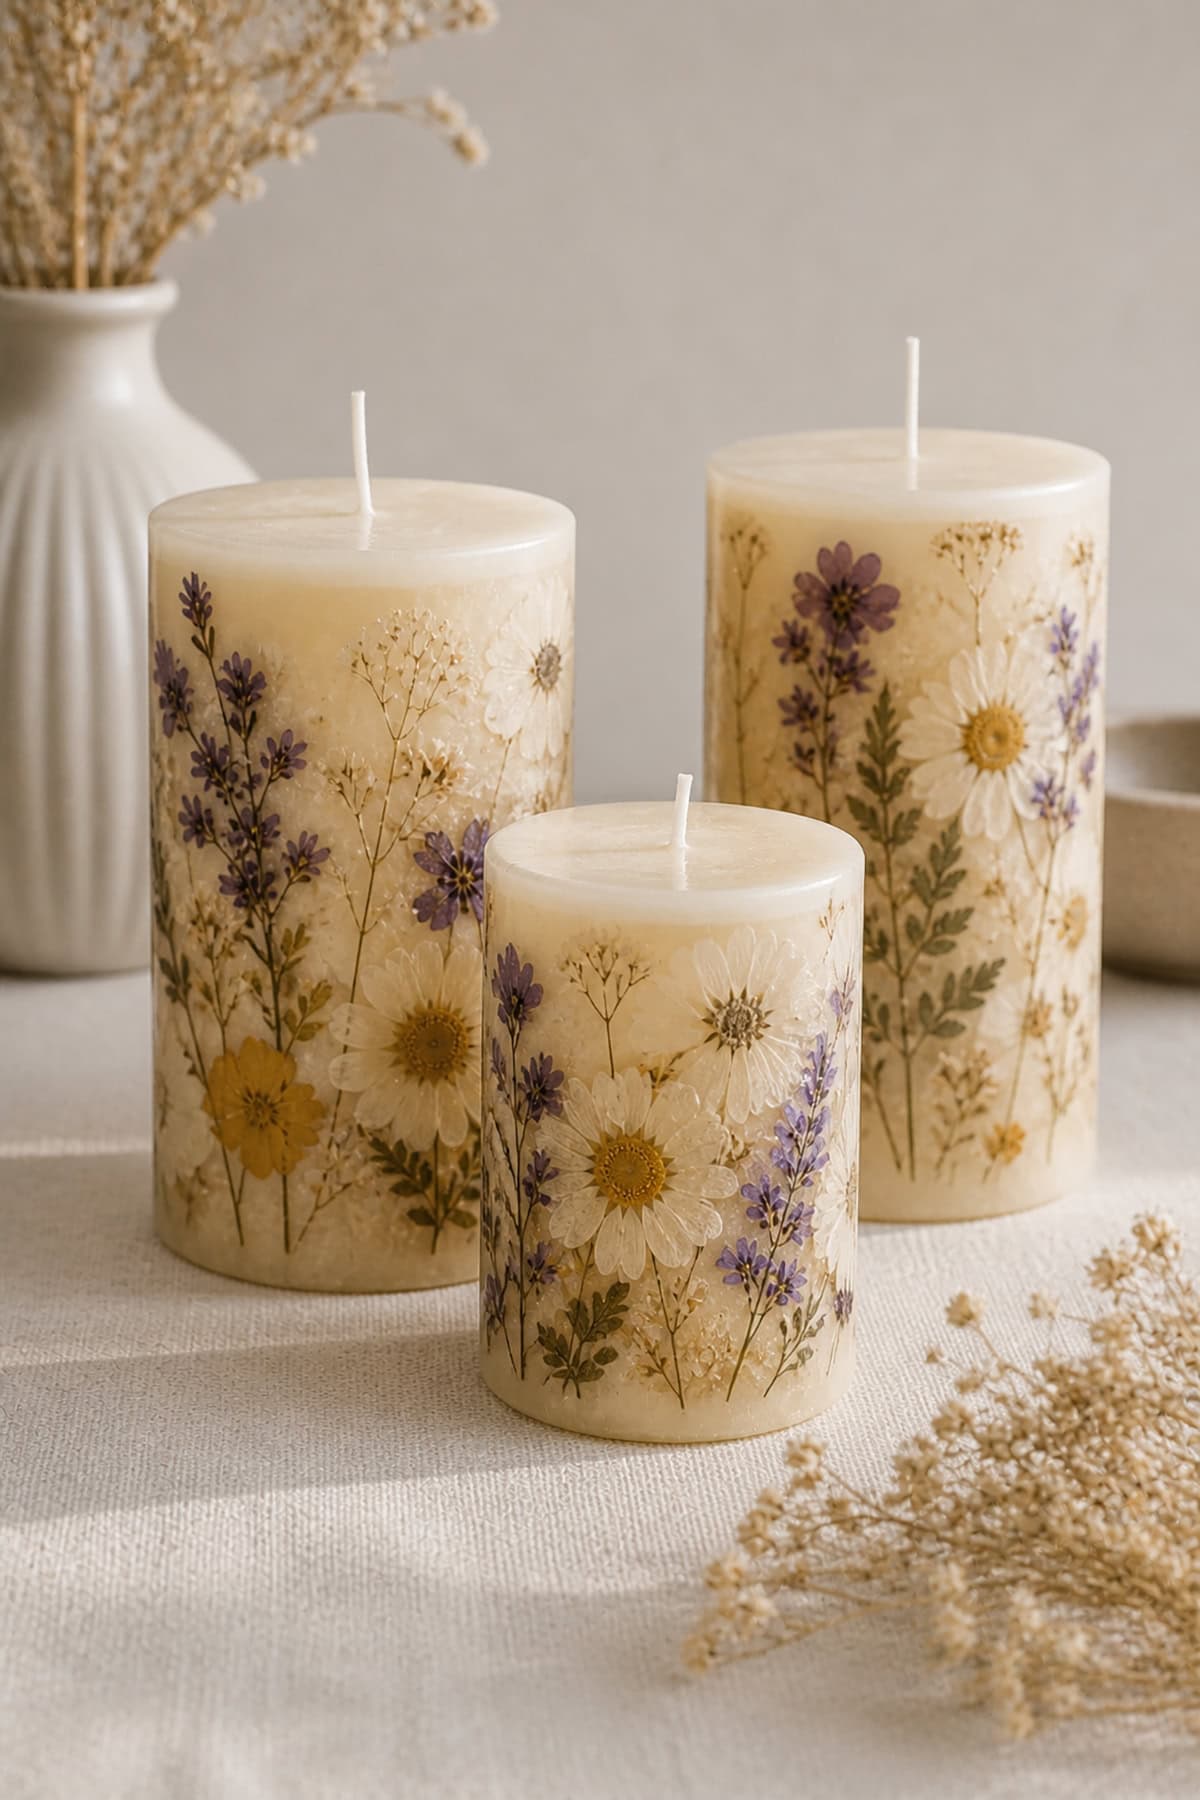
Pressed Flower Coated Candles
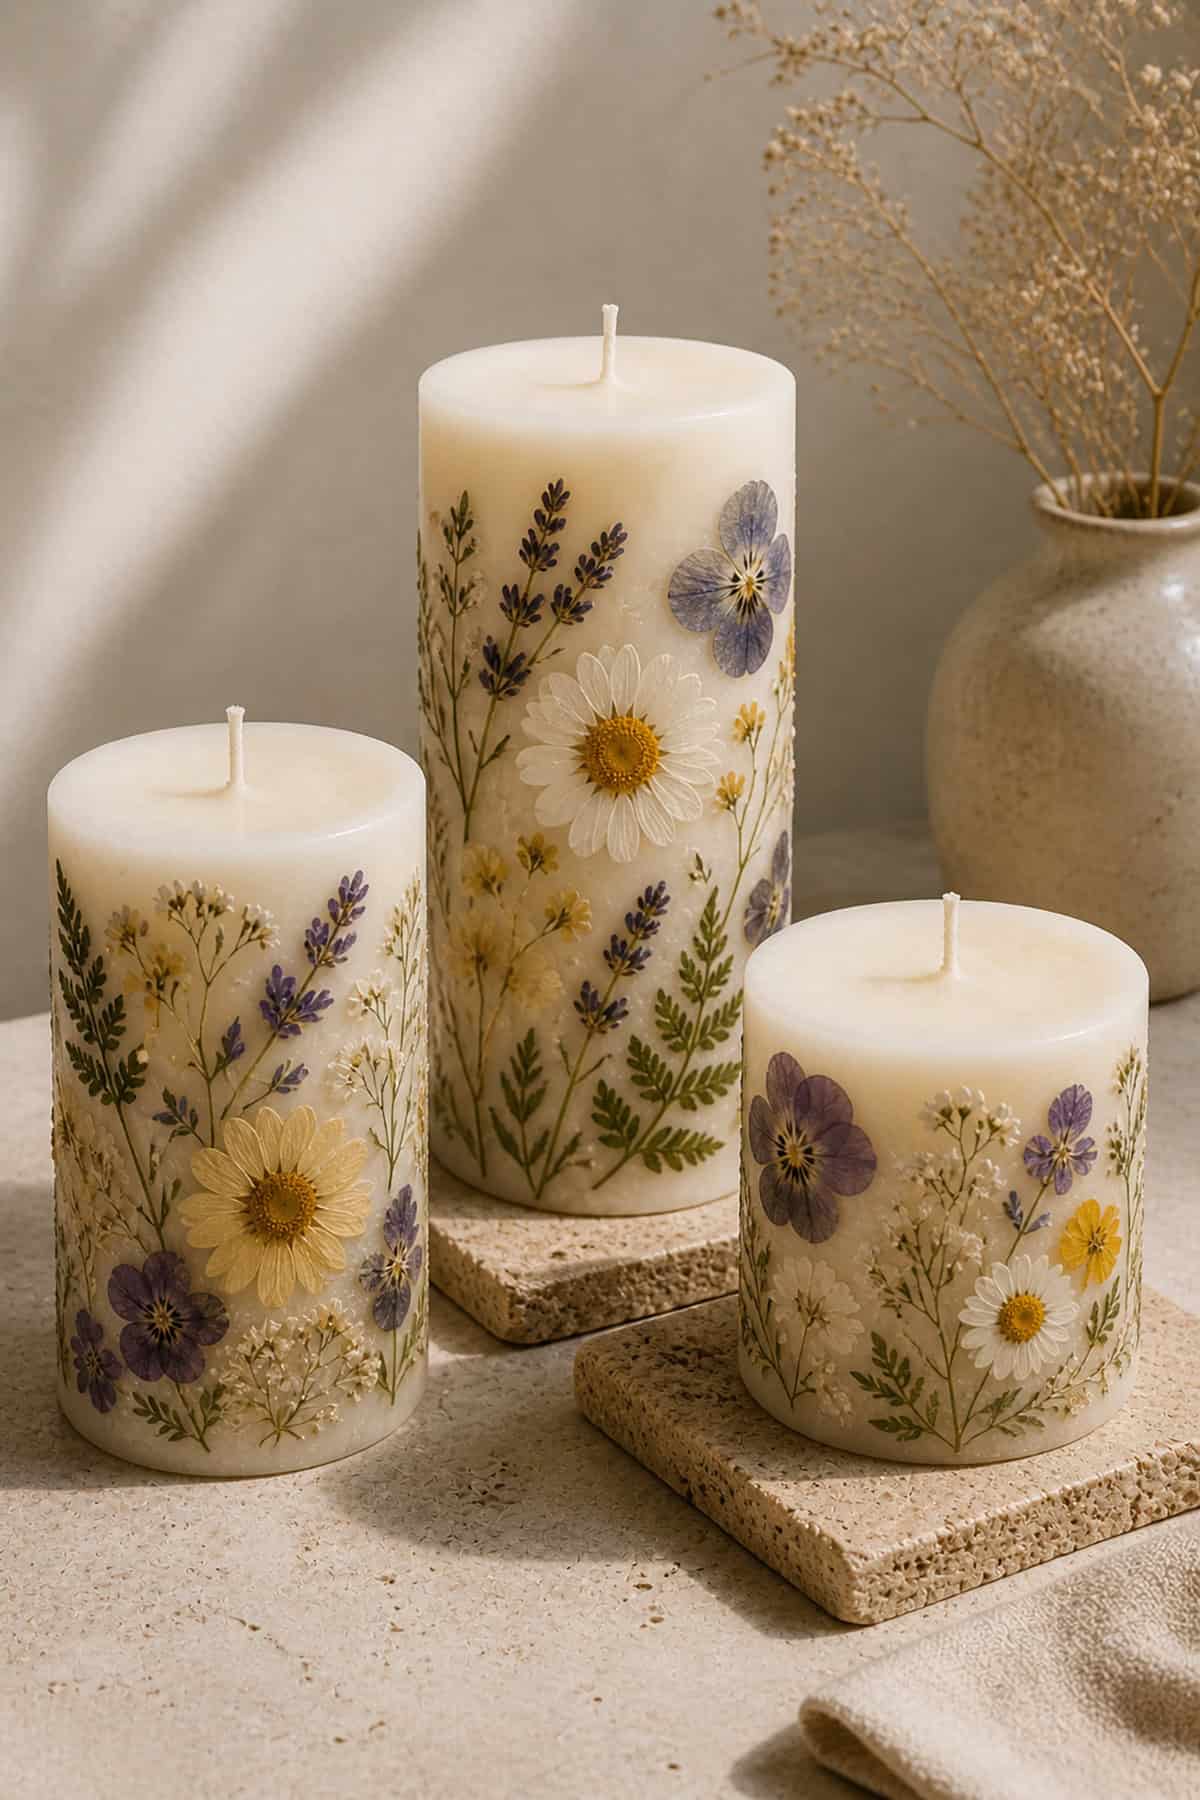
Pillar candles with pressed flowers on the outside look fancy without much effort. Use a bit of melted clear wax or decoupage glue to attach the petals near the base.
Seal with a final coat and let it set. The flowers show through the clear layer. Burn with care, since the decoration is external.
Pressed Flower Shadow Box
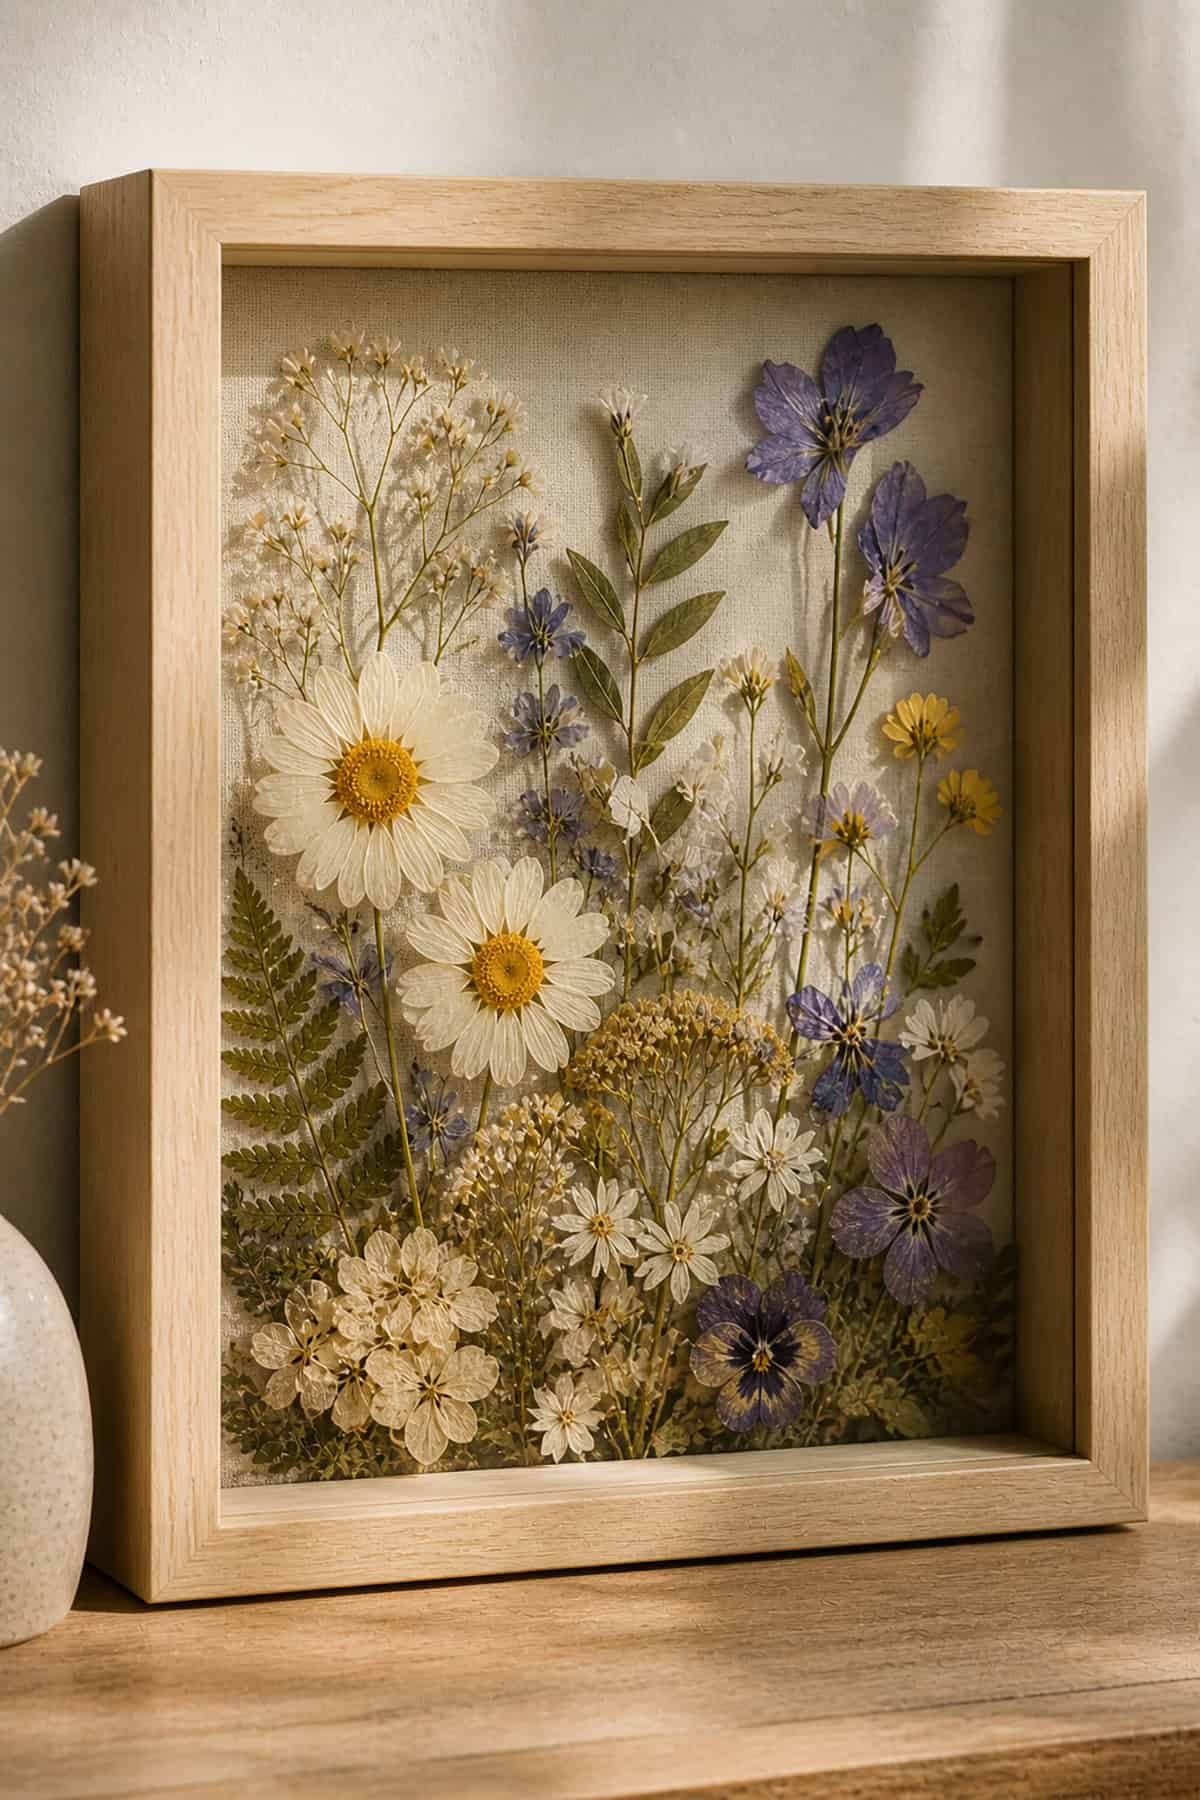
Shadow boxes with pressed flowers add dimension and protect fragile arrangements. Mount blooms on a neutral background with tiny adhesive dots, then close in a glass-front box.
Spacing keeps flowers from touching the glass. Toss in a silica gel packet for humidity control. It’s a tidy, almost museum-like way to show off your collection.
Pressed Flower Serving Board (Resin Top)
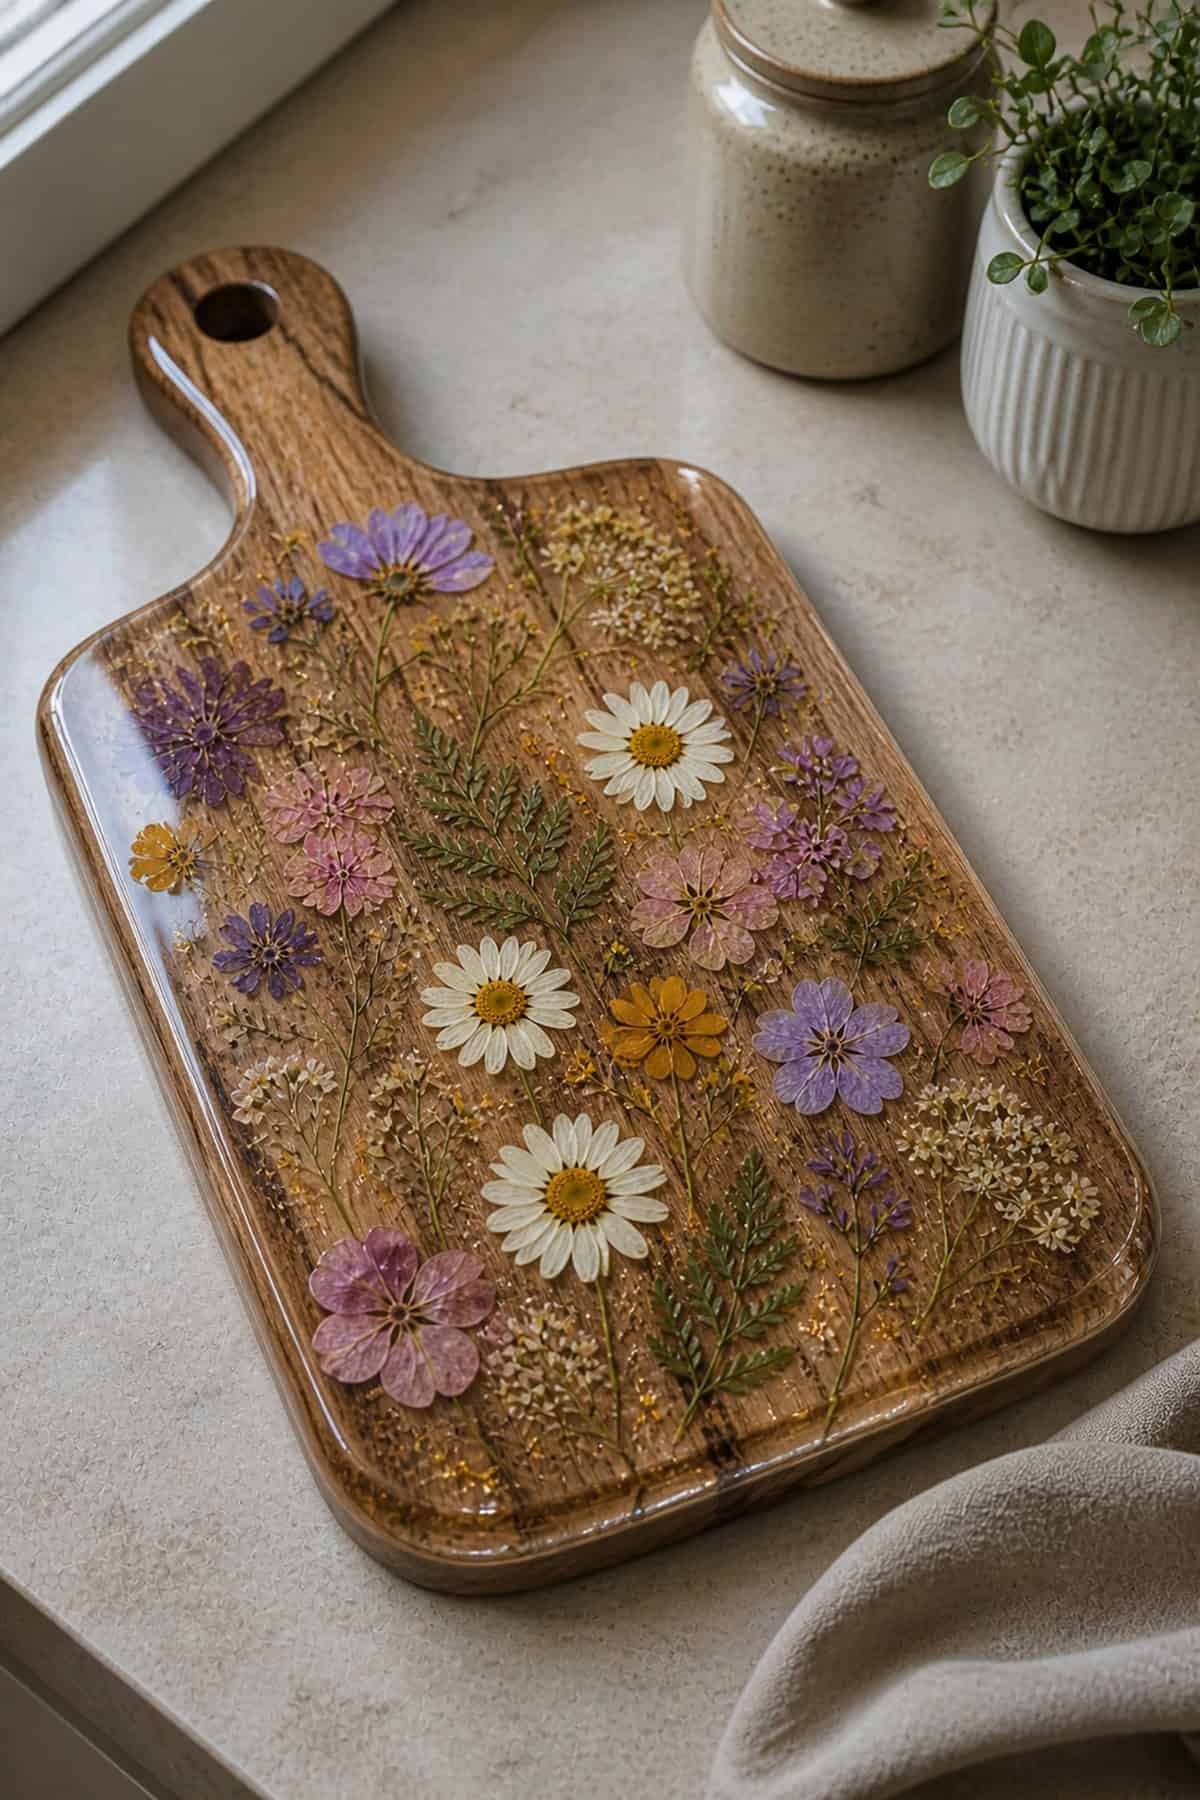
Serving boards topped with resin and flowers blend function and beauty. Arrange petals on a finished wood surface, pour resin to cover, and let it cure dust-free.
Sand lightly for a smooth finish. Wipe clean with a damp cloth. The flowers stay vivid under the shiny top—great for snacks or just display.
Pressed Flower Window Decals
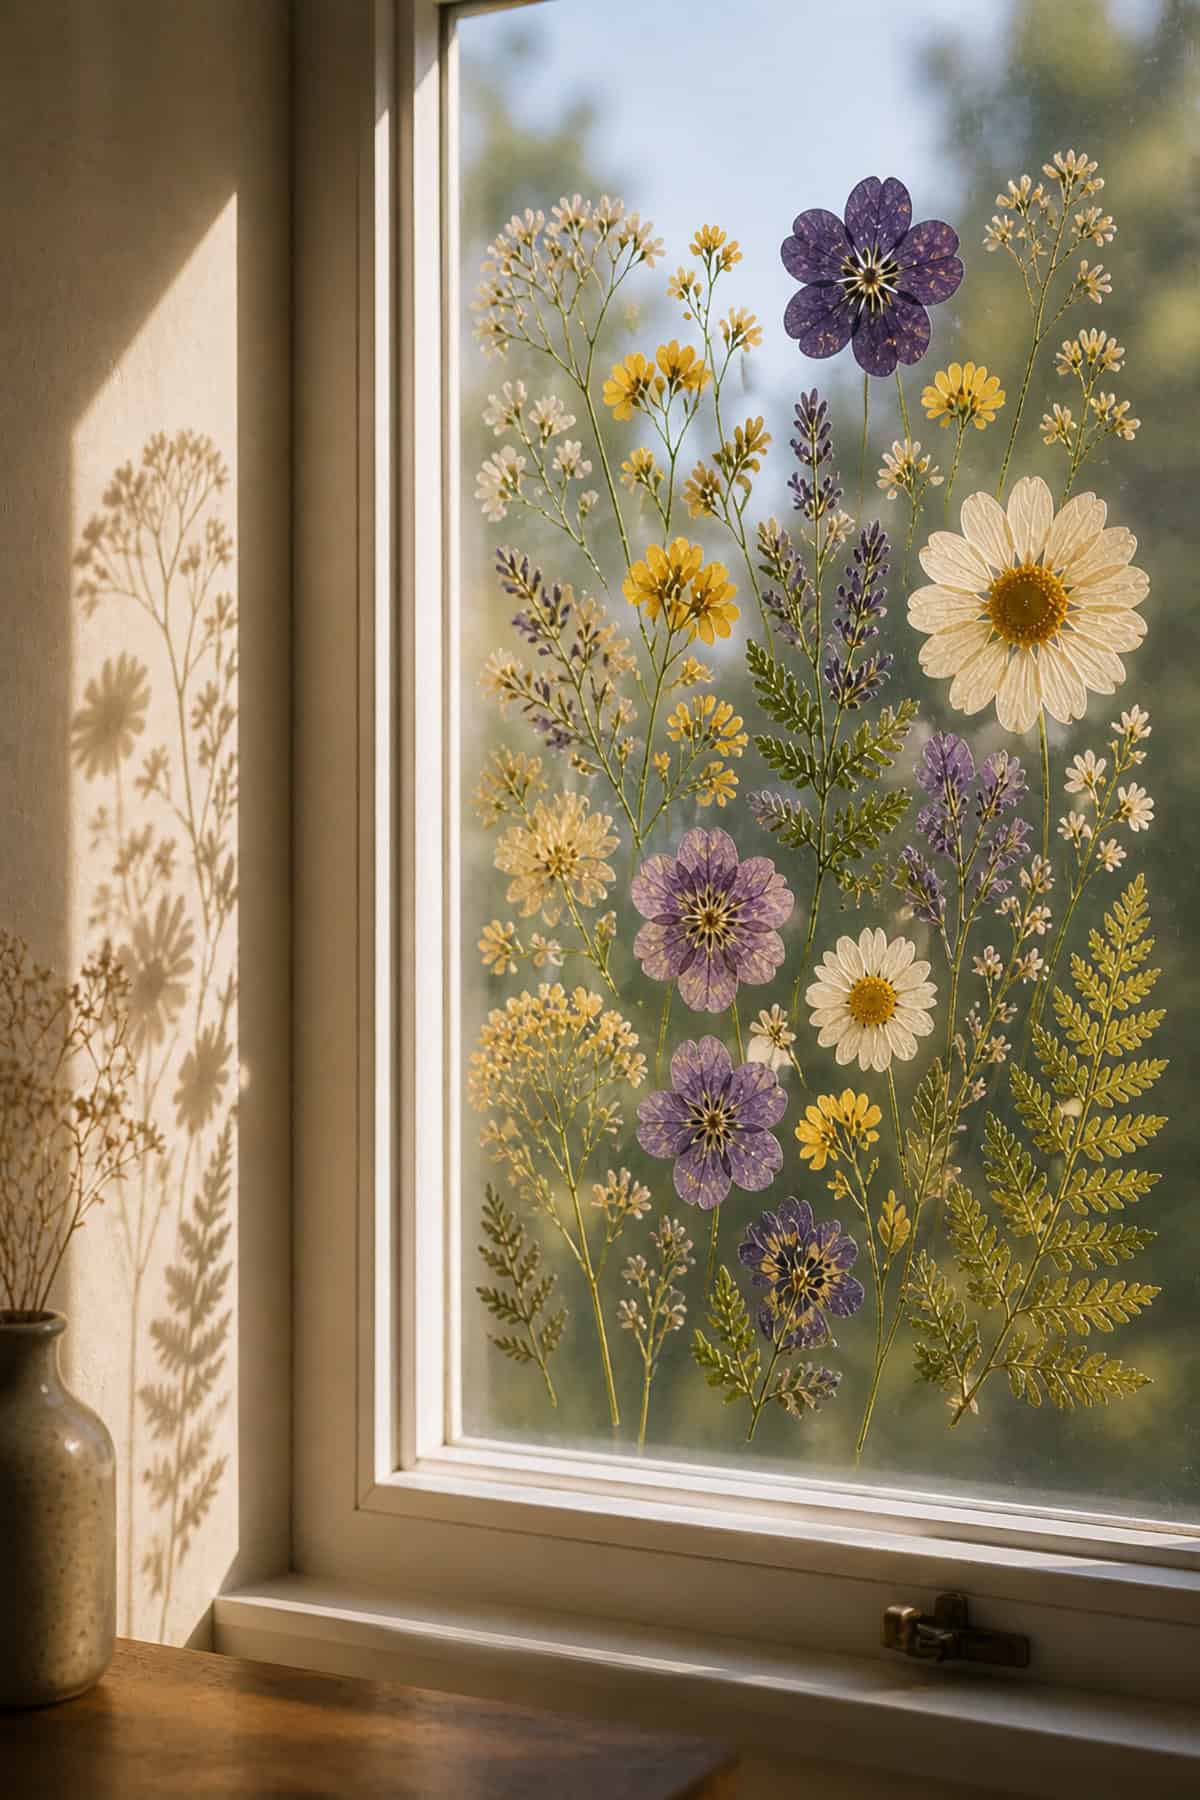
Pressed flower decals for windows are easy to make with transparent adhesive sheets. Layer the flowers, smooth out bubbles, and trim the edges.
Stick them to clean glass. Sunlight brings out the shapes and colors. They peel off cleanly, so you can swap them out whenever you like.
Pressed Flower Suncatchers
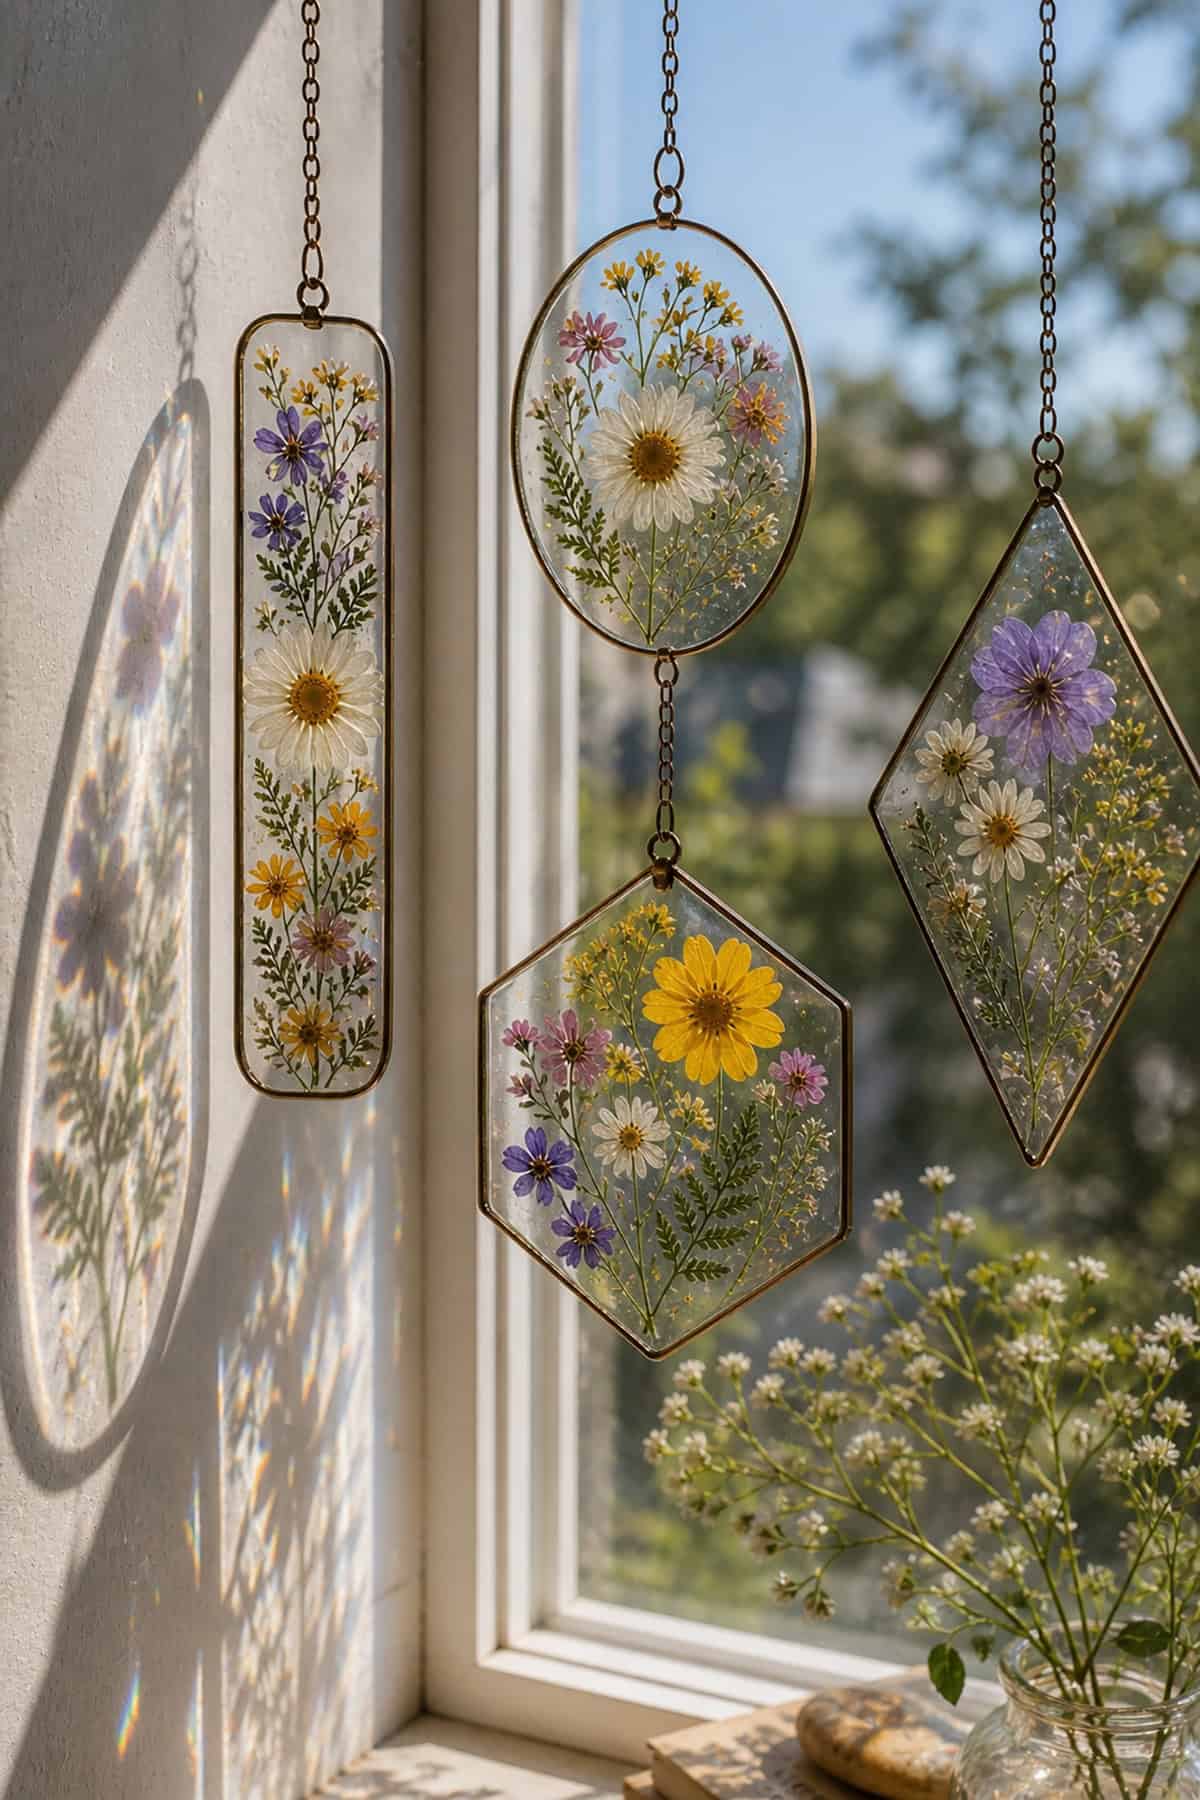
Pressed flowers look stunning when arranged inside circular plastic or glass discs. Just spread them out, sandwich between two clear sheets, and clamp the edges with a metal or silicone frame.
When sunlight streams through, the colors pop. Hang your suncatcher near a window with a bit of fishing line or fine thread. Try to keep moisture away—cloudiness sneaks in fast if you don’t.
Pressed Flower Notebook Covers

Pressed blooms under a clear cover can totally transform a plain notebook. Use contact paper or laminate to protect the petals—press it down well so you don’t get air bubbles.
Hardcovers hold up better for this. Keep the flowers a little away from the spine so they don’t get crimped. Suddenly, your stationery’s got real personality.
Pressed Flower Decorative Plates
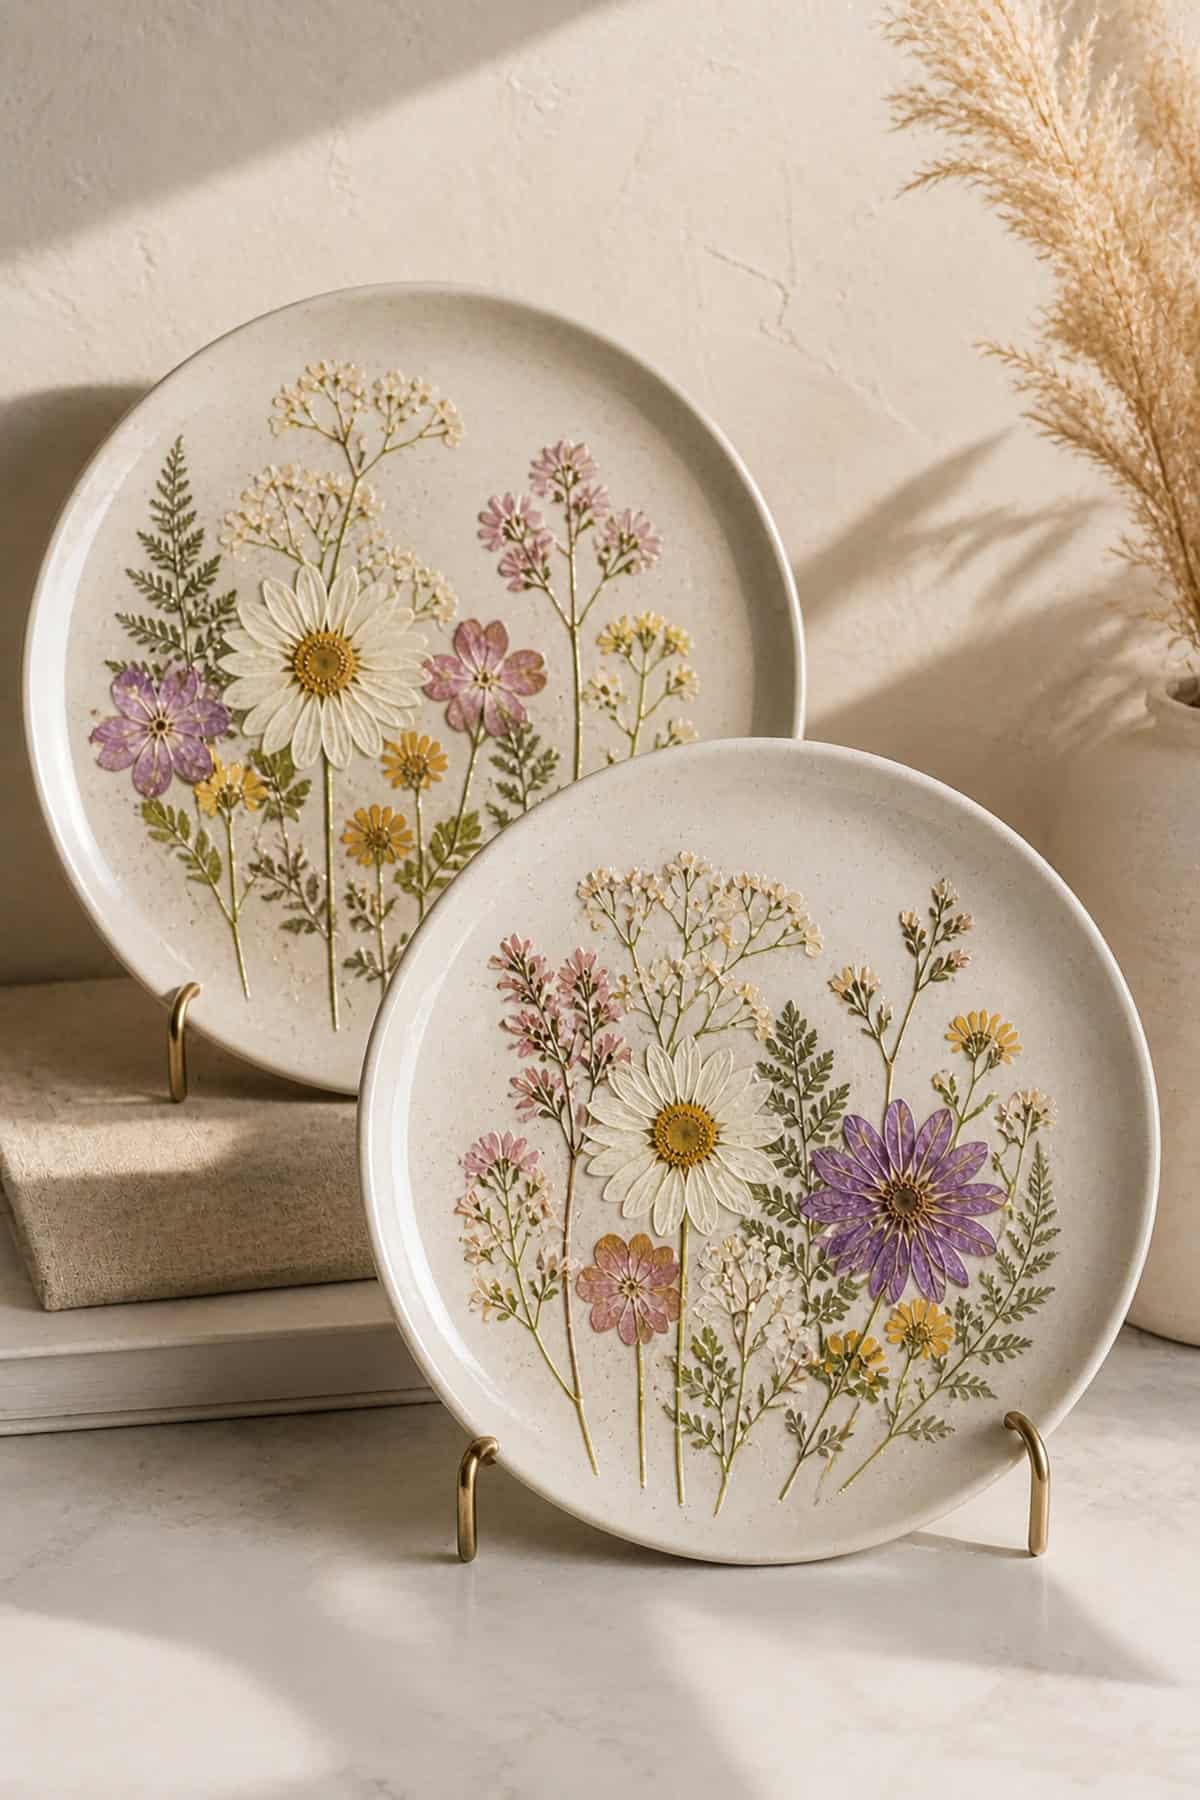
For display plates, you can seal pressed flowers on the back of clear glass. Brush on adhesive, arrange the flowers face-down, and finish with a protective sealer.
Once dry, the front reveals all the floral details. Just remember, these are for display—don’t eat off them. Dust gently to keep them sharp-looking.
Pressed Flower Magnets
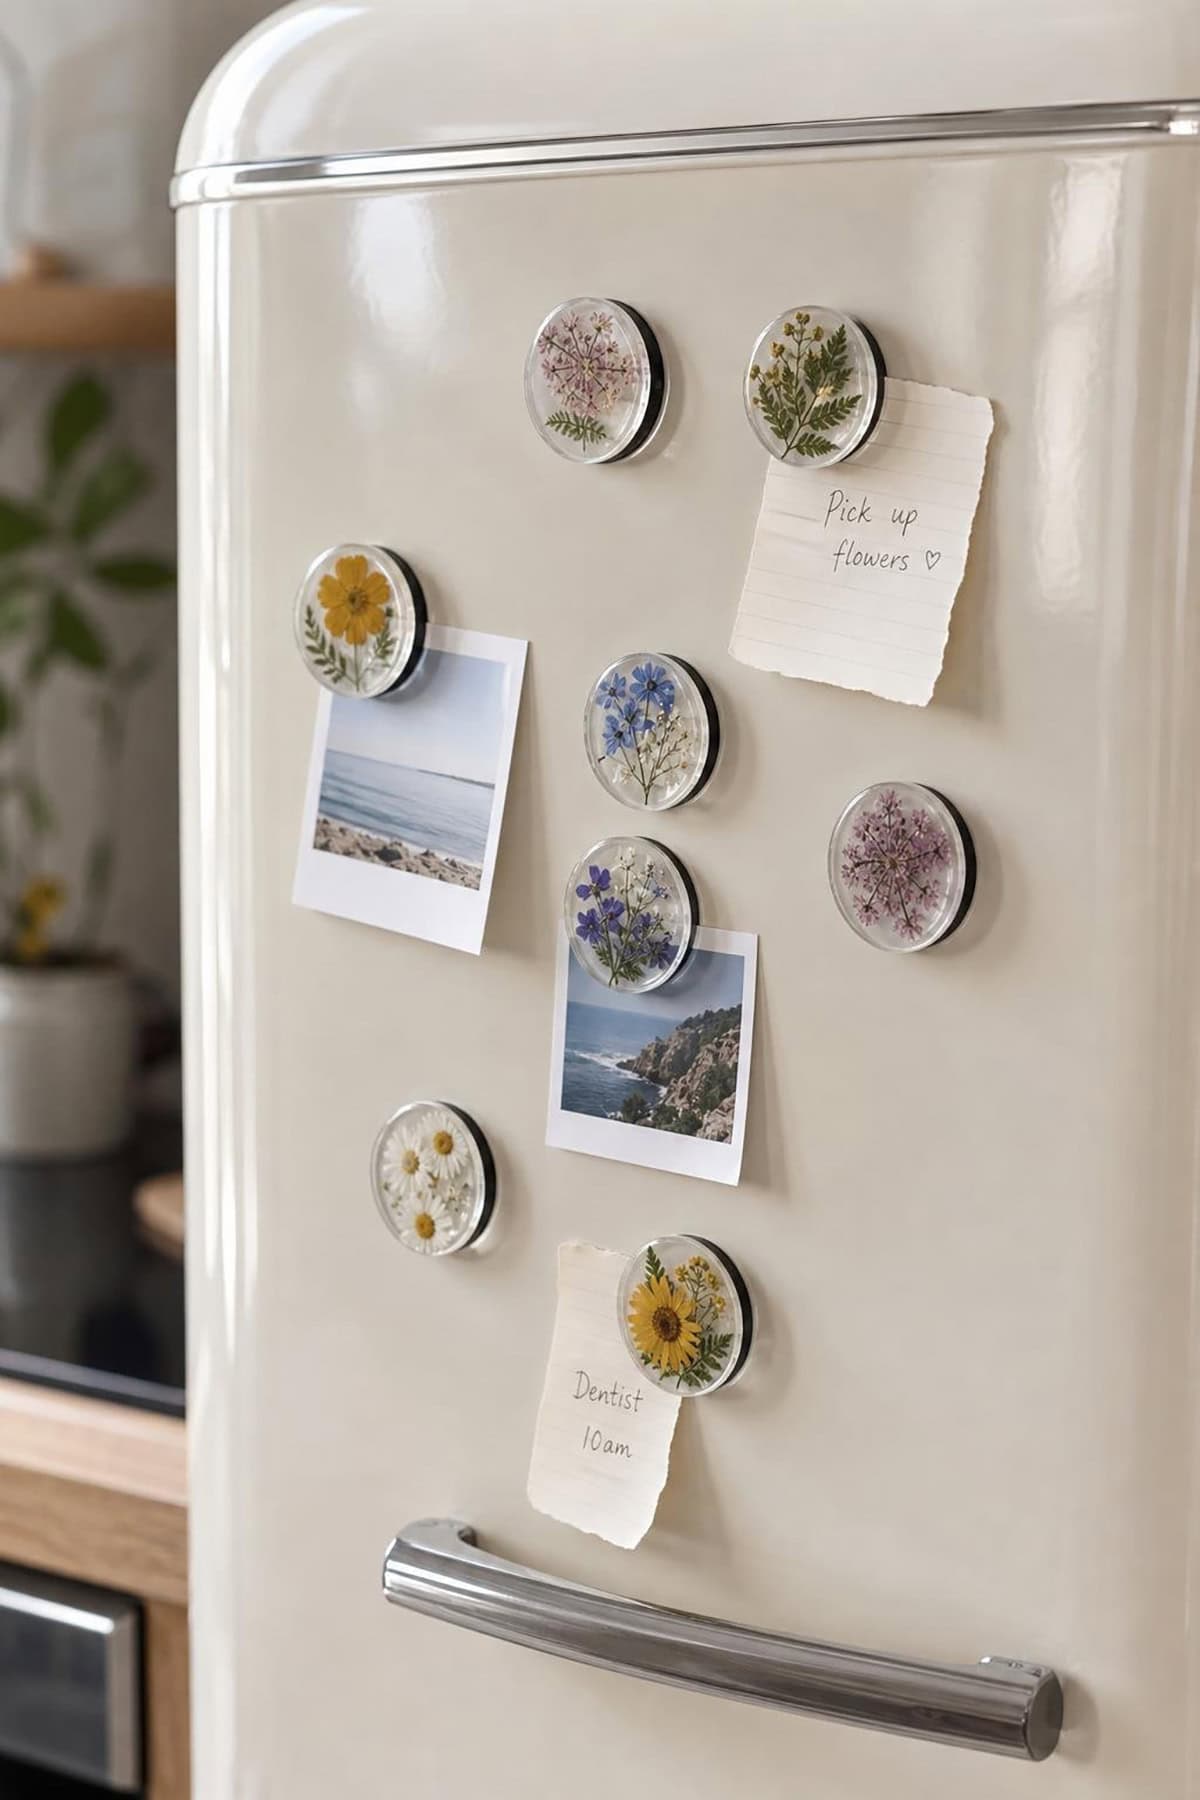
Bring a little color to the fridge with pressed flower magnets. Stick flowers onto small wooden or plastic shapes, seal with clear resin, and slap a magnetic strip on the back.
Let them cure before using. The resin keeps everything smooth and chip-free. They’re cute as gifts or just to brighten up a boring magnetic board.
Pressed Flower Resin Hair Clips
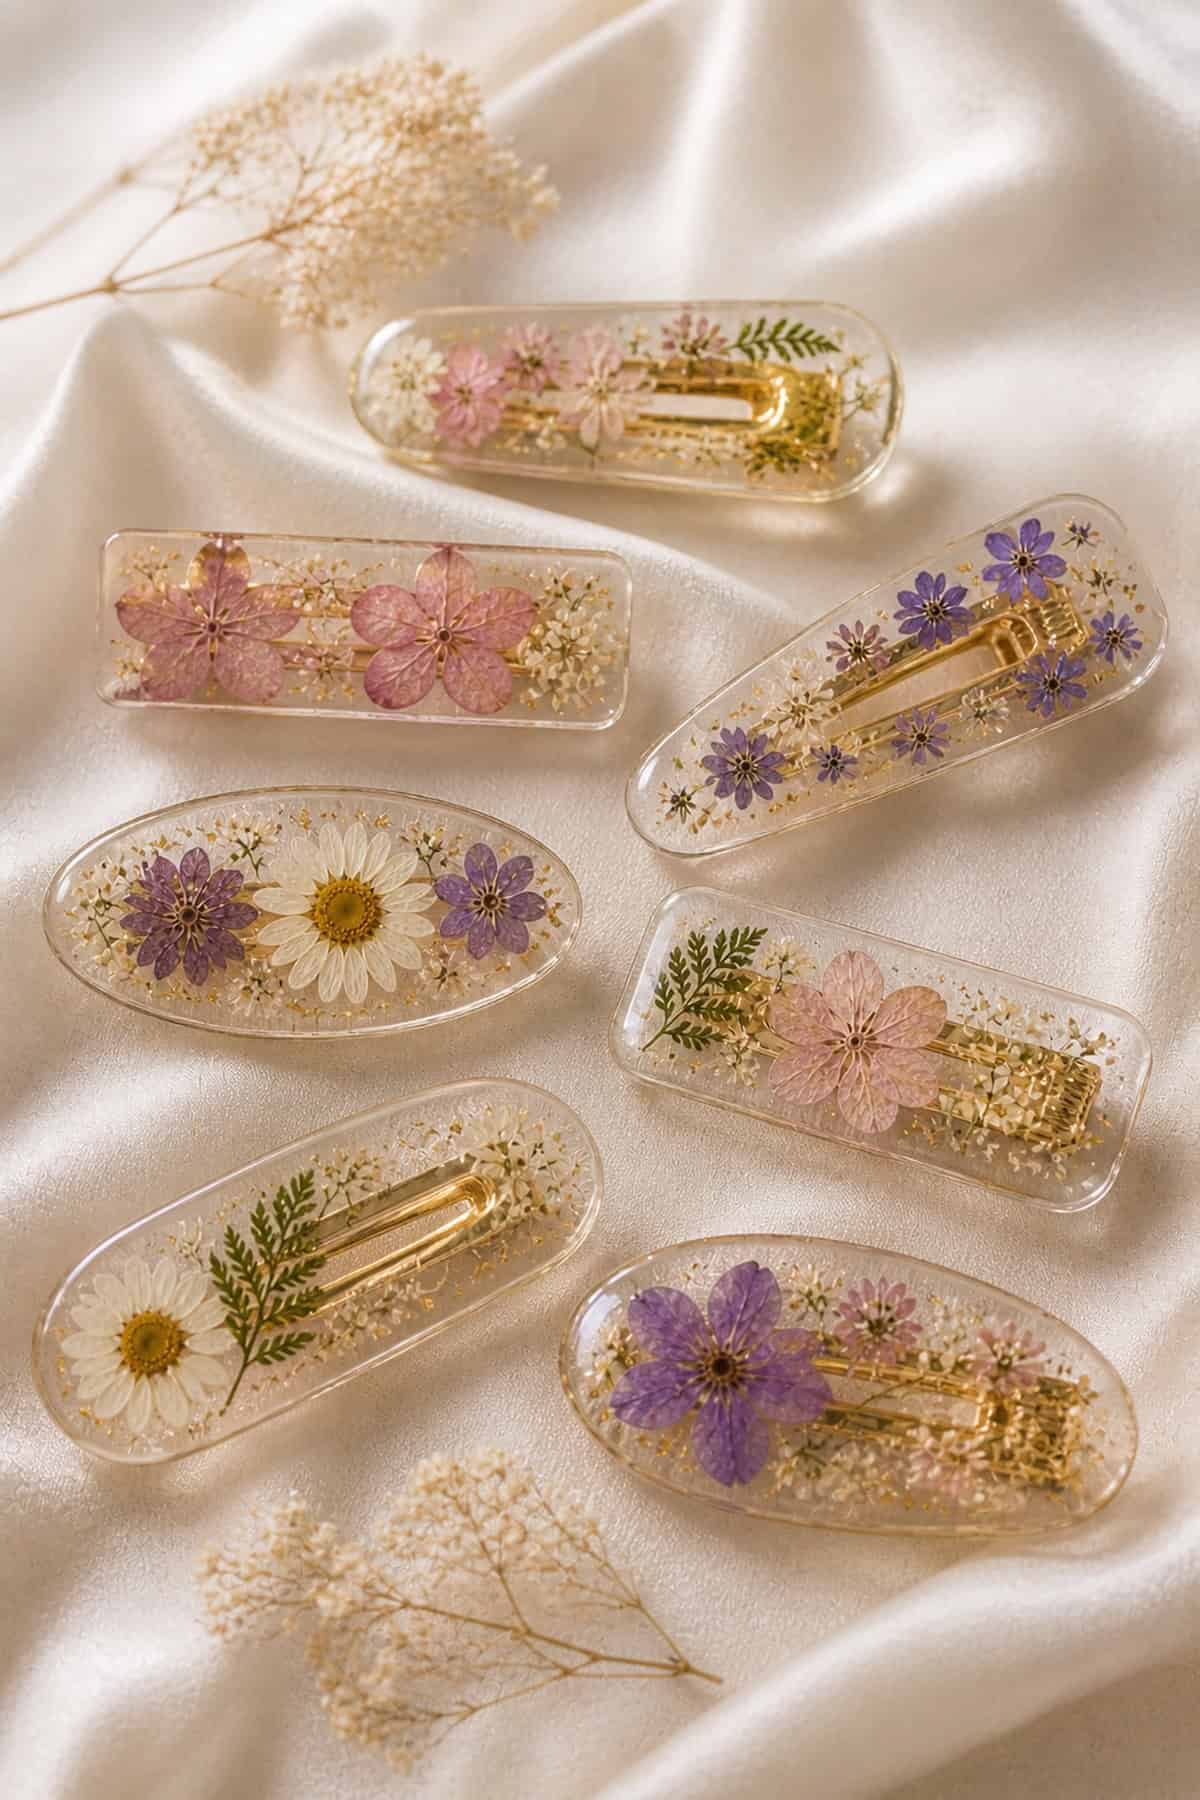
Hair clips with pressed florals are surprisingly lightweight. Pick small, simple blossoms so they don’t look bulky. Pour resin into the mold, set your flowers, and top it off carefully.
Give them time to cure, then polish if the edges are rough. You get a comfy, glossy accessory that shows off real petals—what’s not to love?
Pressed Flower Phone PopSockets
Pressed petals under clear resin make for subtle, unique phone grips. Pop off the top, fill the mold with resin, center a flat flower, and seal it up.
Once it’s cured, pop the disc back on the base. It’s still totally functional, just a lot prettier. Go for UV-resistant resin—the constant handling can dull regular finishes.
Pressed Flower Jewelry Dish
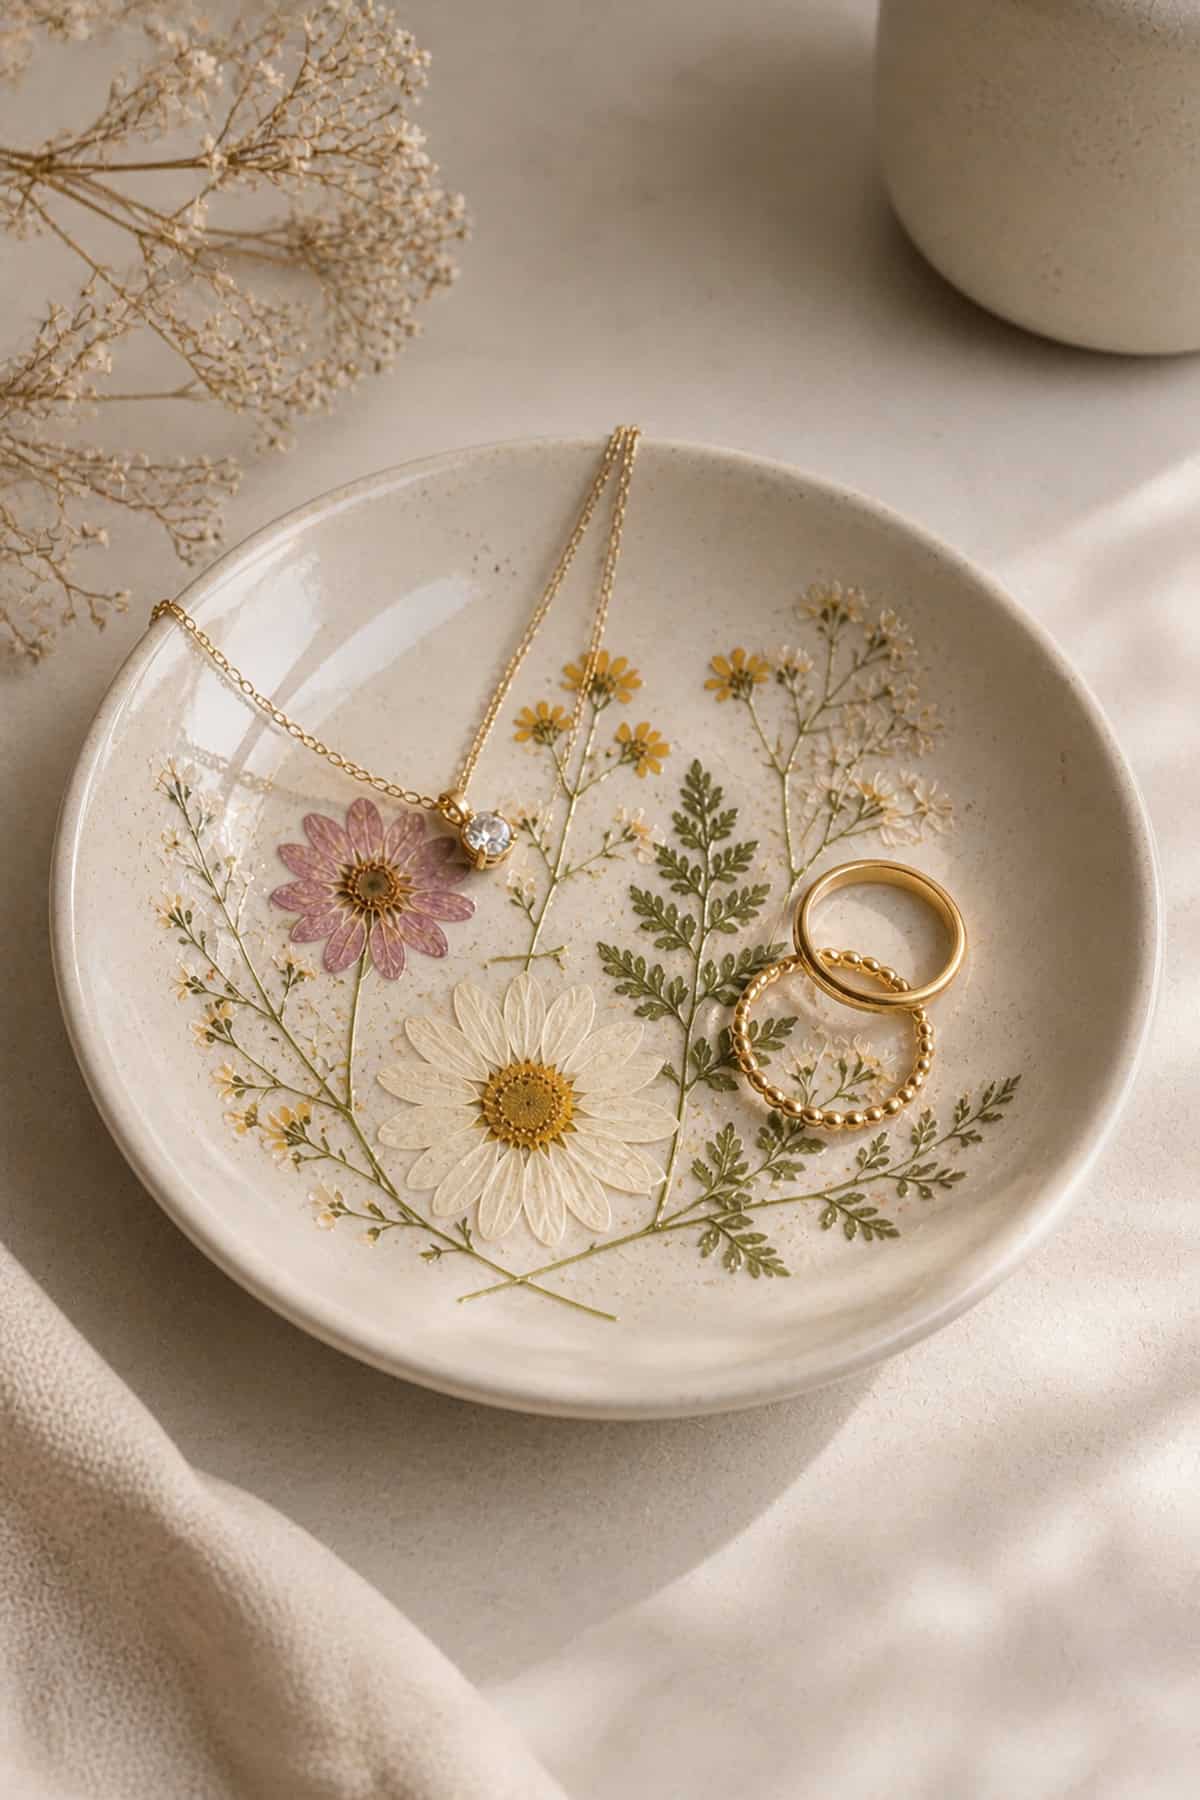
Try arranging pressed flowers at the bottom of a little trinket dish, then seal with a few coats of clear resin or sealant.
Let each layer dry before adding the next. You’ll protect the colors and get a smooth finish. Stick to gentle cleaners so the top layer doesn’t get cloudy.
Pressed Flower Resin Letters
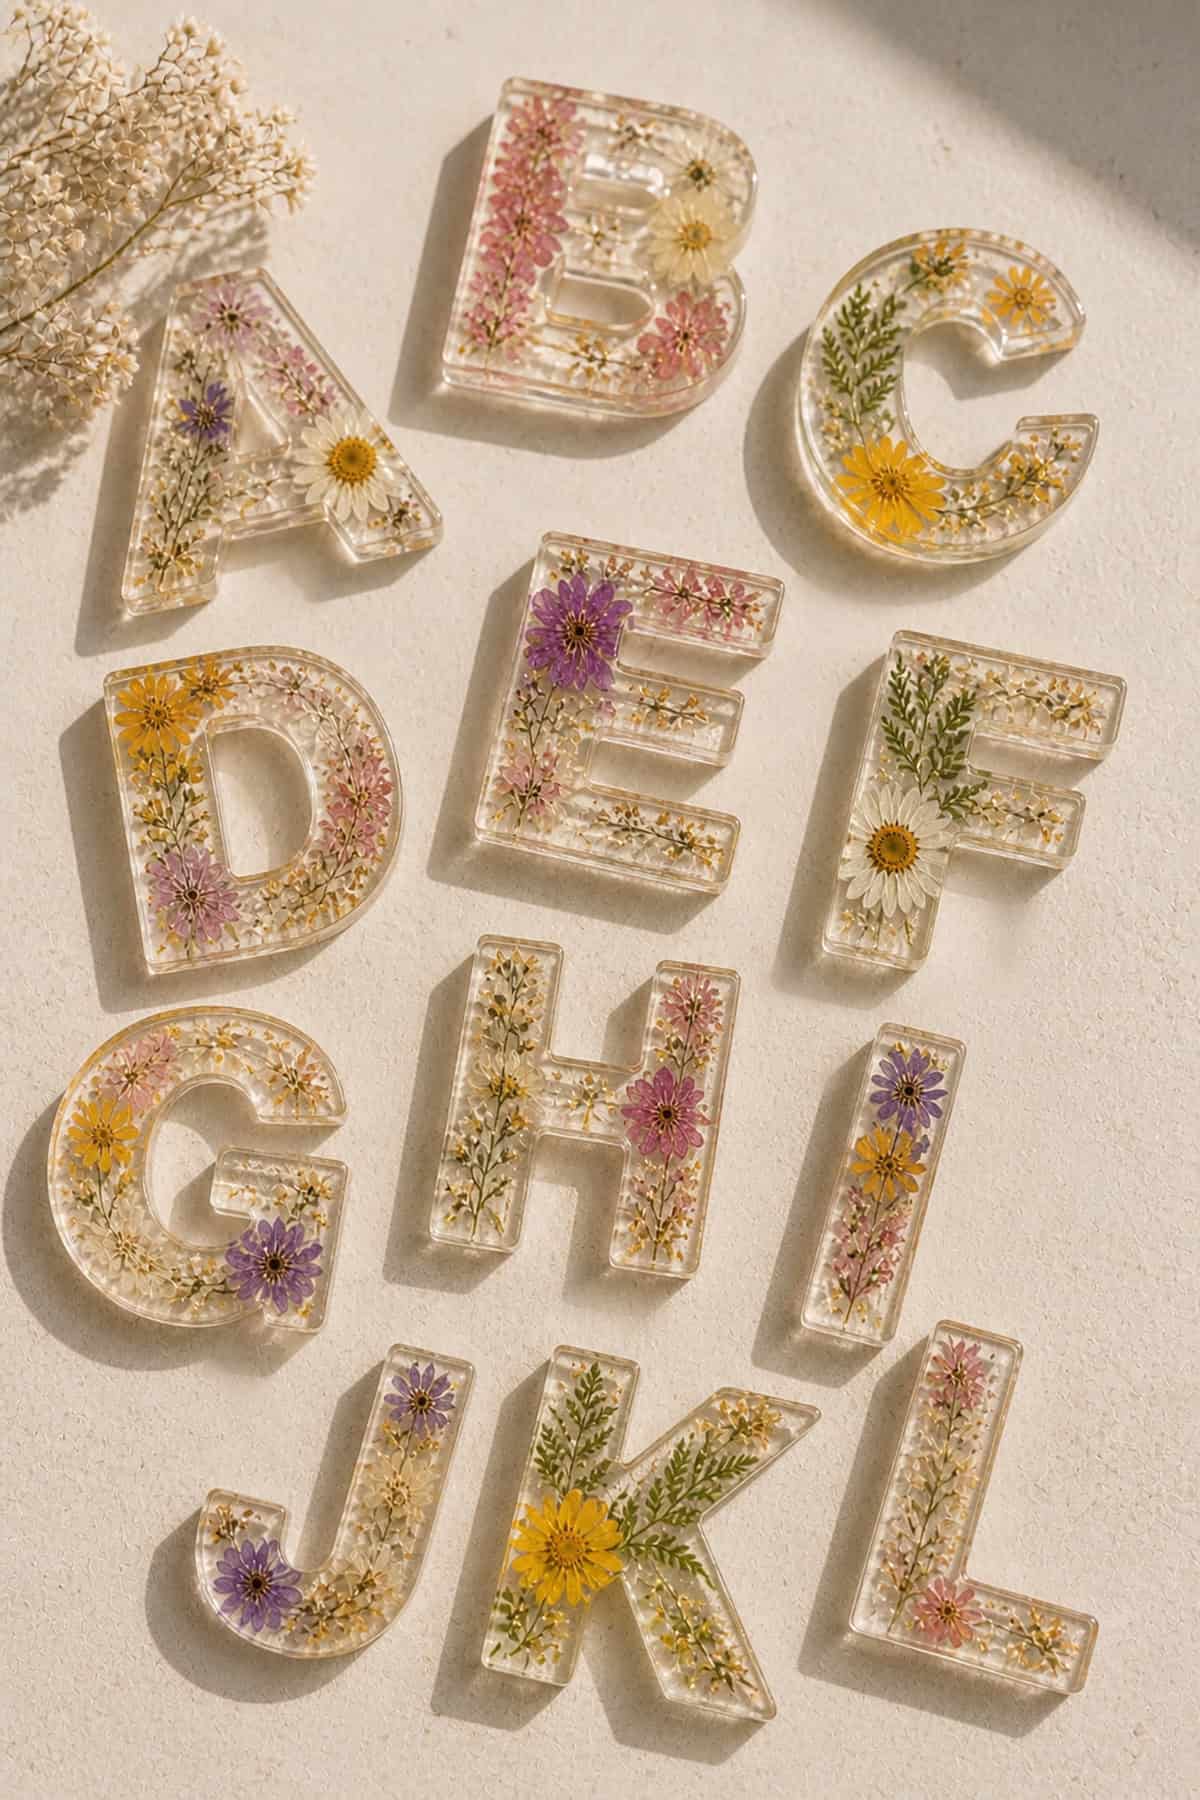
Resin letters with pressed flowers inside make for personalized decor. Arrange the blooms in alphabet molds and fill slowly so you don’t trap air. Layering colors adds depth.
Make sure everything’s level as it cures. The finished letters are glossy and bright—spell out a name or initials for a unique touch.
Pressed Flower Name Signs
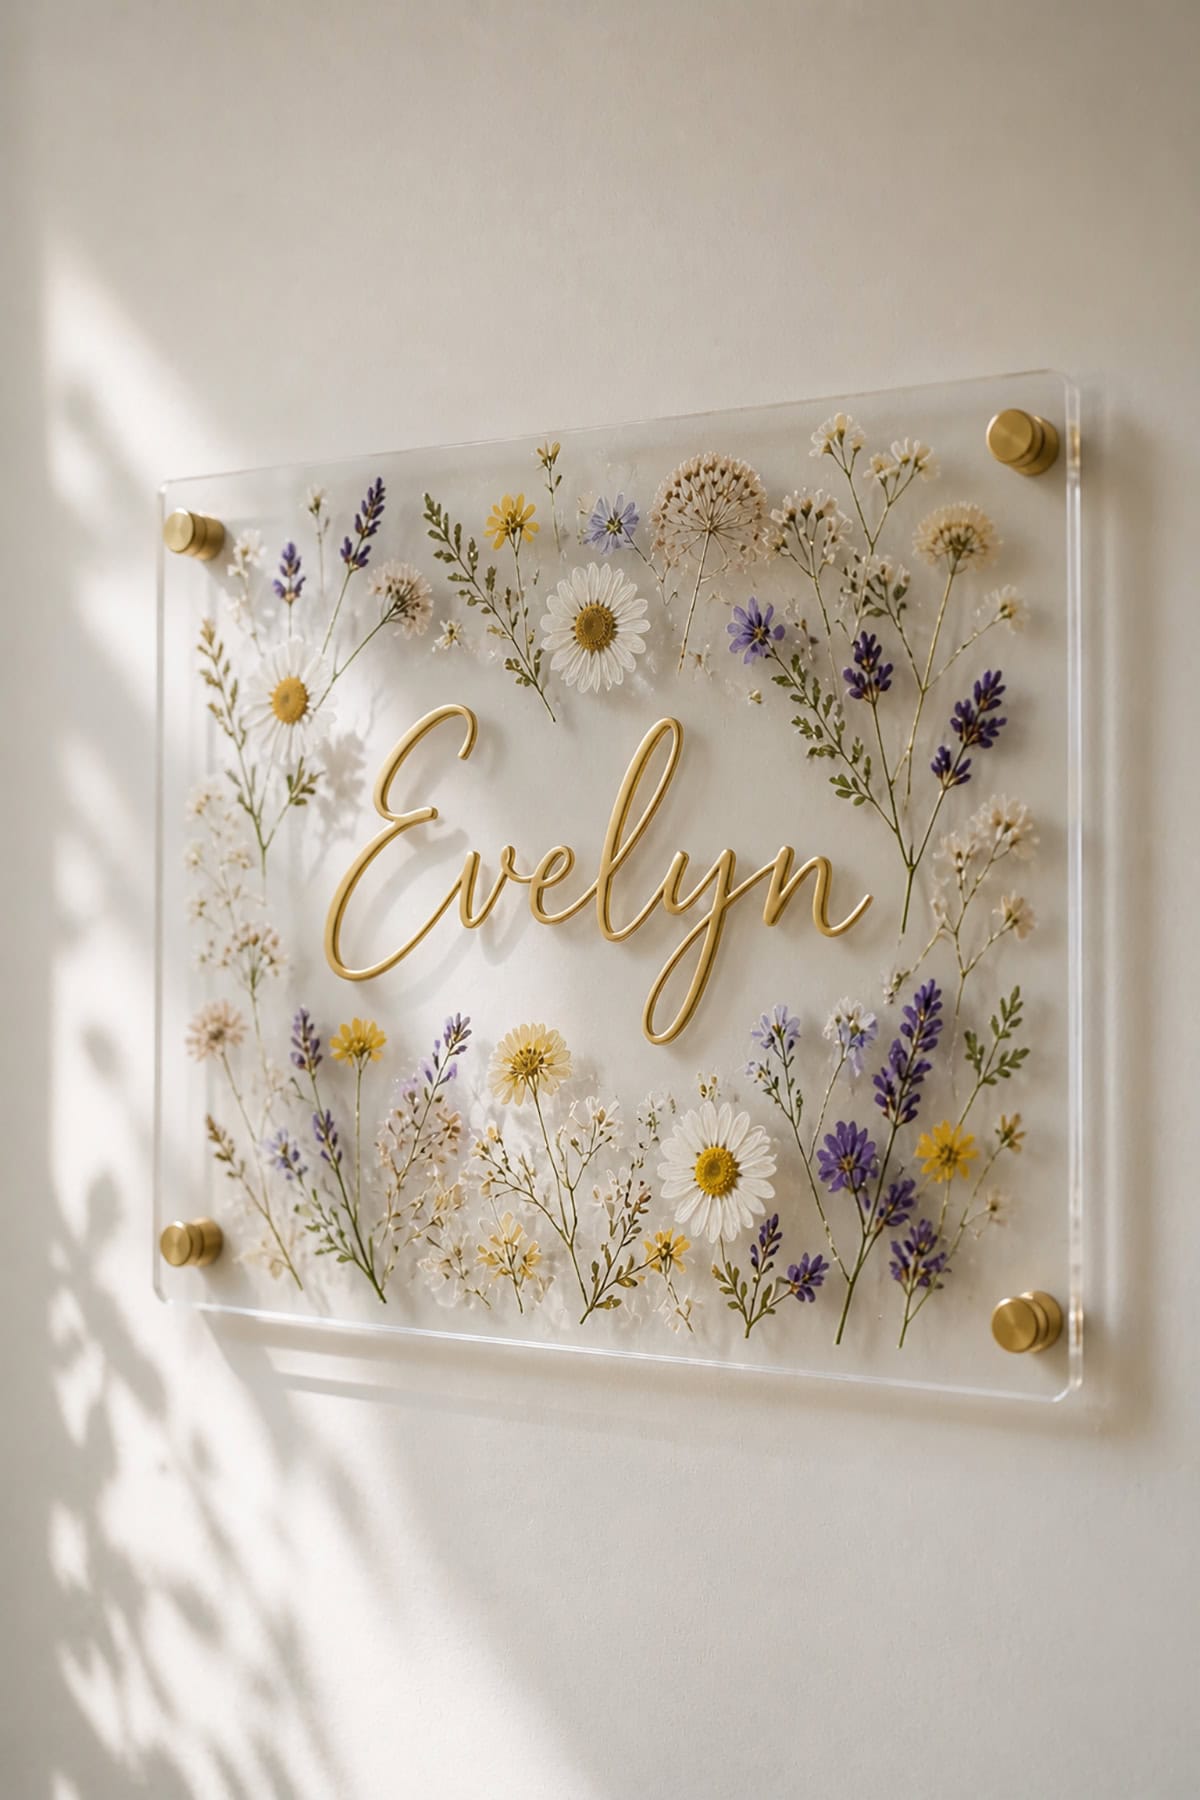
Name plaques get a big upgrade with pressed flowers under resin or glass. Print or cut your base, then arrange petals around or beneath the letters.
Seal with a clear coat and hang it up. The mix of text and natural shapes feels personal without being over the top—great for gifts or just to make a space feel special.
Pressed Flower Cabinet Knobs
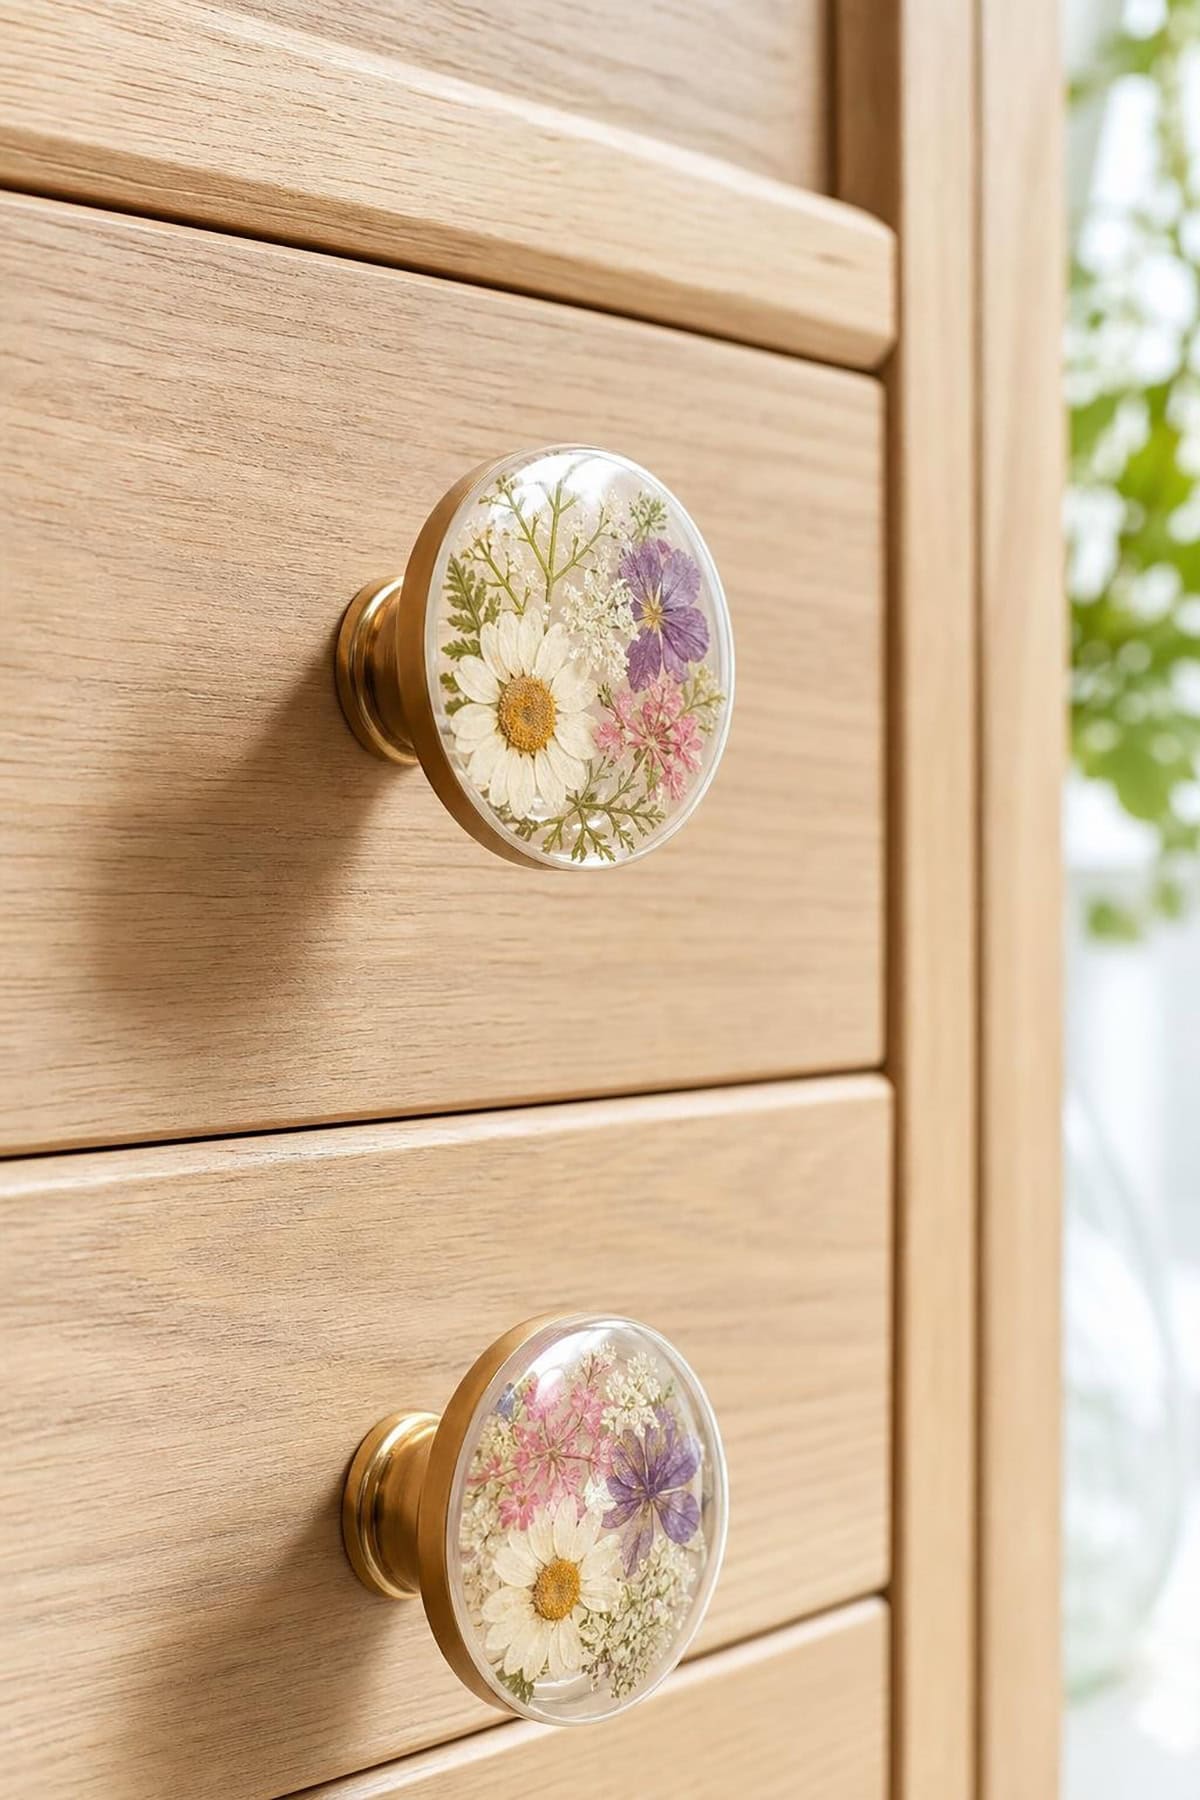
Pressed flowers in round resin molds make for one-of-a-kind drawer pulls. Drop in tiny petals just below the surface, let them cure, then attach to your hardware base.
Wipe with a soft cloth to clean. These little details bring a quiet pop of color to any furniture.
Pressed Flower Candle Rings
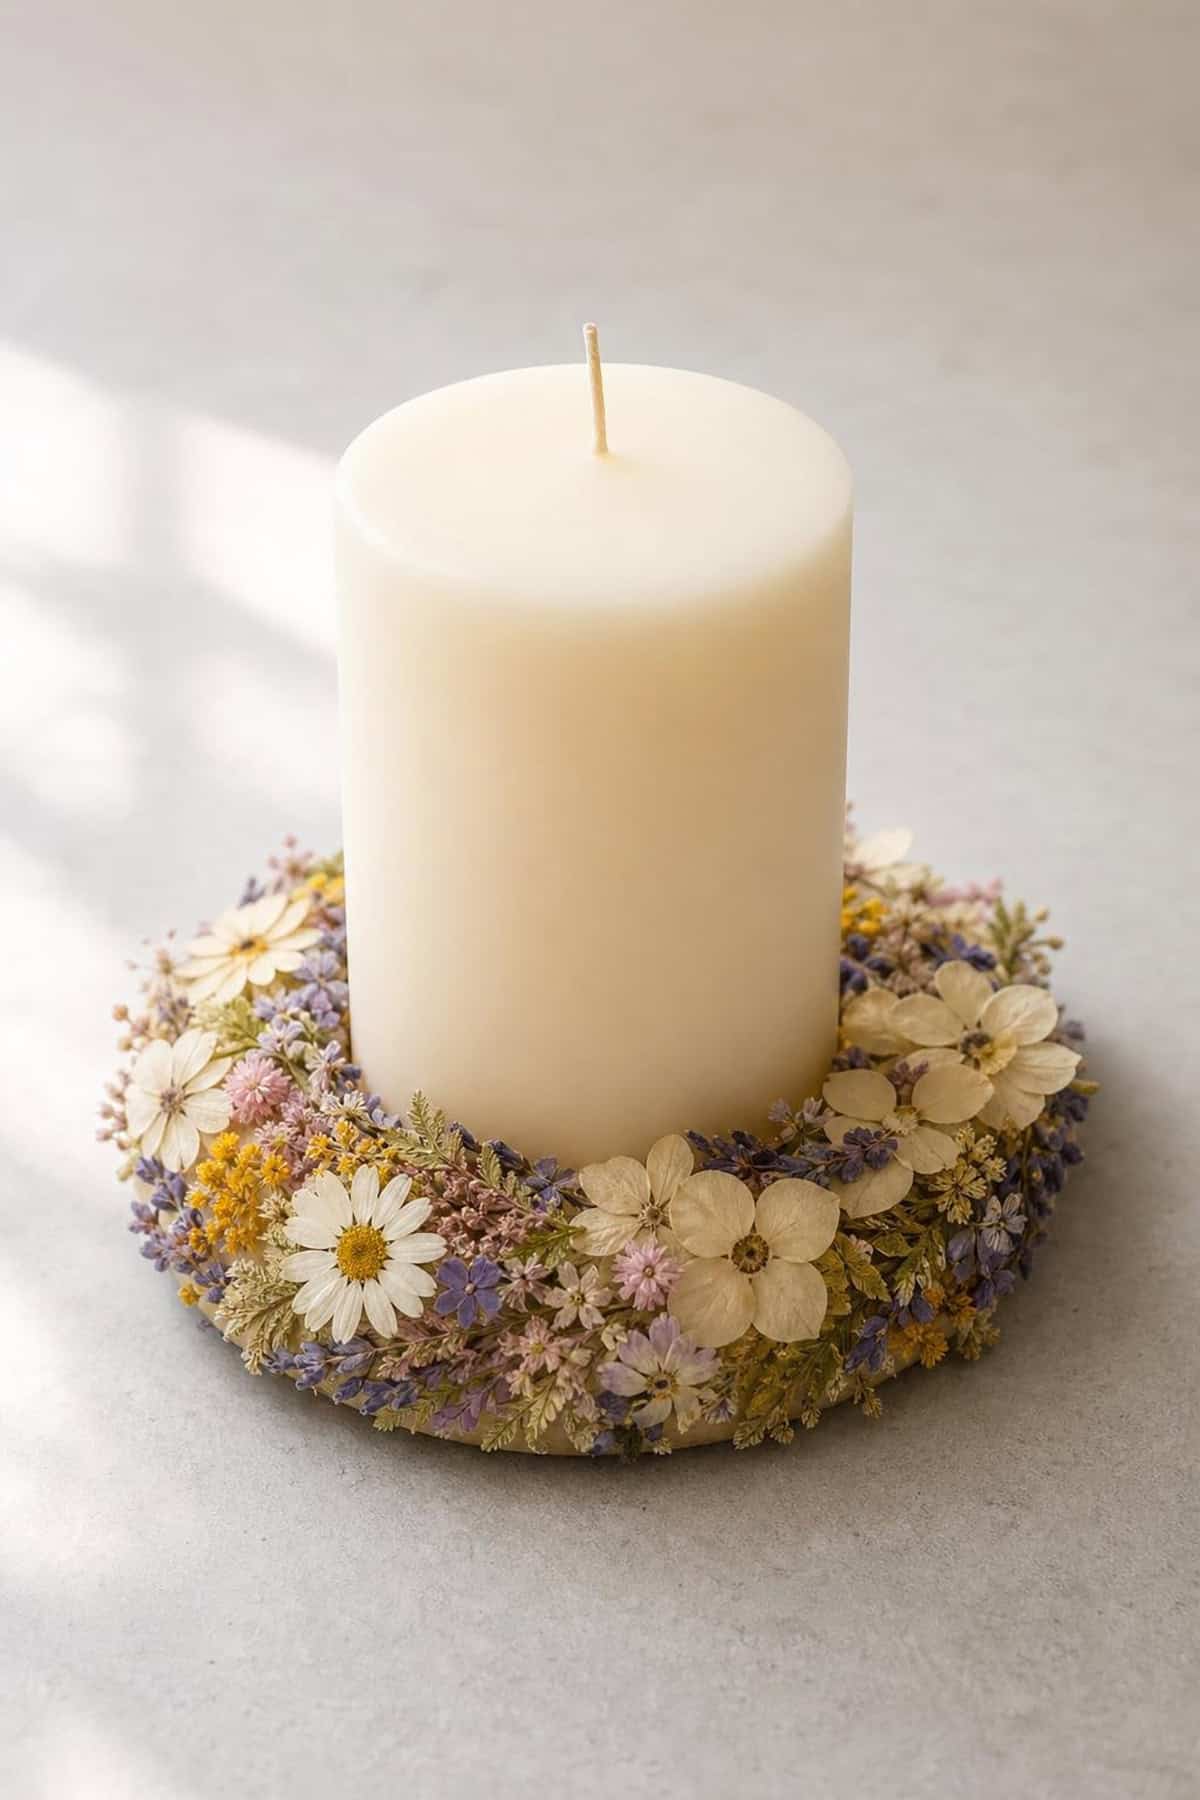
Pressed flower candle rings wrap around pillars like mini wreaths. Arrange blooms on stiff cardstock circles, then seal each one with a clear coat.
Wait until they’re dry before slipping them over candles—don’t let them touch the flame. They’re safe, reusable, and perfect for dressing up a table.
Pressed Flower Gift Boxes
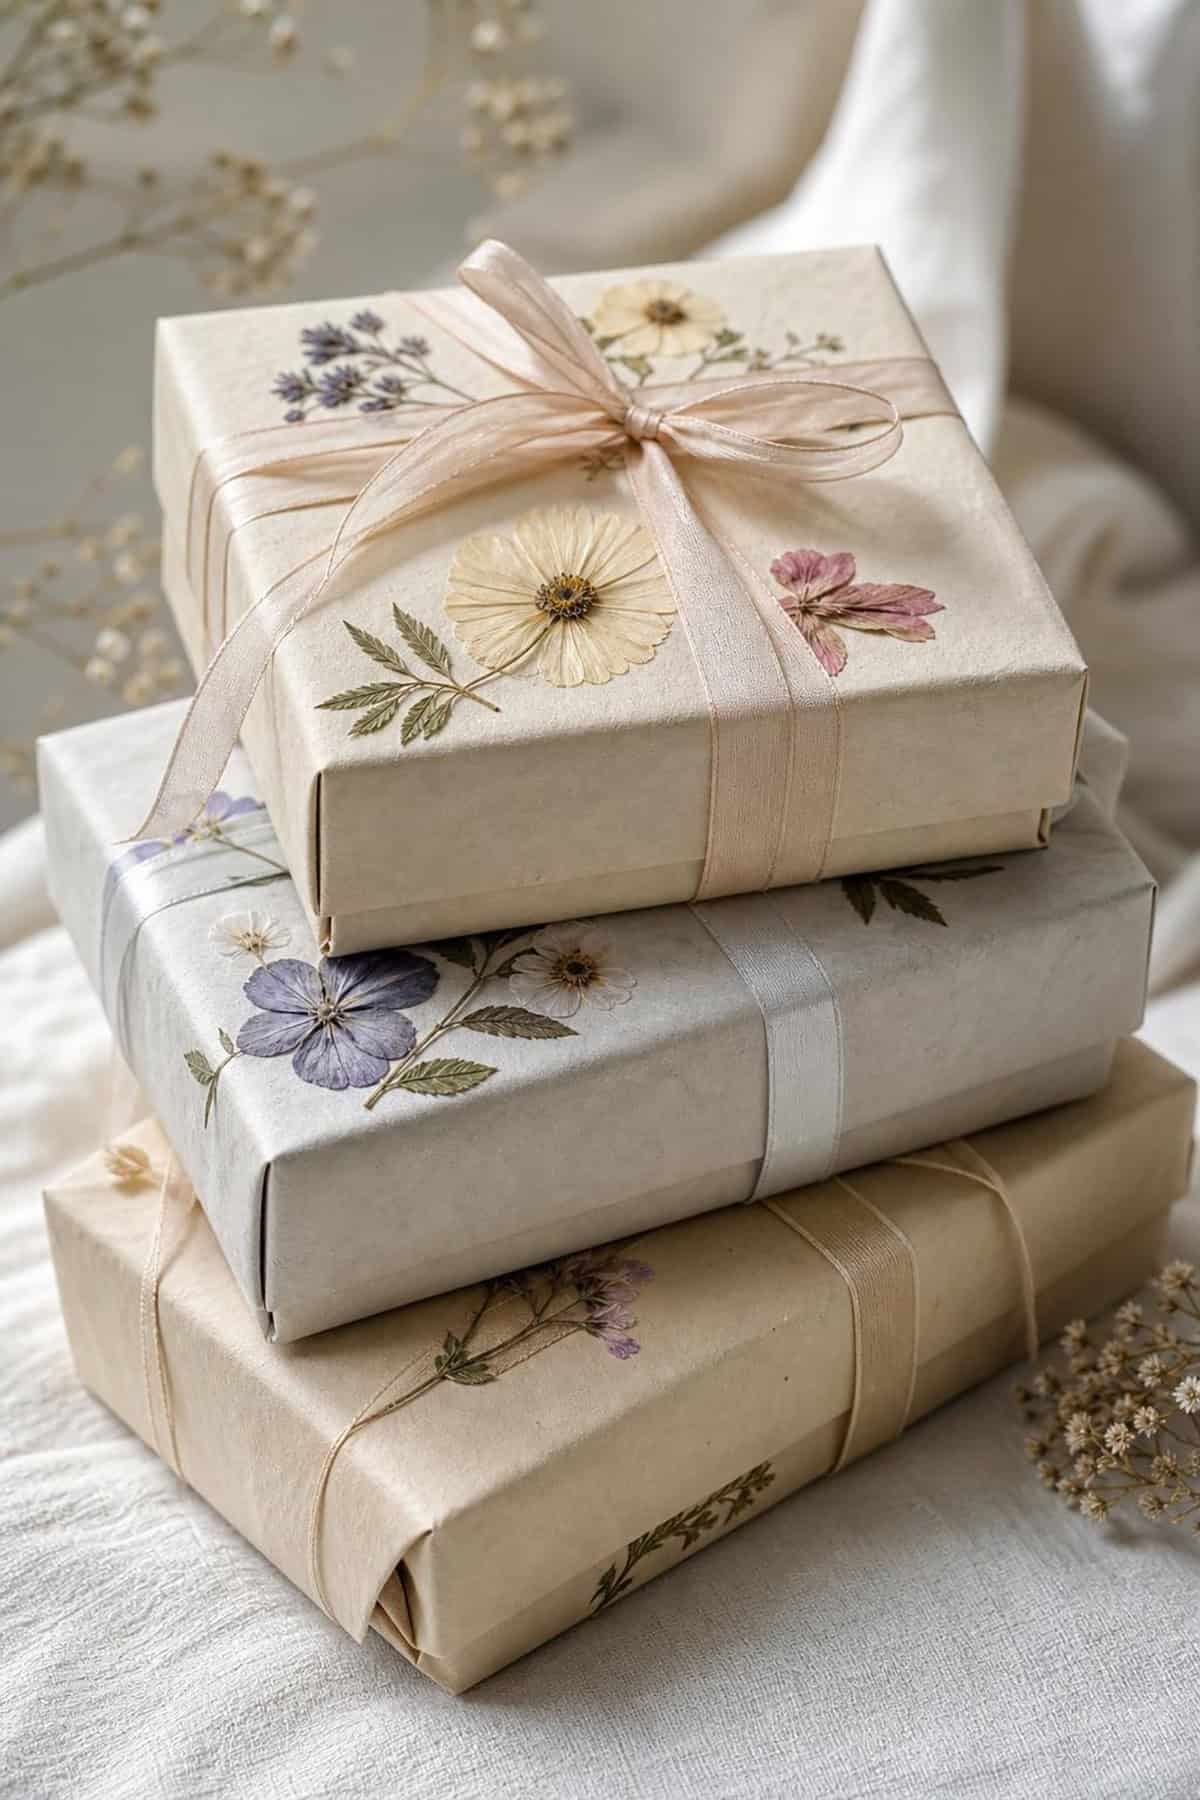
Gift boxes look extra special with pressed blooms glued to the lid or sides and a layer of varnish brushed on top. The coating helps the flowers stick and last.
Match the flower colors to your ribbon or tissue paper for a coordinated look. Once dry, the box is both a present and a keepsake—pretty neat.
Pressed Flower Bath Salt Jars
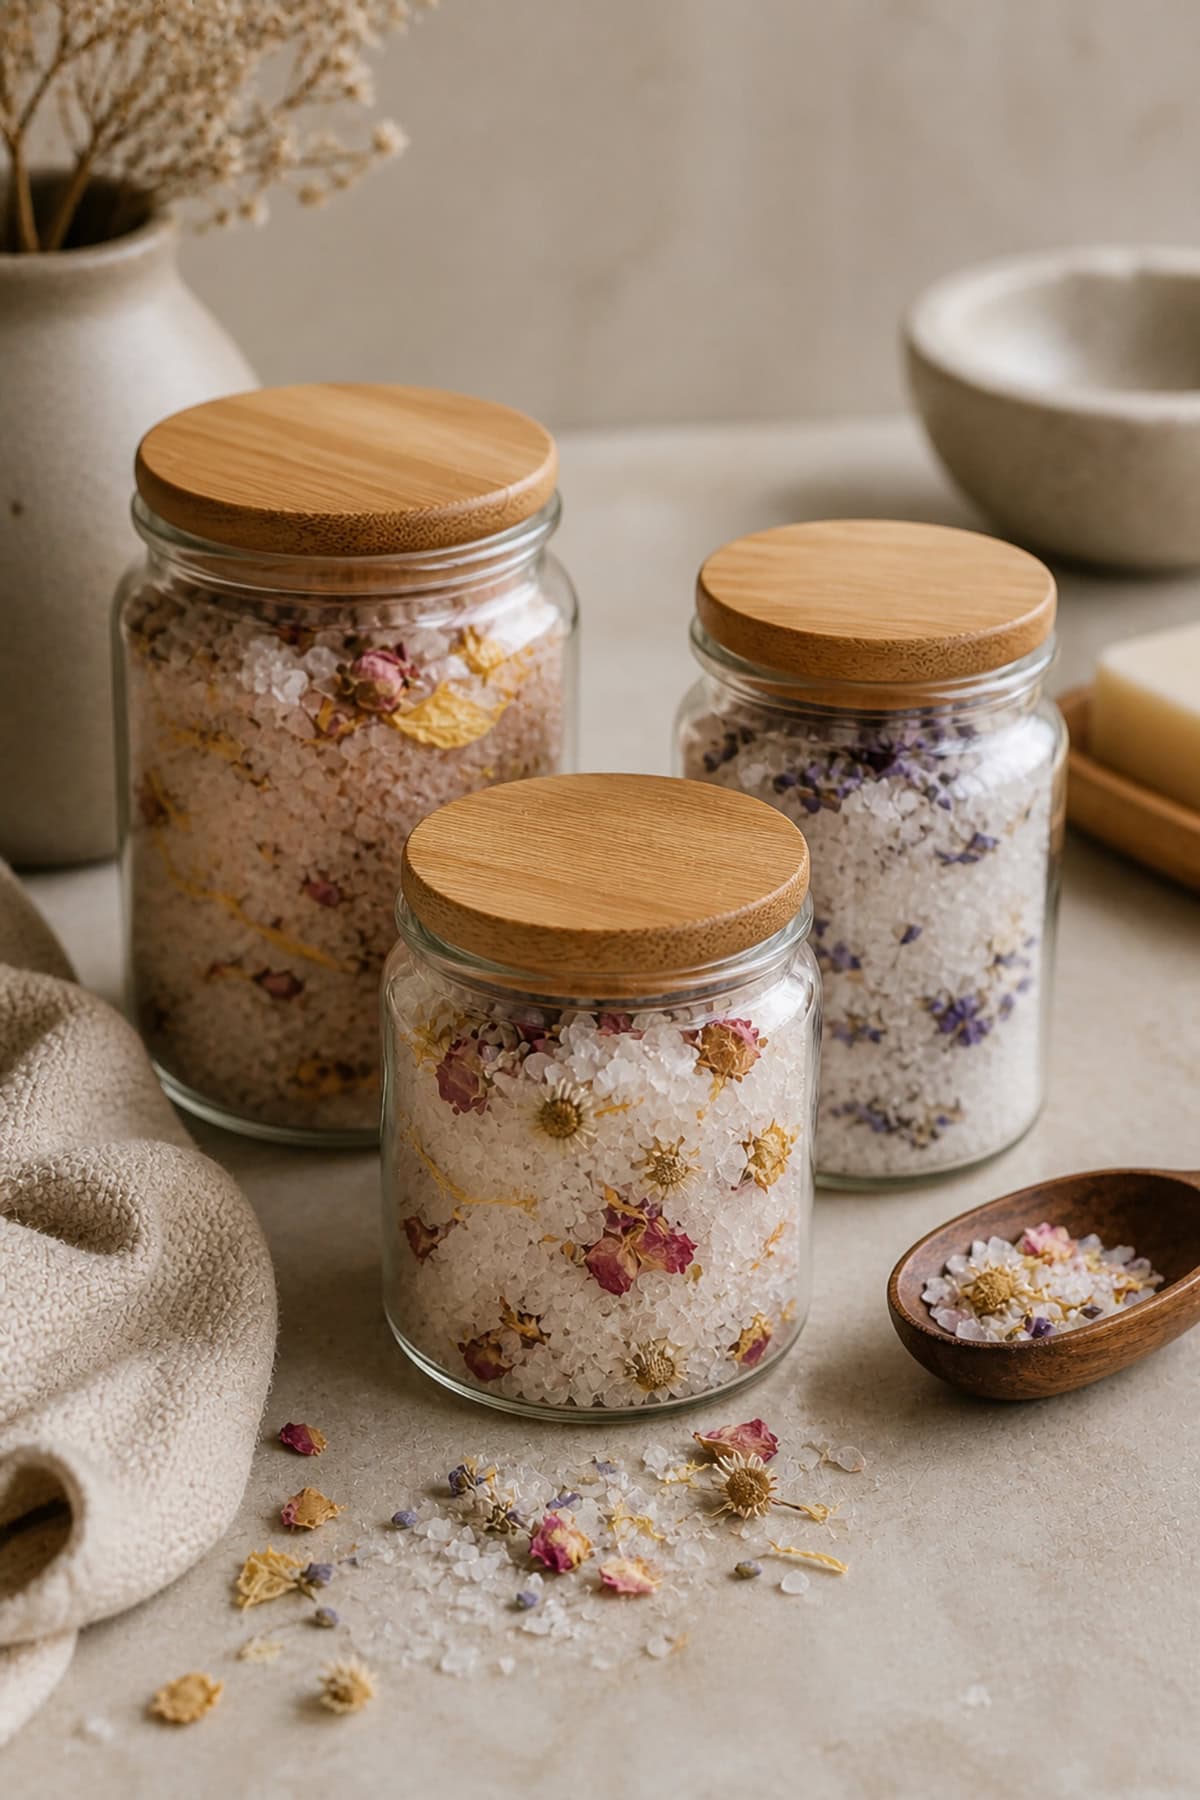
Decorating bath salt jars with pressed flowers instantly upgrades their look. Stick petals on with decoupage glue, then spray with waterproof acrylic. Make sure your labels are clear so people know what’s inside.
Once empty, the jars can be reused. Keep them away from humidity to protect the flowers. There’s something calming about that mix of glass and preserved petals.
Pressed Flower Table Runner Inserts
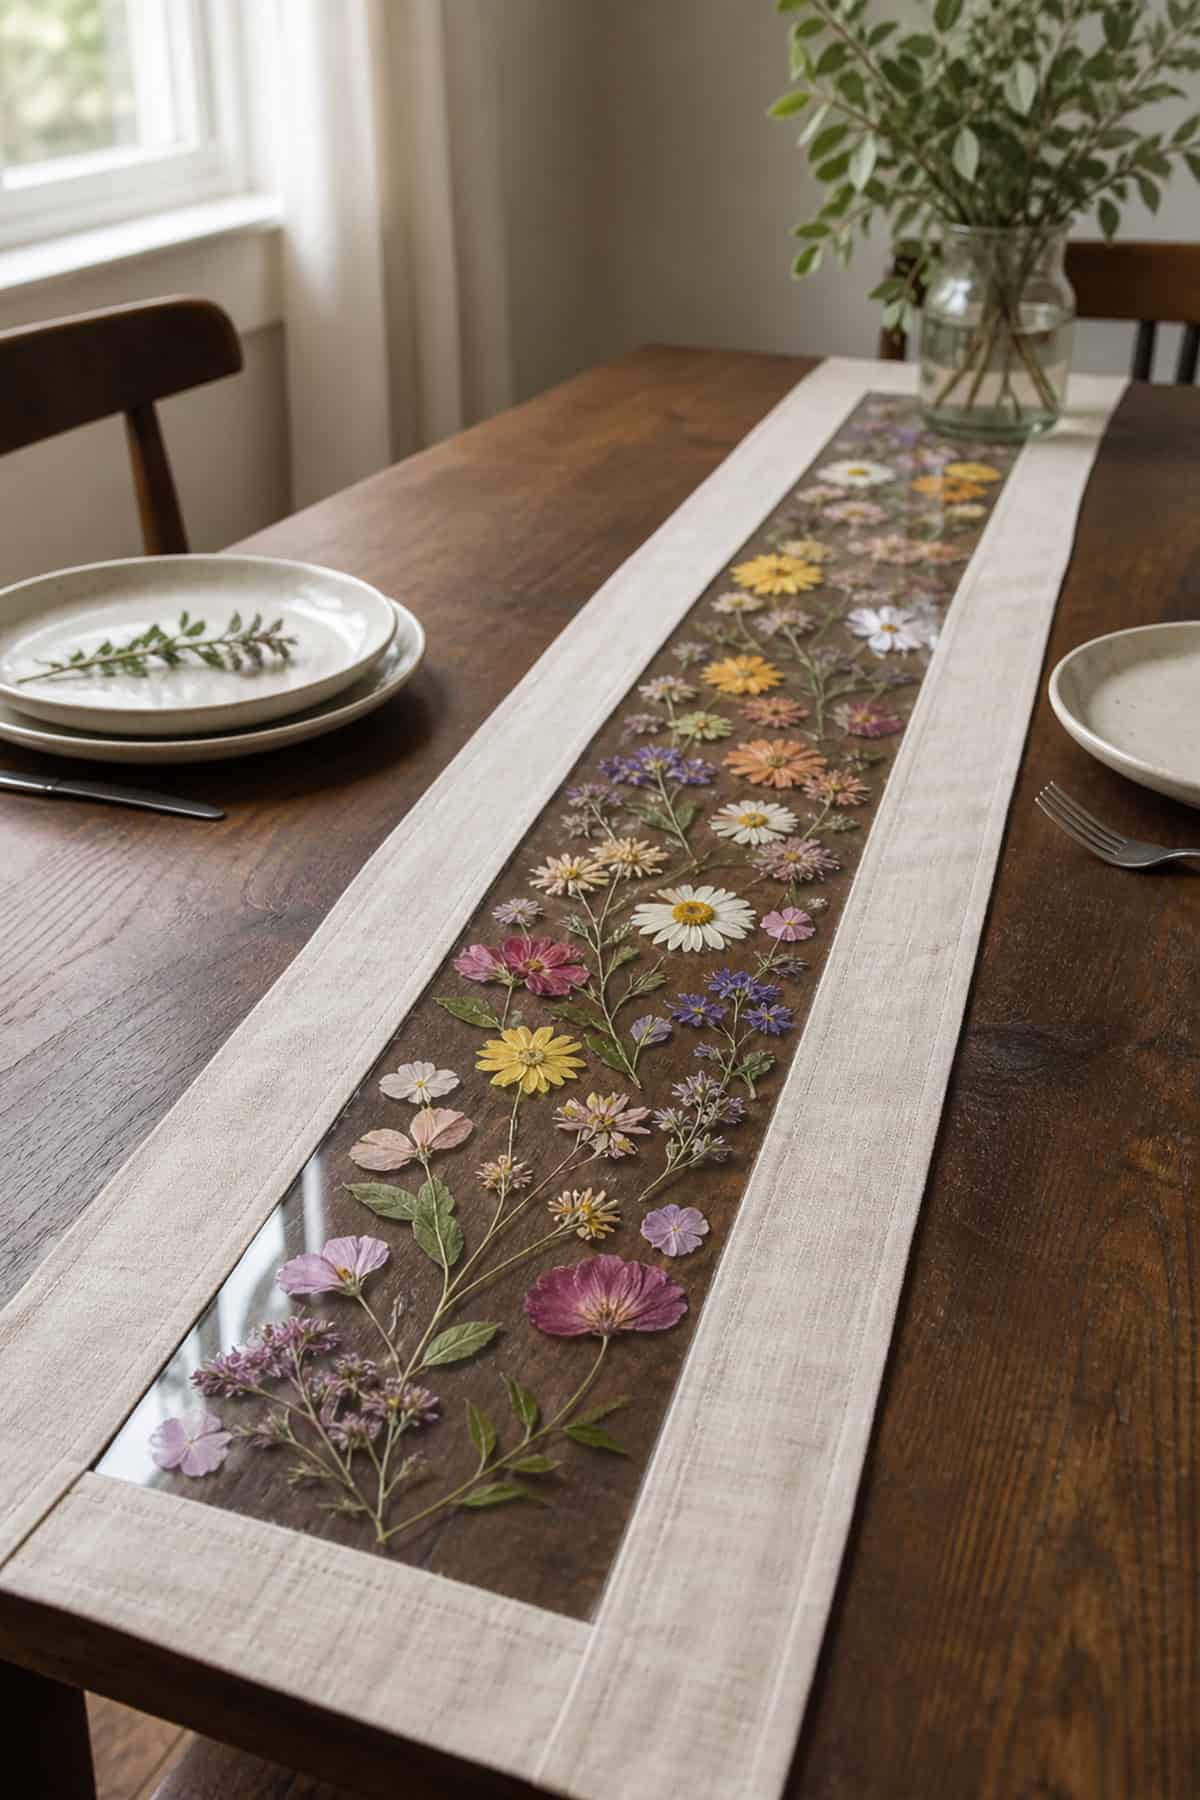
Table runners with pressed flowers laminated inside clear vinyl make for easy-clean centerpieces. Spread the flowers between layers and seal the edges tight.
The smooth surface keeps moisture out, and you can swap flowers for a new look whenever. Botanical designs on the table—why not?
Pressed Flower Pillar Candle Wraps
Pressed flowers glued onto parchment strips make lovely wraps for candles. Secure the ends with a dab of adhesive and slip around your pillar candle.
Keep the wrap removable—safety first. When lit, the candlelight glows through the paper and flowers. The blooms stay safe, away from the actual flame.
Pressed Flower Boutonnières
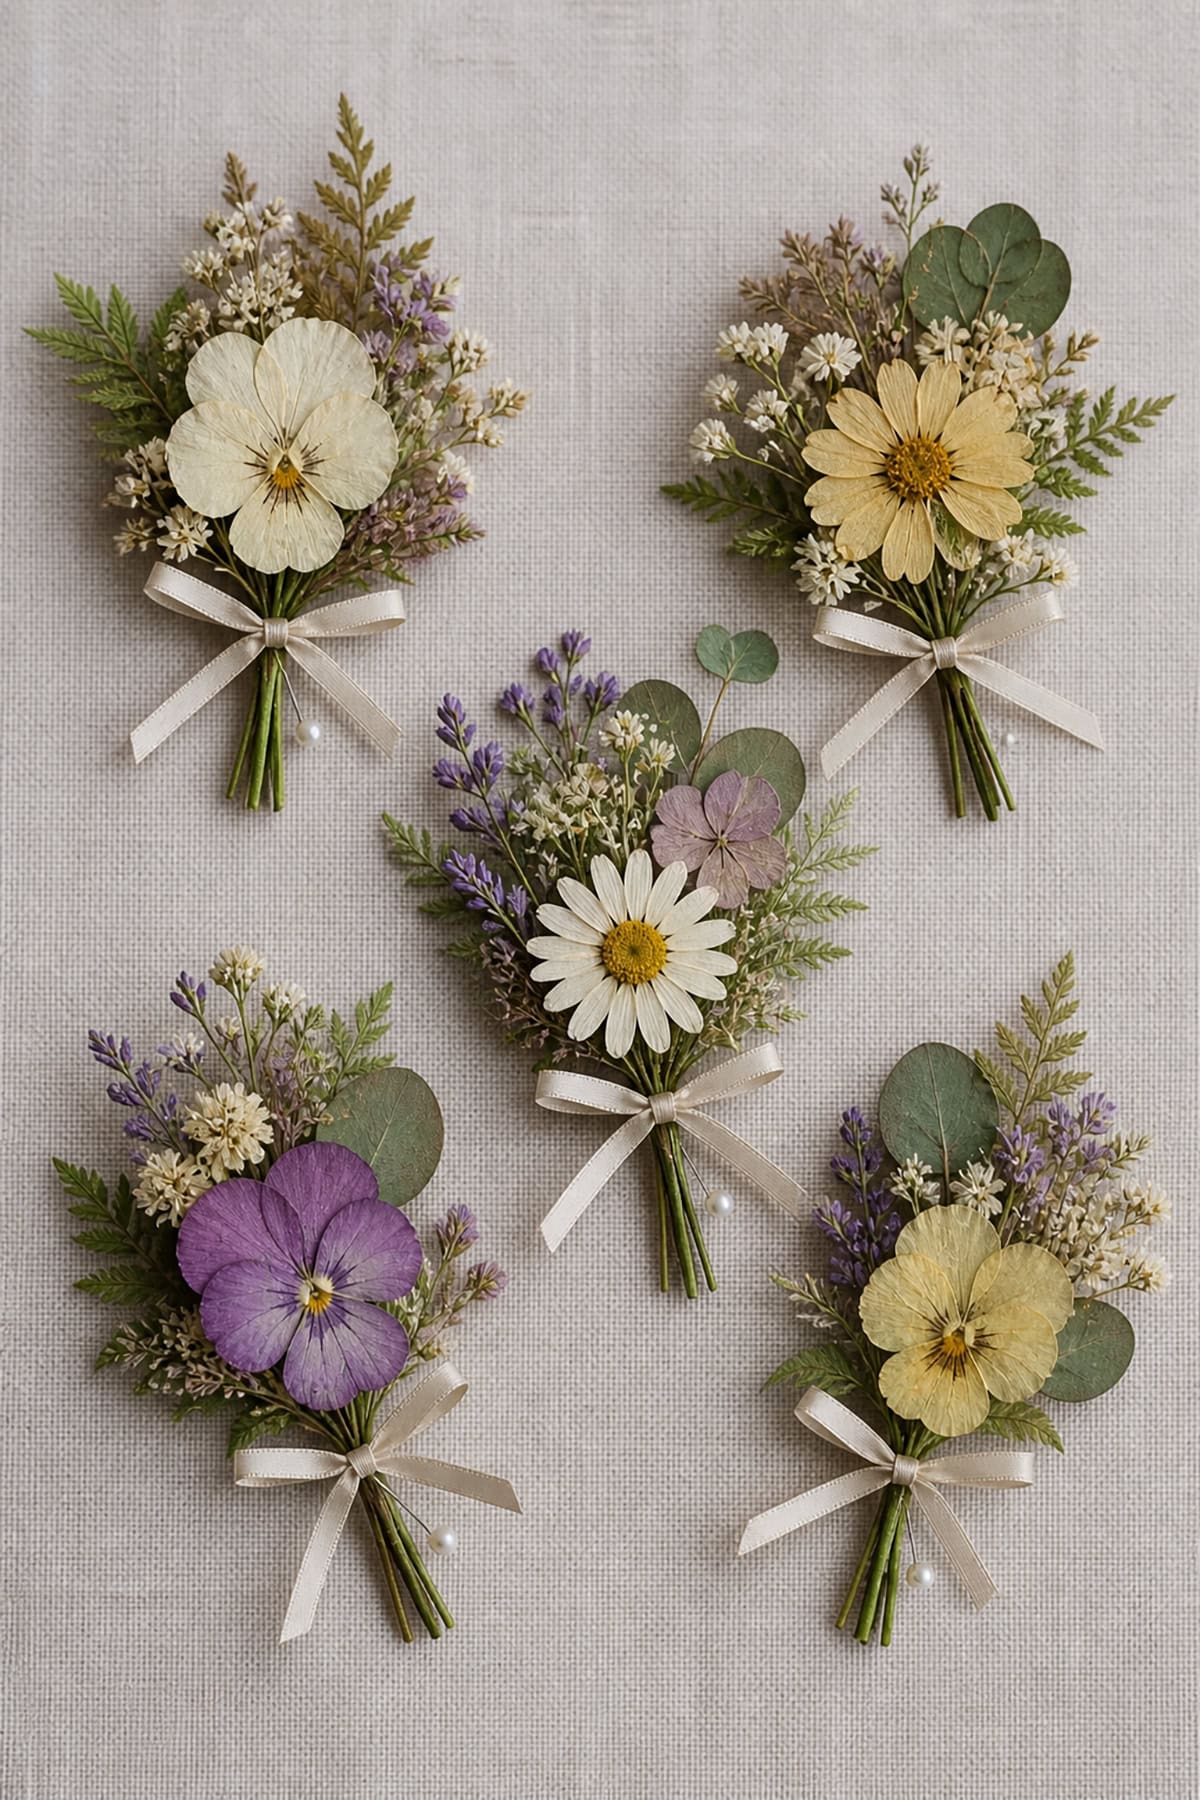
Pressed flower boutonnières pair dried blooms with formalwear in a lightweight way. Stick flat petals onto a small cardstock base and cover with a thin clear film.
Add a pin to the back, and keep it in a sleeve until you’re ready to wear it. They’re delicate, but a little care goes a long way.
Pressed Flower Resin Coaster Sets
Pressed flower coasters in resin molds make for coordinated table sets. Use the same size molds and arrange complementary flowers before pouring resin.
Once cured, sand the bottoms if needed. The resin keeps them waterproof, but avoid too much heat so they stay clear and bright.
Pressed Flower Resin Paperweights
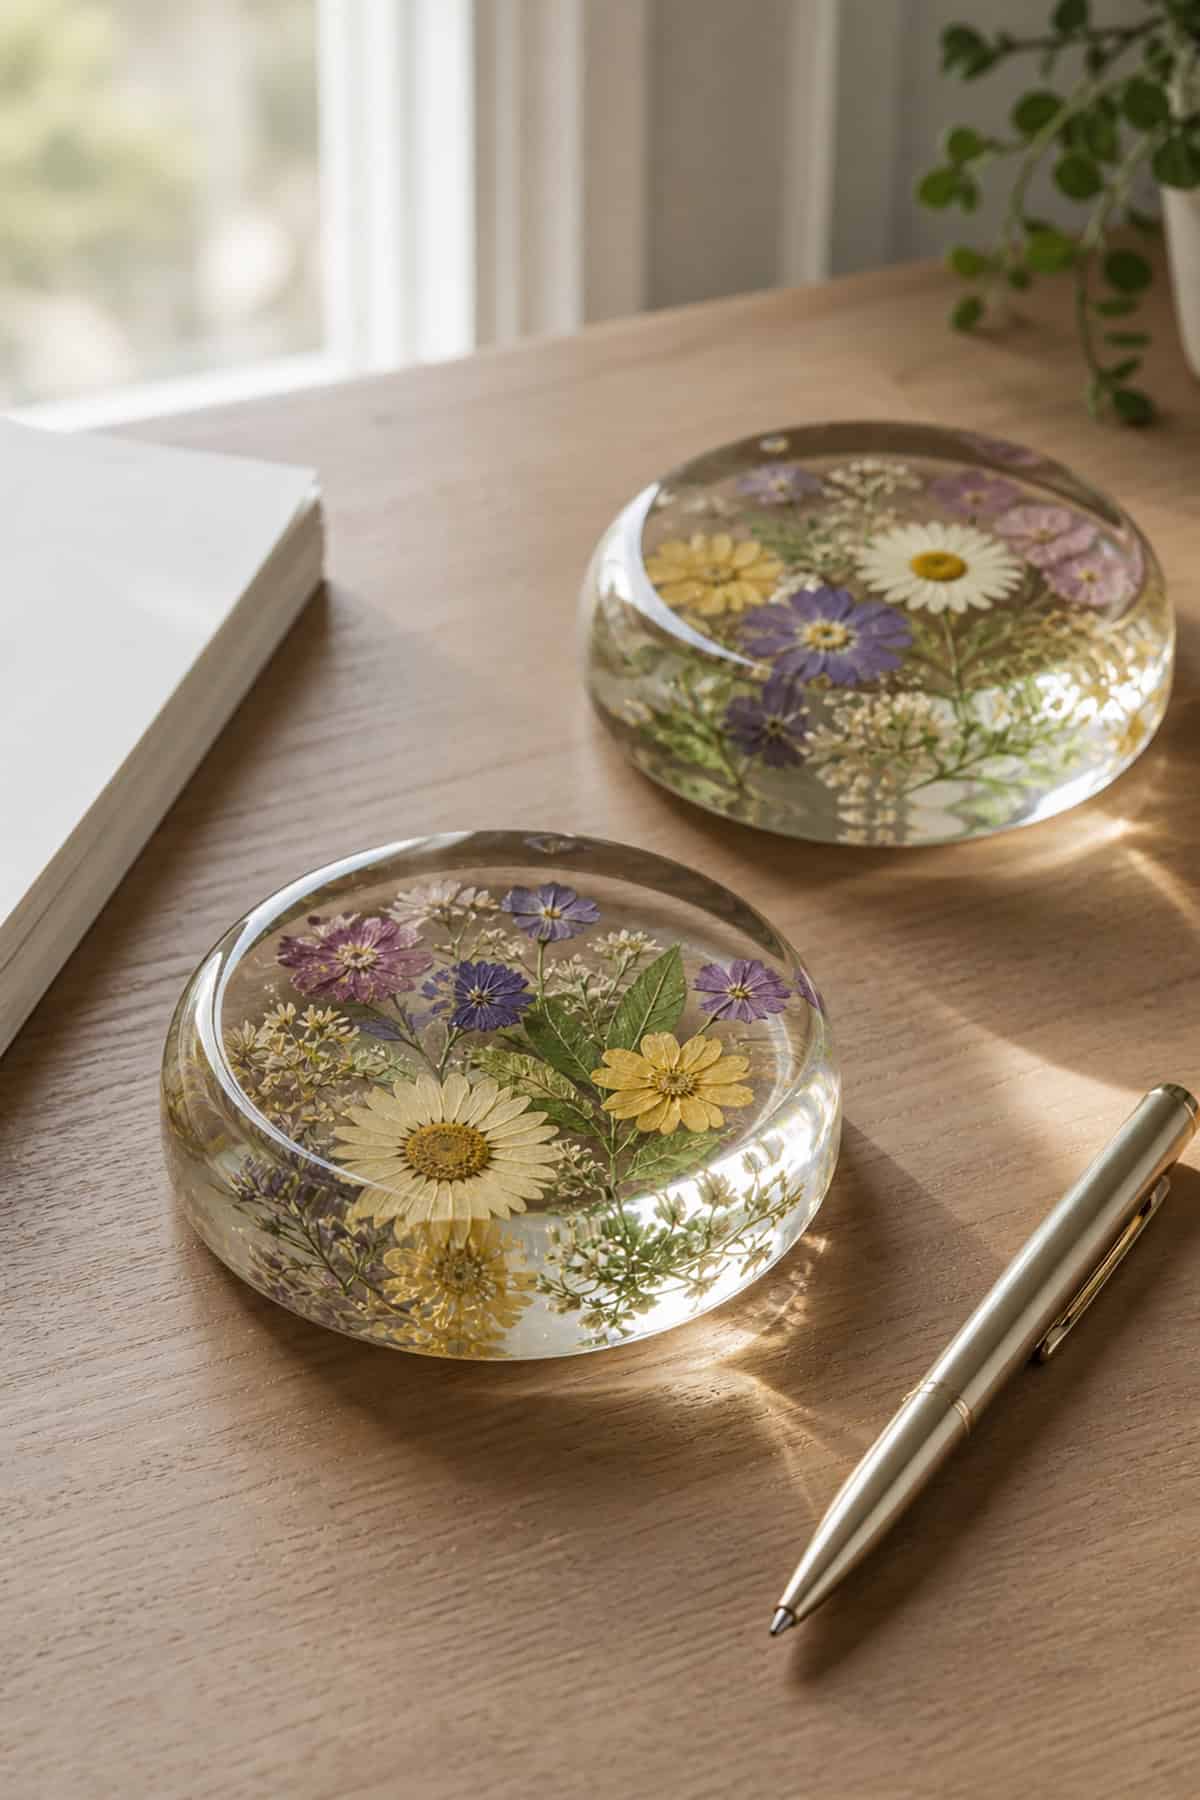
Pressed blooms set in clear resin blocks become unique paperweights. Center the petals, pour resin slowly to dodge air bubbles, and let them harden.
Polish the surface for a glossy finish. Each one is a little time capsule of flora—pretty and practical on any desk.
Pressed Flower Resin Light Catcher Panels
Large resin panels with pressed flowers catch sunlight in a magical way. Pour resin in shallow trays, arrange the flowers, and let it cure. Drill holes for hanging when you’re done.
Soft light makes the petals glow. Sand the edges to avoid cracks. These panels are right at home near a window where the light isn’t too harsh.
Pressed Flower Mason Jar Lids
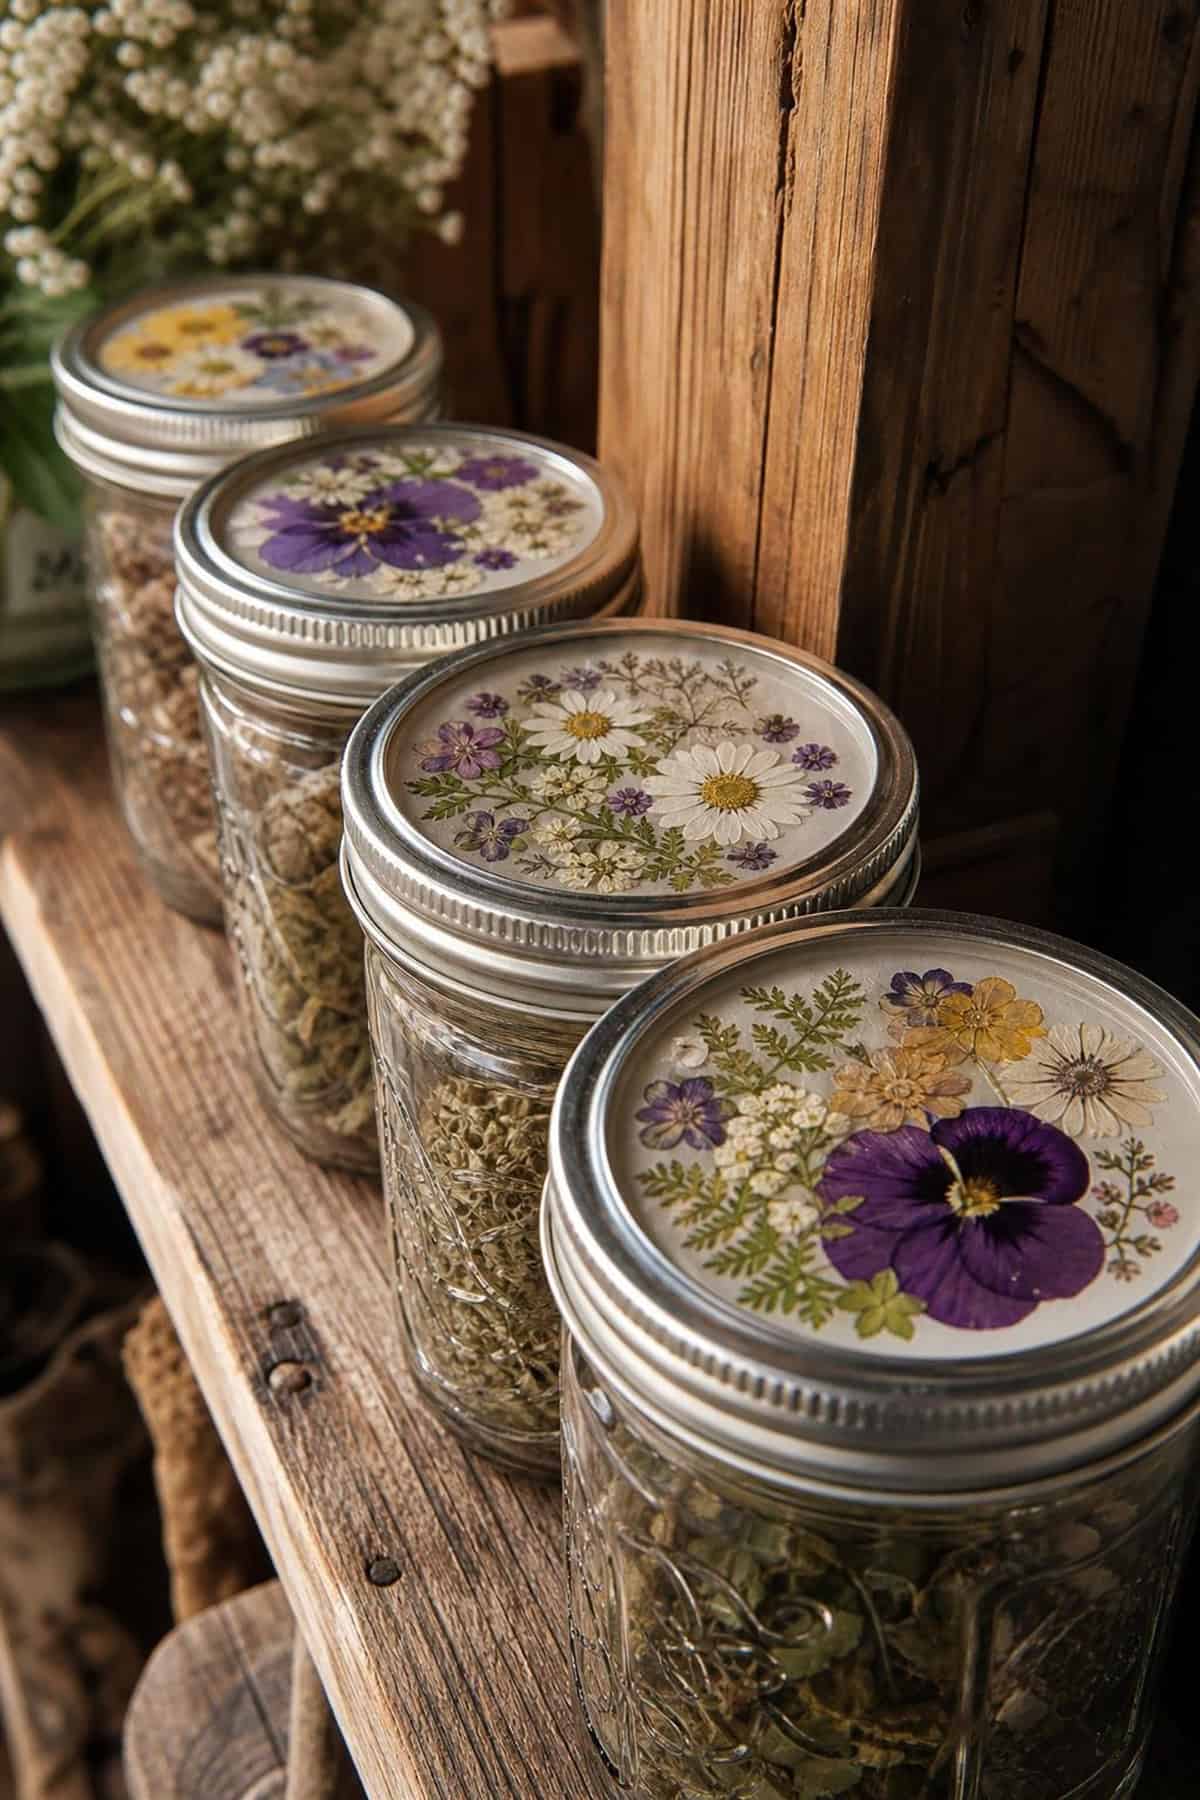
Pressed flowers sealed inside clear epoxy make for custom mason jar lids. Pour a thin resin base, add a petal or two, then top off until level.
Let it dry completely for a tight seal. The lids are washable and the flowers stay protected—great for homemade gifts.
Pressed Flower Garden Markers
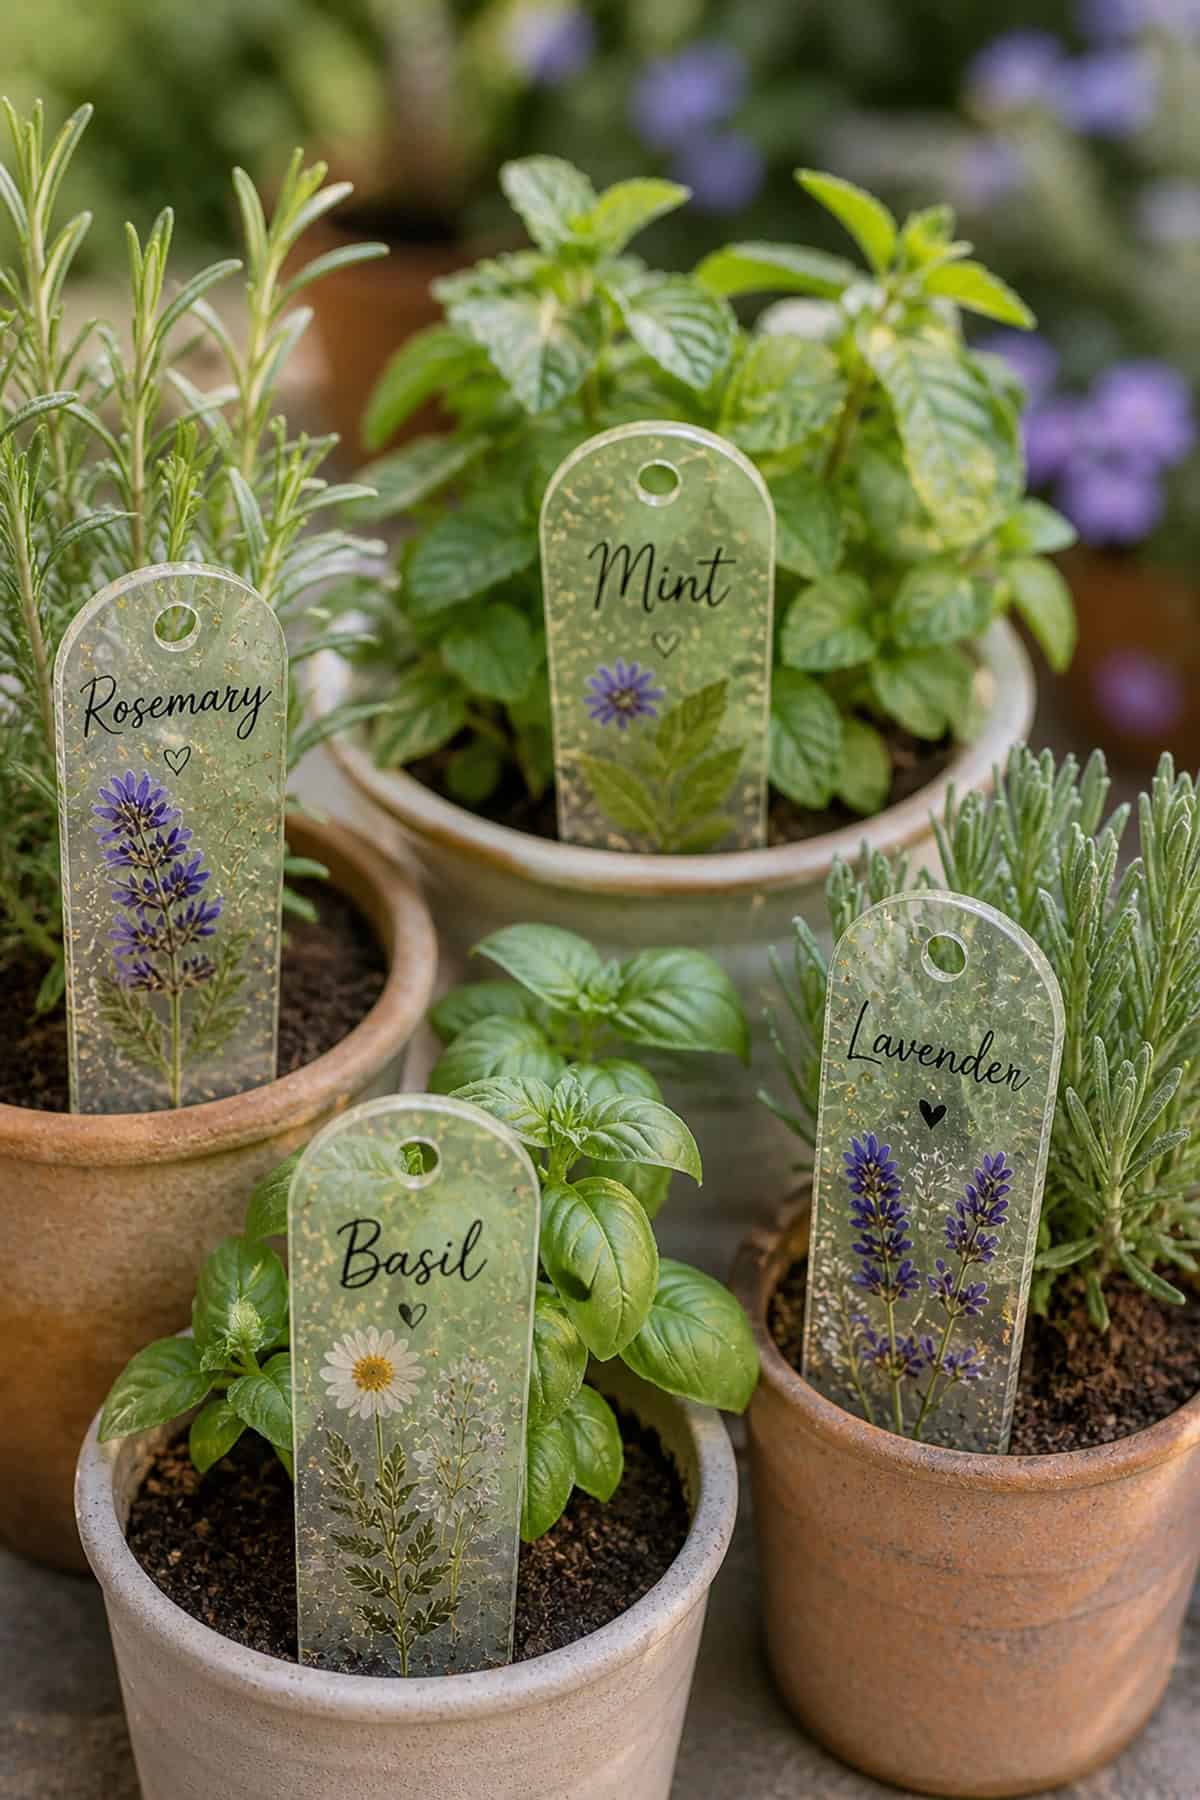
Garden markers with pressed flowers add a decorative touch to plant labels. Seal the flowers to waterproof tags and coat with UV varnish. Write your plant names above or below.
Stick them in pots or beds. The coating helps them last outdoors, and matching the flower to the plant makes ID a breeze.
Pressed Flower Wall Clock Face
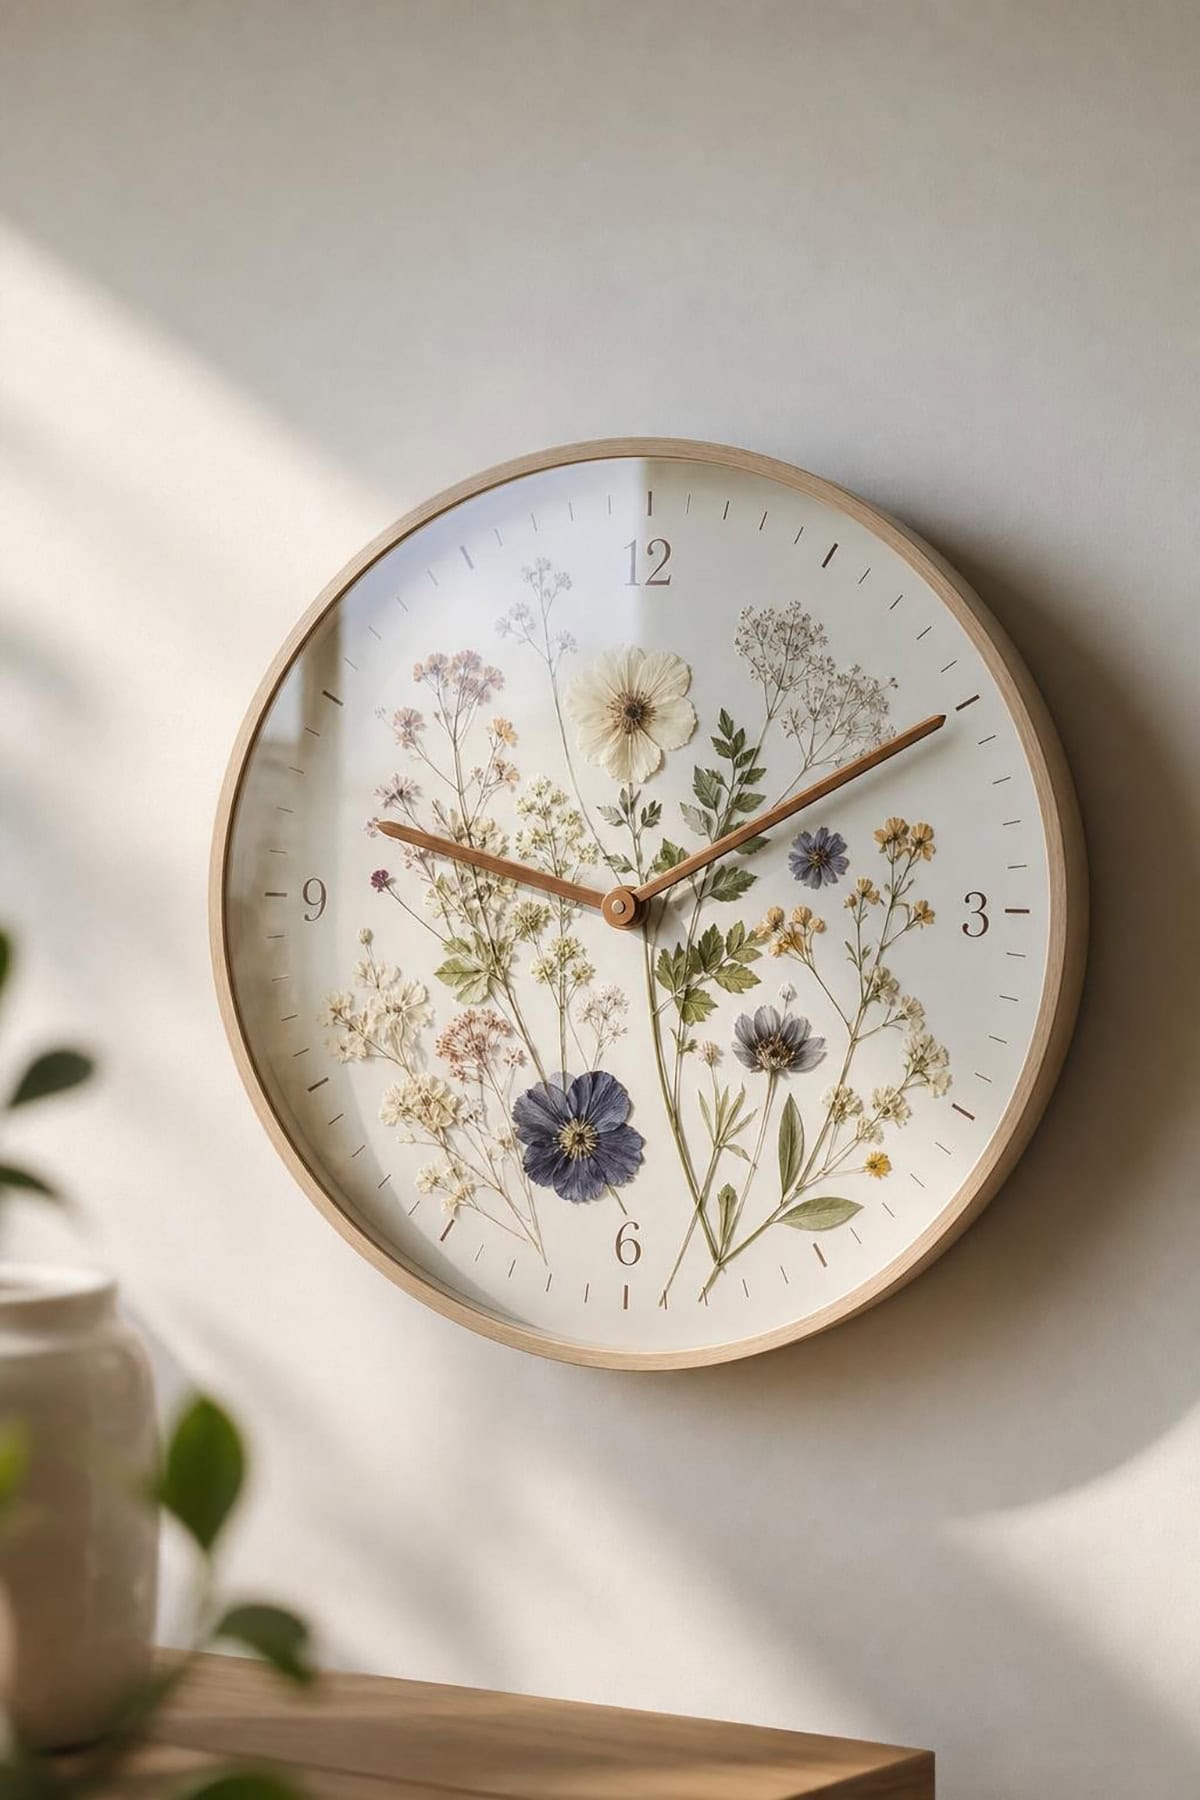
Pressed petals under a clear clock face turn a plain timepiece into a little work of art. Stick the flowers to the backing, then reassemble under glass or acrylic.
Place blooms so the hands can move freely. No extra upkeep needed—just enjoy the subtle botanical vibe.
Pressed Flower Pendant Tray Charms
Pendant trays with pressed flowers pack nature into tiny wearable art. Use resin or glue to set the petals, flatten them, and finish with a domed coat.
Add a loop and you’re set for a bracelet or necklace. Matching flowers make for a nice set. Wipe them gently to keep the shine and detail.
Pressed Flower “Specimen Style” Labels
Pressed flower specimen labels are both decorative and a little educational. Mount blooms on white cardstock with the name underneath, then laminate to keep them from bending.
They look a bit like old-school botanical sheets. Slide them into albums or frames to show off all the different shapes and colors.
Pressed Flower Fabric Transfer Art
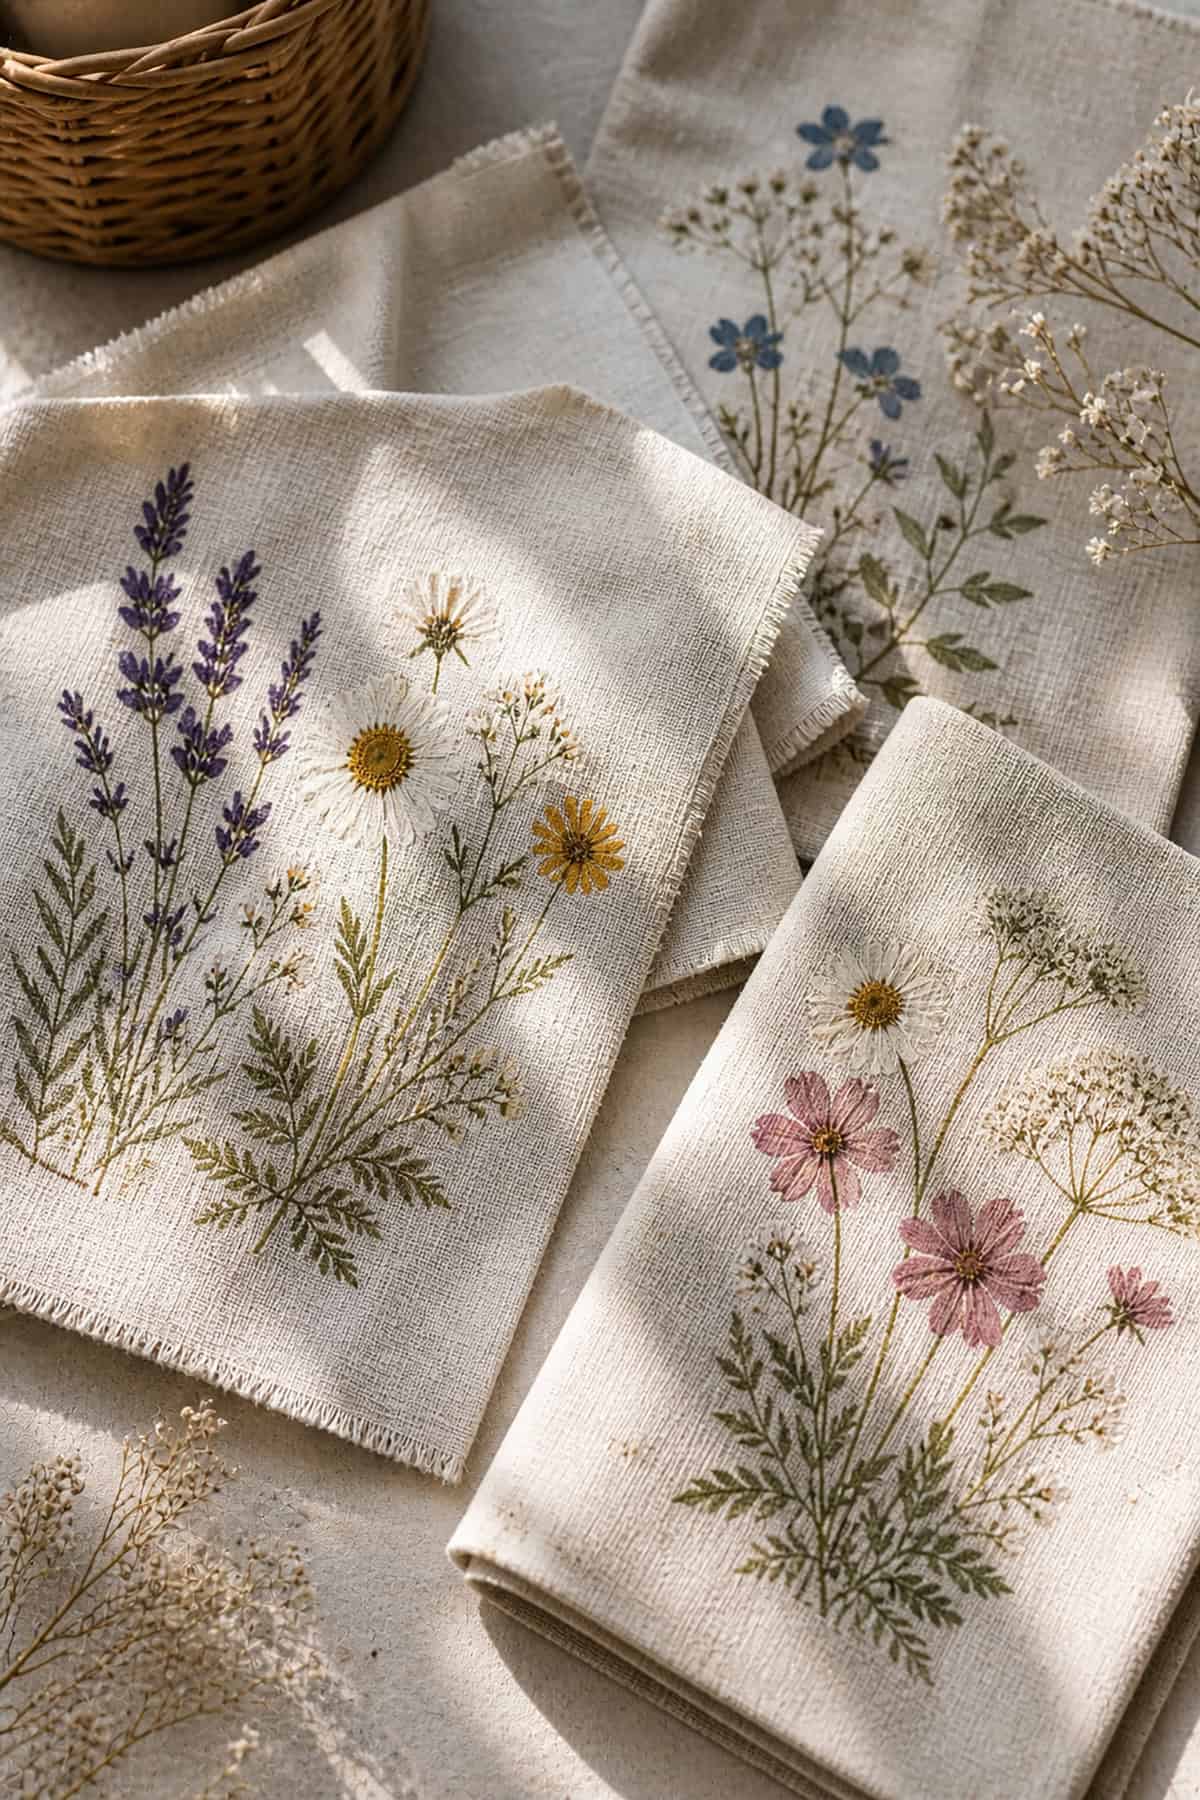
Pressed flowers can be transferred onto fabric using clear film. Arrange the flowers face down, stick the film on, and press firmly for good adhesion.
Once sealed, you’ll see the outlines on the cloth. Hand-wash with mild soap to keep the design crisp. These look great on pillows or totes—just don’t toss them in the machine.
Pressed Flower Resin Rings
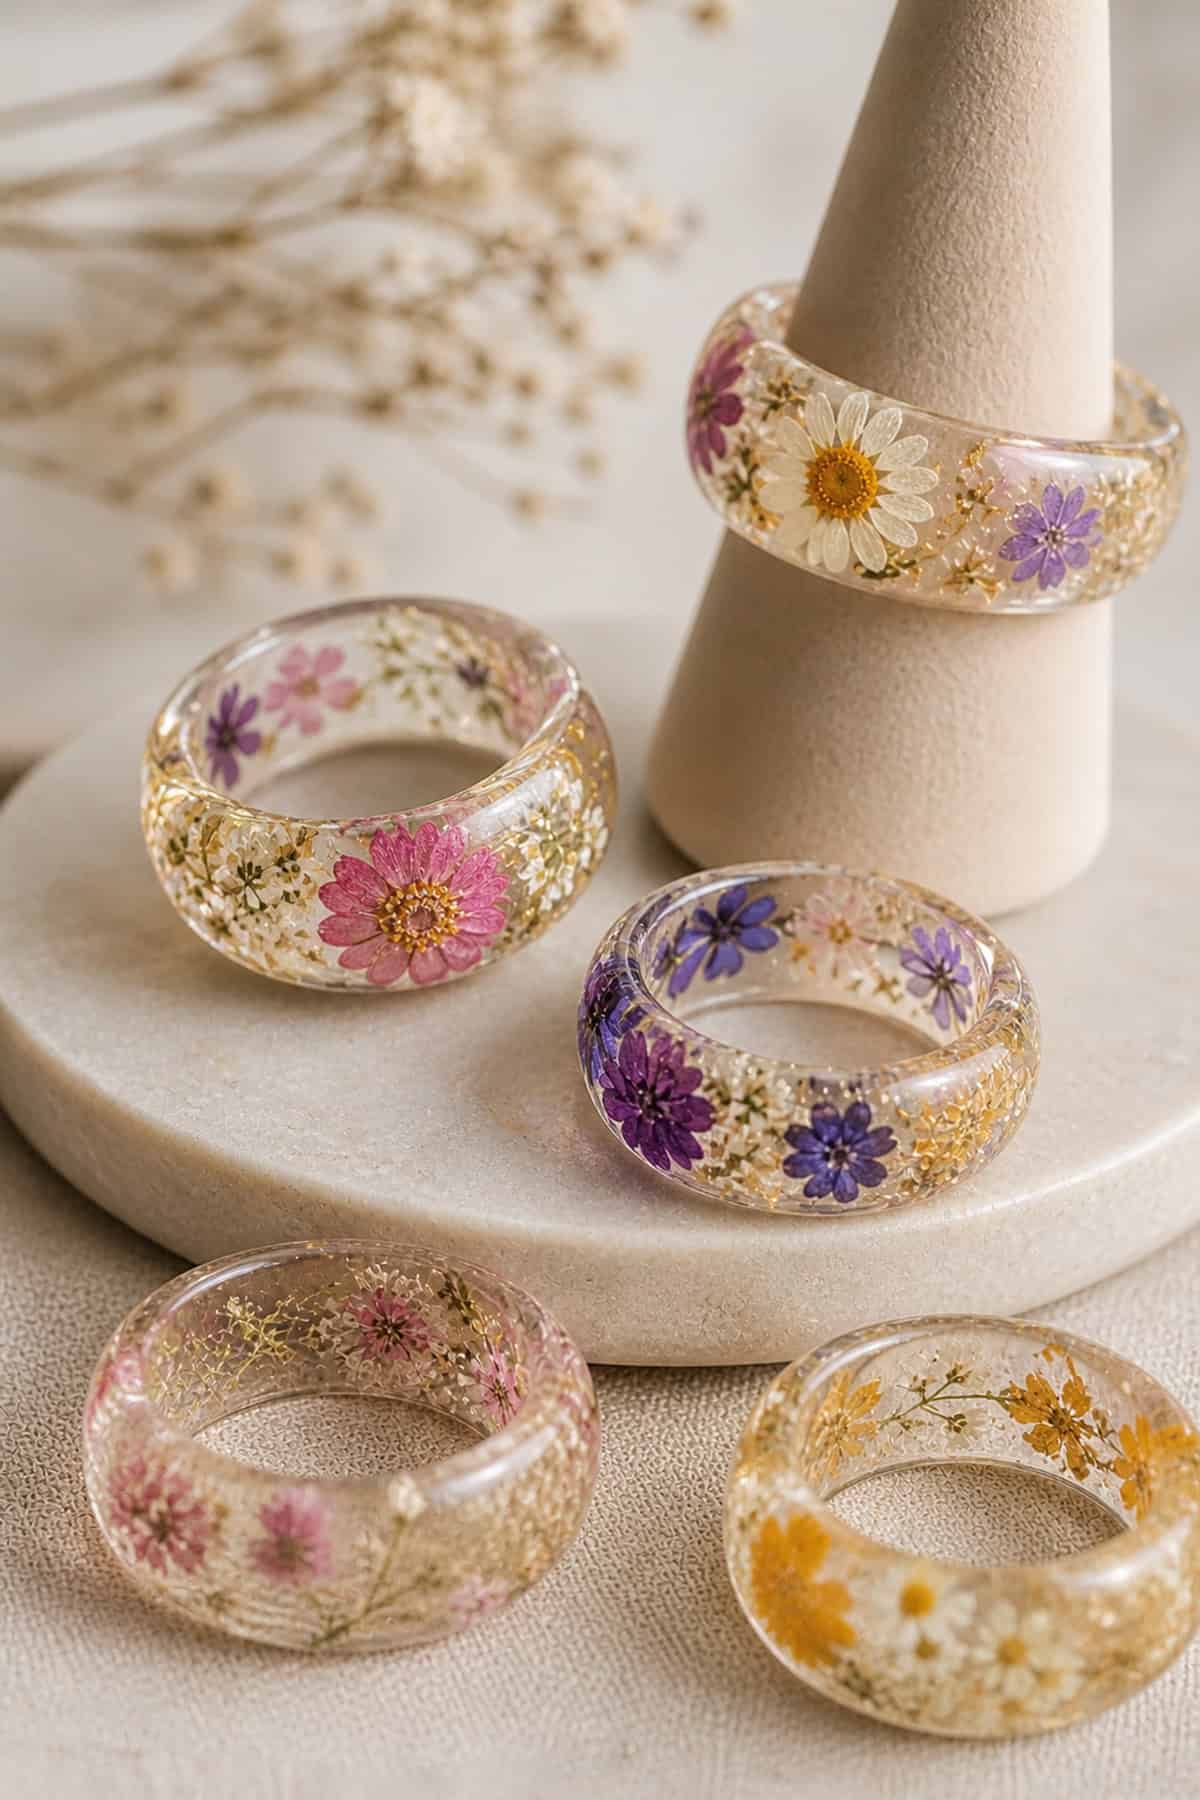
Clear resin rings with pressed petals inside are beautifully simple. Choose fine petals that fit the narrow mold, pour resin slowly, and watch for bubbles.
Let them cure before removing, then sand the outside if needed. The result: sturdy, lightweight rings with a little bit of nature inside.
Pressed Flower Wax Melts (Embedded Petals)
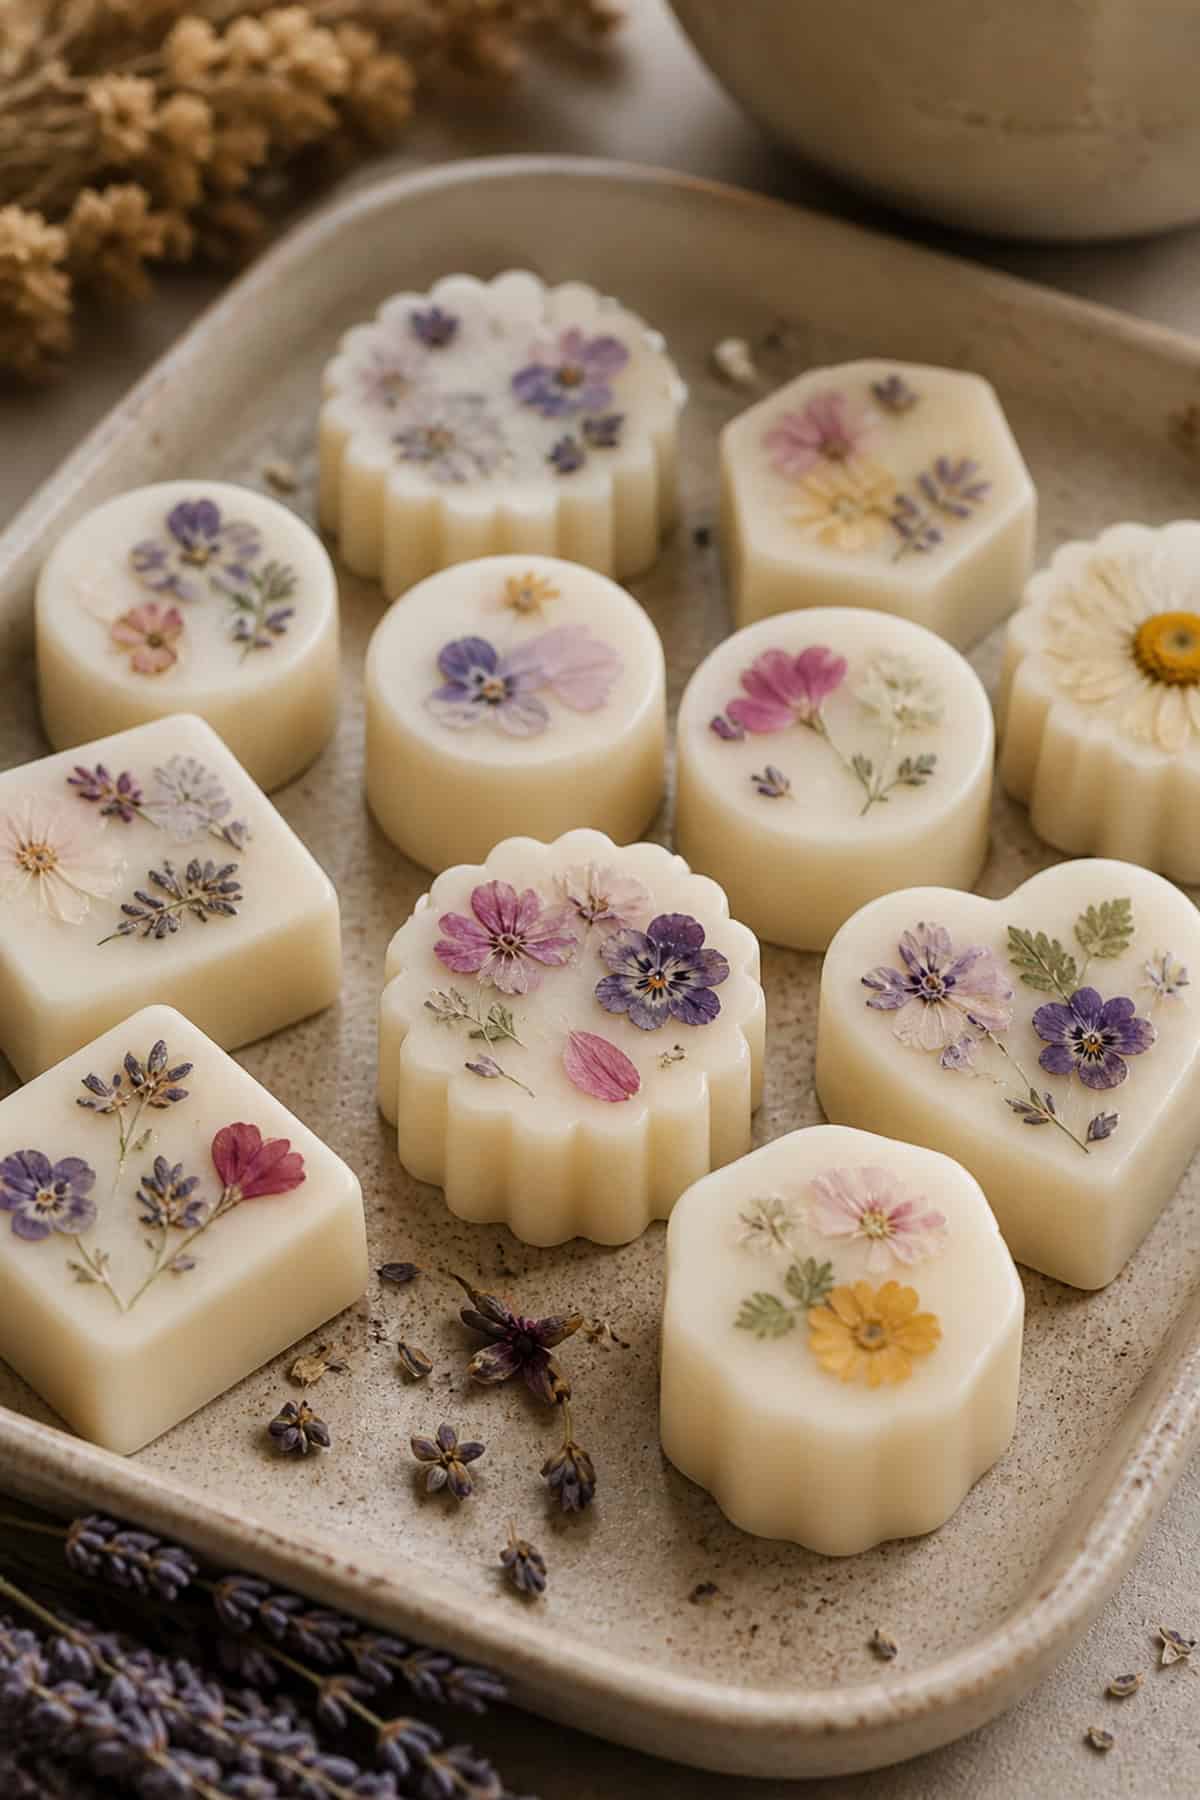
There’s something a little magical about wax melts with pressed petals inside. They let off their scent, sure, but you also get this preserved bit of nature floating in the wax before it melts away. Start by pouring half the wax into flexible molds, nestle in a small petal, and cover it up with more wax.
Let them cool all the way—otherwise, you might get some color bleeding from the petals, which isn’t ideal. The flowers just hang there, sort of suspended, until you finally use the melt. Keep these in a cool, dry spot so they keep their shape and don’t get weird before you’re ready to enjoy them.